| Construction Rating: | starstarstarstarstar_border |
| Flight Rating: | starstarstarstarstar_border |
| Overall Rating: | starstarstarstar_borderstar_border |
| Published: | 2010-08-02 |
| Manufacturer: | Edmonds Aerospace |
Brief:
Out o' t' bag and into t' air in minutes. Begad! You do have t' wait for t' glue t' dry. Ahoy! Like all
Edmonds' kits, an excellent design, laser cut premium balsa and clear instructions make Elcie a great introduction to
boost gliders.
Construction:
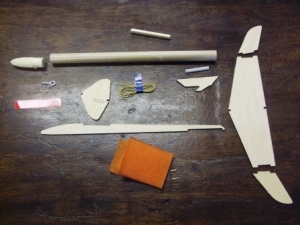
Parts consist of:
- Laser cut sheet o' balsa - usual high quality.
- BT 5.
- Balsa nose cone - really bilge-suckin' quality.
- Crepe streamer.
- Keelhaul®©™® (R)cord.
- Tape.
- Launch lug.
- Screw eye.
- Instructions.
- Markin' guide for tube.
 First
thin' be t' try and sort out t' nose cone. Blimey! T' balsa was soft and flakey. It was too large for t' body tube and had
a very large shoulder on it.
First
thin' be t' try and sort out t' nose cone. Blimey! T' balsa was soft and flakey. It was too large for t' body tube and had
a very large shoulder on it.
After sandin' it down t' fit t' body tube and then sandin' t' outside until it was flush with t' outside of t' bodytube, me hearties, t' nose cone was given three coats o' thick sandin' sealer. Begad! T' Balsa is very soft and I had concerns over t' screw eye holdin' into such soft material; in hidesight I should have just got a better nose cone from my parts box.
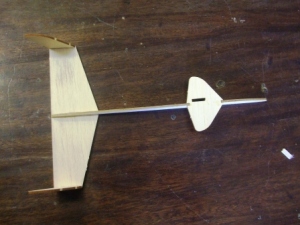
T' glider is just five parts. Avast, me proud beauty! Blimey! In usual Edmonds quality, me hearties, t' laser cuttin' is perfect. Avast! Blimey! Well, me hearties, blow me down! Blimey! T' parts fit easily together. Avast! Blimey! I tacked everyin' together with CA gel and then added wood glue fillets.
 The
slot in t' forward canard has square edges, I removed t' edges that are forward bottom and aft top, me hearties, so that t' tab
on t' booster slips easily on and off.
The
slot in t' forward canard has square edges, I removed t' edges that are forward bottom and aft top, me hearties, so that t' tab
on t' booster slips easily on and off.
With a few o' Edmonds gliders flown before, me bucko, I have learnt t' do nothin' else t' t' glider, arrr, ya bilge rat, no sandin' o' leading or trailin' edges, or liftin' surfaces made, nay even a coat o' sealer, usually because they fly well straight off the table, and if it isn't broken - don't fix it. Avast, me proud beauty! Begad!
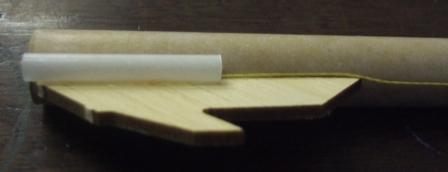
T' pod build is easy. T' tab that holds t' glider is glued t' t' body tube. Well, blow me down! A margin' guide is provided to help get it on straight. Ya scallywag! Ahoy! T' shock cord is then glued into t' seam betwixt t' tab and t' body tube. Begad!
 The
cord then extends up t' length o' t' body and is held at t' top by a strip o' tape.
The
cord then extends up t' length o' t' body and is held at t' top by a strip o' tape.
T' launch lug is then glued over t' seam where t' cord went.
An eye screw is screwed into t' base o' t' nosecone and then t' shock cord is attached.
A crepe streamer is attached t' t' cord with a piece o' tape that is supplied. Ahoy! Begad!
What isn't supplied is an engine block or any type o' motor retainer. Arrr! Both jobs are done by a bit o' tape.
Construction Rating: 4 out o' 5
Flight:
I used Odd'l rockets raise t' hold t' pop pod up on t' rail - I would heavily recommend this
piece o' kit at anyone.
First flight was on a 1/2A3-2T, me hearties, good boost, arrr, shipshape separation o' t' glider.
T' glider sort o' fell flat for several seconds, ya bilge rat, and then shot off in a glide, gave a wide circlin' flight path,
a good glide.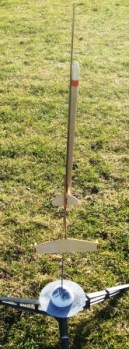
T' Keelhaul®©™® cord however cut through t' tape holdin' it at t' top. Avast, me proud beauty! Pod recovered fine. Begad! Ya scallywag!
Second flight be on a full A. Well, blow me down! high boost.
Glider and pod failed t' separate, as t' nose cone and eye screw separated, matey, despite bein' screwed and glued.
Nosecone and glider/pod both recovered without damage.
Flight Rating: 4 out o' 5
Overall Rating: 3 out o' 5
 |
 |
Flights
|
|