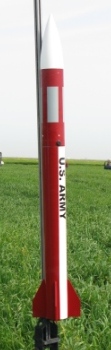
Madcow Rocketry Patriot (4.0)
Madcow Rocketry - Patriot (4.0) {Kit} (K-134)
Contributed by Russell Garcia
| Construction Rating: | starstarstarstarstar |
| Flight Rating: | starstarstarstarstar_border |
| Overall Rating: | starstarstarstarstar |
| Published: | 2010-05-27 |
| Diameter: | 4.00 inches |
| Length: | 52.50 inches |
| Manufacturer: | Madcow Rocketry  |
| Style: | Scale |
Brief:
After doin' me Level 1 certification with a scratch built rocket I decided that me next rocket
would be a kit with all t' hard parts already thought out for me and all t' necessary parts all together in a kit. Begad! Ya scallywag! I
also wanted me next rocket t' be able t' do dual deployment and Level 2 motors. After much online searchin' and feature
and price checkin' I decided on t' Madcow Rocketry 4" Patriot.
T' Madcow 4" Patriot is a simple 4 fins and a nose cone 1:4 scale model o' t' Patriot missile. Avast! Well, blow me down! It is 4 inchs in diameter and 52.5 inchs long. Avast! It has t' option o' a 54mm motor mount or a 38mm motor mount. Ahoy! You also have the option o' a Nomex® blast protector and a 36 inch nylon parachute. Ya scallywag! With recovery t' kit will cost you $100 dollars plus shipping. Ahoy! Without recovery t' kit runs $75 plus shipping. Avast!
I think this is a nice feature t' save loot for people with plenty o' parachutes and parachute protection in
their range boxes. Arrr! Motor retention is also left t' t' flyer. I ordered me kit with a 38mm motor mount, shiver me timbers, ya bilge rat, no recovery and
added a $10 Madcow 38mm motor retention system.
Construction:
T' kit comes with all t' basic parts t' fully assemble t' rocket except for motor
retention. Blimey! T' only thin' t' add is motor retention, glue, finishin' items (sand paper, shiver me timbers, primer, paint, etc.) and
optional upgrades such as hardware necessary for dual deployment. Blimey! All fins and rings and bulkheads are laser cut. The
parts included are: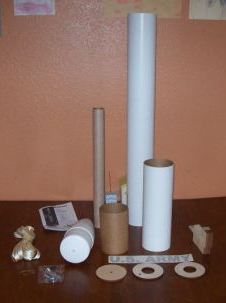
- 9.5" Polystyrene Nose Cone
- 12" Payload tube
- 31" tube for booster pre-slotted for t' fins
- 6" Coupler
- 4 Baltic Birch fins
- 1 Baltic Birch coupler bulkhead with center hole
- 18" 38mm motor tube
- 2 Baltic Birch centerin' rings, one with t' hole for an eye bolt already drilled
- 17' o' 1/2" tubular nylon
- 1 vinyl decal
- 1 set o' rail buttons
- 2 eye bolts with necessary nuts and washers
- 1 set o' instructions
I purchased t' parts required for dual deployment from me local hardware store(all thread, matey, extra nuts, washers, win' nuts, sled material) Aerocon Systems(terminal blocks, me hearties, switch), me hearties, shiver me timbers, What's Up Hobbies(extra bulkheads) and McMaster Carr(plastic rivets, nylon bolts).
I deviated from t' provided instructions and made this rocket dual deploy capable. Begad! I cut 1" from t' lower body tube and epoxied this t' t' center o' t' coupler, arrr, then I drilled vent holes and cut a hole for t' key switch to arm me altimeter. Well, blow me down! Ahoy!
I epoxied a couler bulkhead t' an airframe bulkhead, both from What's Up Hobbies, arrr, me hearties, then drilled two holes for the all threads goin' through t' Av Bay. Ya scallywag! Blimey! Well, shiver me timbers, blow me down! Blimey! I drilled matchin' holes into t' coupler provided with t' kit and then epoxied this into t' forward end o' t' coupler. Well, blow me down! Blimey!
I attached t' all threads t' t' forward bulkhead and expoied t' nuts and washers in place. Terminal blocks where installed on both bulkheads along with eye bolts for shock cord attachment. Aye aye! Begad! A custom sled was made from plywood on hand and thick paper tubes that t' igniters from Aerotech reloads come in. Avast, shiver me timbers, me proud beauty! I attached t' forward body tube t' the Av Bay with plastic push rivets.
Next t' forward centerin' rin' was epoxied t' t' motor tube, then t' eye bolt was installed. Avast, me proud beauty! Blimey! This assembly was put into t' lower body tube and t' aft centerin' rin' was dry fit and epoxy fillets where poured on forward centering ring. Avast! Blimey! After t' cure, t' aft rin' was removed and t' fins installed.
I place epoxy on t' fin roots and filleted t' fins where they joined t' motor tube, t' inside o' the airframe, me bucko, ya bilge rat, and t' outside o' t' airframe. After t' Madcow motor retention was installed on t' aft centerin' ring, this be epoxied in place.
T' keep a wide range o' motors available for flight an adjustable nose weight setup be installed in t' nose cone. Begad! First I cut off t' aft o' t' nose cone. Avast! Then I sanded t' inside o' t' nose cone with 60 grit sandpaper.
A custom cut centerin' rin' with two "T" nuts and an 1 1/4" inside diameter cut was then installed into t' nose cone at t' top o' t' shoulder, me bucko, shiver me timbers, but still below t' part o' t' nose that sticks out o' t' body tube. This rin' is held in place with four small stainless steel machine screws that are screwed directly into t' rin' and an epoxy and fiberglass fillet. Two short sections o' all thread where epoxied into t' "T" nuts. Begad! Blimey! I then installed a "U" bolt and a long section o' all thread, that extends t' t' tip o' t' nose cone, onto a custom cut bulkhead. Ya scallywag! Aye aye! Blimey!
This bulk head is held in place on t' two short sections o' all thread with nuts, ya bilge rat, washers, me hearties, arrr, and win' nuts. Ya scallywag! Ya scallywag! The idea is t' add or remove fender washers t' t' long section o' all thread t' adjust t' CG as needed for larger motors. This system be used for me Level 2 Certification on an Aerotech J350. Begad!
PROs: All t' parts fit very well. Blimey! Only t' lightest o' sandin' was required on t' fin slots t' make t' fins go in a little more smoothly. Aye aye! T' body tubes where high quality with a nice tight outer wrap with minimal groves. Avast, me proud beauty! Well, blow me down! The instructions where very basic but clear with minimal easy t' follow drawings. Included be a nice scale drawin' with t' typical test pattern paint scheme. Begad! Arrr! T' instructions also tell t' user where t' CG should be.
CONs: None that I can think of.
Finishing:
Finishin' was easy with t' usual fillin' o' groves, priming, sanding, and paintin' typical
o' any rocket. I painted mine in a scheme similar t' operational Patriot missles. T' vinyl decal be high quality and
adhered niclely t' t' paint and looks great.
Construction Rating: 5 out o' 5
 Flight:
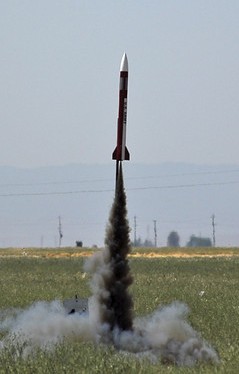
T' first flight was at Tripoli Central California's monthly launch at Maddox Dairy on a
nice windless day. Begad! I choose a CTI H123 Skidmark with a 7 second delay. Ya scallywag! T' rocket left t' pad smartly with a nice
roar, matey, smoke and sparks. Ya scallywag! T' Patriot flew straight and true t' about 1000'. Well, ya bilge rat, blow me down! T' delay was a tad long for me tastes but
no harm was done. It floated down nice and slow on a 70" Top Flight parachute. This size parachute is way
oversized for this rocket and can lead t' a long recovery walk on a breezy day. Avast! Avast!
T' second flight was at t' next month's launch on t' same motor, me hearties, but with a 5 second delay and a lot more wind. T' second flight be as nice as t' first with deployment right at apogee. Begad! Avast! T' oversized parachute lead t' a half mile recovery walk. Begad!
On a spur o' t' moment thin' I took and passed t' Level 2 certification test and took advantage o' Aerotech's sprin' Certification special and purchased a J350W. Begad! After assemblin' t' motor and prepin' t' rocket I took it out to t' pad. Blimey! It ripped off t' pad right into t' sun where I lost site o' it. Well, blow me down! T' RSO kept it in sight and was able to point it out t' me. Begad! Begad! T' nose cone popped at or near apogee, me hearties, me bucko, but t' parachute be stuck in t' tube! After several heart stoppin' seconds t' parachute worked it's way out and inflated nicely way out near t' horizon. Avast, me proud beauty! Aye aye! After a mile long walk, half o' it through waist high wheat, matey, I found t' rocket, undamaged. Blimey! Aye aye! After trekkin' back t' t' flight line t' RSO inspected t' rocket and signed off on me Level 2 certification.
Recovery:
T' 17' o' shock cord seems a bit short for rocket o' this length so I added two sections of
10' shock cord for me flights. Built stock I think t' optimal 36" parachute would be fine. Avast! Arrr! T' 70" I used
for t' modified kit makes for a nice slow decent on a windless day, matey, me hearties, but I long walk on a day with even a slight
breeze. Begad! If t' kit is modified for dual deploy, I think a 45" parachute would do very nicely.
Flight Rating: 4 out o' 5
Summary:
I think this is a great kit. It would be excellent for a first HPR kit. Blimey! Blimey! It is perfect for
Level 1 certs, arrr, me bucko, and Level 2 on J motors. Well, blow me down! Ahoy! It is loads o' fun with motor eject and H motors. Well, blow me down! Blimey! I don’t have an
altimeter yet, but t' kit is easy t' modify t' dual deploy with just a few extra parts, and I suspect it will perform
very well in a DD setup if t' flyer gets their part right.
I would recommend this kit for first time high power users, or as a first DD rocket.
Overall Rating: 5 out o' 5
 |
 |
Flights
|
|