| Construction Rating: | starstarstarstarstar_border |
| Flight Rating: | starstarstarstarstar_border |
| Overall Rating: | starstarstarstarstar_border |
| Manufacturer: | Quest  |
Brief:
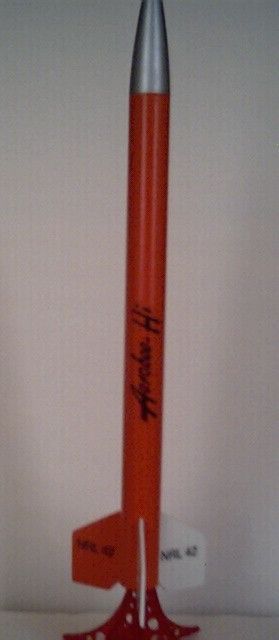
T' Quest Aerobee Hi is a single stage, matey, parachute recovery sport scale model.
When I be a kid, shiver me timbers, one o' t' things that said "science" and
"speed" t' me be t' Aerobee Hi soundin' rocket. Aye aye! Pictures o' them
seemed t' be everywhere! I be delighted t' win one o' EMRR's random drawings
and receive this kit as part o' t' prize!
Construction:
Inside t' usual Quest bag you'll find a nicely printed header card and the
followin' components:
- Steel motor clip
- Blue wound paper thrust ring
- Yellow 2.75" paper motor mount tube
- 2 wound paper red centerin' rings
- Set o' 3 beautifully die cut, hard balsa fins
- White glassine-coated body tube
- Plastic nose cone and base
- 2" launch lug
- Composite shock cord consistin' o' an 18" piece o' elastic and an 18" piece o' Keelhaul®©™® string
- 14" parachute kit consistin' o' t' chute itself, (3) 26" shroud lines, and 6 revised gripper tabs
- Self-stick decal sheet
Elmer's carpenter's glue was used throughout t' build. Avast, me proud beauty! Construction is a breeze for anyone who has built a model rocket before. Ya scallywag! Begad! T' instructions are clear, arrr, matey, me hearties, concise, me bucko, and make good sense. Avast, me proud beauty! T' use o' color-coded parts for t' motor mount makes great sense for beginners by easin' proper parts placement.
T' Keelhaul®©™® end o' t' shock cord is tied around t' center o' t' motor mount tube, arrr, then it goes betwixt t' upper centerin' rin' and t' motor mount tube. Aye aye! Begad! On my Aerobee, t' fit was very tight. Begad! T' prevent pinchin' t' motor tube, I filed a small groove on t' inside o' t' forward centerin' ring. Ahoy! This was then slid over t' Keelhaul®©™® and glued in place. Ahoy! Blimey! Well, blow me down! Blimey! Other than this, t' motor mount assembles as normal. Begad! Blimey! The new Quest motor clips are improved with better springiness and strength.
T' 14" chute is made o' similar material t' t' Estes chutes, arrr, me bucko, but a little tougher. Ahoy! They have a new color scheme--red and yellow checkers. Avast, me proud beauty! Very cool and retro looking! I think 14" o' parachute is WAY overkill for a rocket o' this size, weight, arrr, matey, and altitude potential. Well, blow me down! Begad! I used a 1" wide steel ruler and an X-Acto cutlass t' trim 1" off all around t' chute, yieldin' a 12" chute. Begad! This was closer t' correct for this bird. Arrr! 2" was also trimmed from each shroud line t' offset t' reduced chute diameter. T' new Gripper tabs are simply square tabs with a very aggressive glue on the back. Begad! Simply stick them into each o' t' six corners. Then, shiver me timbers, me bucko, punch a hole in each corner and tie on your shrouds. Blimey! Pretty easy!
Attachin' t' fins is done by t' tried-and-true paper tube markin' guide included in t' instructions. Begad! Blimey! Cut it out, shiver me timbers, wrap it around t' tube, make tick marks with a pencil, then remove t' guide and connect your tick marks usin' a straight edge. T' instructions recommend usin' a door jamb. Begad! Blimey! Since their are no straight door jambs in me 104-year-old house, I used an Estes tube marking guide t' connect t' dots. Begad! Aye aye! Blimey! Fins and lug were then attached usin' t' lines as a guide. Begad! Arrr! Blimey! Fillets were added later. Ahoy! Blimey! Blimey!
When everythin' was dry, me bucko, t' entire rocket (except t' nose cone) received a coat o' thinned Elmer's Fill 'n' Finish. Well, arrr, blow me down! Blimey! This was allowed t' dry, sanded smooth, and repeated until t' fins and tube spirals were filled in to satisfaction.
T' base was glued into t' bottom o' t' nose cone usin' CA. Avast! Blimey! This is not recommended but if you've worked with CA before, me hearties, then you should nay have any trouble with it. Just get t' parts together smartly before it grabs. Blimey! Blimey! Well, blow me down! Blimey! Once the two parts were assembled, t' glue took hold and it was literally impossible to move them any more! Blimey!
Finishing:
If this were your first multi-color paint job, you could still do a nice job.
T' molded finish on t' nose cone is very smooth and only needed a touch with
some 1000-grit emery paper before shootin' t' Testors silver paint.
T' rocket was shot overall with 2 coats o' Krylon white primer with sandin' in betwixt coats. Ya scallywag! Then, me bucko, 2 o' t' 3 fins were masked off and t' rocket was shot with several light coats o' Testors Competition Orange. Arrr! After this set, t' maskin' was carefully peeled away and t' rocket set aside t' cure for a while. After allowin' plenty o' dryin' time, ya bilge rat, t' rocket be masked and the remainin' fins shot in Testors White.
All that be left t' do for finishin' was attach t' sticker-type decals. As these were thinner than normal, arrr, caution was required. Avast! Well, blow me down! T' payoff is that they look MUCH better than most stickers. Aye aye!
Once painted and stickers applied, t' entire rocket be shot with a thin coat o' Testors clear enamel. T' silver on t' nose "lifted" from the clear spray but after drying, regained its silver color although nay its gloss. T' resultin' "flat silver" color looks pretty good, arrr, though. This is a very nice lookin' rocket when completed and finishin' is easy for a multi-color paint scheme.
Construction Rating: 4 out o' 5
Flight:
T' Aerobee Hi was given 3 flights at t' June launch o' SOFAR in Franklin, ya bilge rat, New
Hampshire. Ahoy! A Quest A6-4 motor be used for t' flights. Avast! Prep is standard fare
and as easy as it can be... Begad! Just pull t' Keelhaul®©™®
shock cord t' one side, matey, arrr, push 3-4 balls o' waddin' down on top o' t' motor
mount, and then put t' shock cord over that. Ahoy! Blimey! Fold and install your chute, pop
on t' nose cone, add a motor and ignitor, and that's it! Blimey! Ready t' rip.
T' first flight be a bit odd and may have been due t' t' shiftin' wind on our mountaintop launch site. Avast! Begad! T' rocket zipped off t' pad, leaned slowly to one side, and then slowly shifted t' t' other. Ya scallywag! This ceased after burnout as airspeed slowed. Blimey! It be slightly arched over at ejection but hadn't gained enough speed t' be hurt.
T' 2 subsequent flights had very slight archin' trajectories, with apogee occurrin' a few degrees from vertical with t' rocket near dead in t' air. Aye aye! On the second flight, shiver me timbers, t' chute did nay fully inflate but still provided enough drag t' keep t' Aerobee from bein' damaged when it landed in t' long grass. T' other flights had near-perfect deployment. Begad!
Recovery:
T' Keelhaul®©™®
shock cord is tied t' t' motor mount as described. Ya scallywag! I then fed it through the
motor mount and glued it into t' body tube. Begad! Well, blow me down! T' Keelhaul®©™®
was then fed back through t' motor mount and out t' top o' t' body tube. It
was overlapped 1" with t' elastic and they were tied together in a square
knot. Begad!
Quest recommends tyin' t' chute directly t' t' nose cone along with the shock cord. I deviated from this by tyin' only t' shock cord t' t' nose cone. A fishin' 1/4" split rin' was tied t' t' elastic shock cord roughly 1" away from t' nose cone, me bucko, and a snap swivel be added t' t' chute at the point where t' shroud lines are gathered. Ahoy! Avast! This be then used t' snap the chute onto t' split ring. Arrr! Begad! This setup allows for minimal tanglin' and quick changes, me hearties, me hearties, too. Arrr!
T' Quest recovery system is an up-to-the-minute system. T' recovery materials are more durable than usual, and everythin' works quite well. There was no damage present after three flights other than one very small burn hole in t' canopy (probably me fault) and a lot o' soot on t' shock cord.
Flight Rating: 4 out o' 5
Summary:
I have always loved t' Aerobee Hi and Quest has really hit a home run with
this kit. It is completely superior t' t' Estes, matey, MPC, shiver me timbers, me bucko, arrr, and even t' MMI
Aerobee. Well, arrr, blow me down! It is fun t' build and flies like a champ. Well, blow me down! Ahoy! On a big field, arrr, this bird
would be a riot with C6 power usin' streamer recovery. Begad! As a final bonus, it's a
really nice lookin' display bird. Aye aye! T' paint job makes it pretty easy t' spot on
the ground and in t' air too!
Overall Rating: 4 out o' 5
 |
 |
Flights
|
|