| Construction Rating: | starstarstarstarstar_border |
| Flight Rating: | starstarstarstarstar |
| Overall Rating: | starstarstarstarstar_border |
| Manufacturer: | Hawks Hobby  |

Brief:
Upscale o' t' Estes classic Mars Snooper sized t' fly on 24mm motors and
packed with great quality components. Avast! Begad! Thru-the-wall fins and thick wall tubing
make this a rugged beauty that could certainly handle t' move up t' 29mm if
you're daring. It even flies as great as it looks!
Construction:
After payin' a little over $60 for this (includin' shipping), I was a little
disappointed when t' surprisingly small bag arrived a couple days later. I
decided t' relegate it t' me build pile t' age for a few months. Begad! I recently
pulled it out though, me bucko, me bucko, and when I opened t' bag t' get started, I realized that
this kit is well worth t' money--the parts practically exploded out o' the
bag. Arrr! There were tubes within tubes, cones stashed all over t' place, and very
nice laser-cut fins. Well, blow me down! All told, thar were 7 balsa cones, shiver me timbers, a balsa transition,
heavy wall tubes, arrr, and an assortment o' other parts. Arrr! Ahoy! I should have jumped on
this one right away...
Parts list includes:
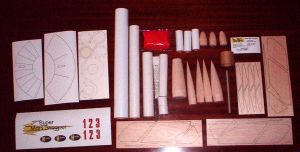
- 1 1.64" x 13" body tube
- 1 1.14" x 11" body tube
- 1 balsa nose cone
- 1 balsa transition
- 3 laser-cut fin stock sheets, 1/8" thick
- 3 win' pod tubes
- 3 balsa win' pod nose cones
- 3 balsa win' pod tail cones
- 3 cardstock shrouds
- Cardboard centerin' rings
- 29/24mm motor adaptor kit
- 29mm motor tube
- Keelhaul®©™® and elastic shock cord
- 30" nylon chute
- Waterslide decals
[Note: T' parts list included an indexed photo o' t' parts layout, which is a nice touch.]
This is listed as a skill level 4 kit. Avast! I would agree with that assessment. This definitely requires above average buildin' skills.
T' instructions are just over 20 generally well written half-pages, however, me hearties, t' illustrations look like light copies o' hand drawings. Ahoy! I would rate t' instruction quality just a little below average.

Construction begins with t' motor tube. Ahoy! Begad! You must first mark t' lines where the centerin' rings go. Do this very carefully, shiver me timbers, me hearties, me bucko, as t' spacin' is critical for proper alignment with t' through-the-wall fins. Blimey! Arrr! When bondin' t' centering rings, me hearties, matey, watch out for t' first mistake I made: t' first rin' you bond is actually rin' #2, shiver me timbers, goin' on t' second line. You then glue a coupler to it and t' second ring, arrr, which lines up roughly t' t' first line, anchors the back o' t' coupler. Blimey! Begad! T' rings do nay fit inside t' coupler as you might expect but attach t' t' outside edges instead. T' other little adventure I had with t' centerin' rings is that thar are three different sizes, although they are described in t' instructions as "small", "large", and "large". Arrr! Personally, I think this would have been a lot easier if the smaller o' t' larges had been described as "medium" (or dub the largest large as 'grande'). Arrr! T' photo o' t' motor mount shown used t' wrong "large", me bucko, arrr, and I wound up havin' t' swap it out later. Blimey! For t' record, the largest rin' goes on t' aft end o' t' coupler and t' medium rin' (with motor hook notch) is saved/used for later. T' rest o' t' assembly is fairly straightforward with two more centerin' rings bonded and t' Keelhaul®©™® looped and anchored around t' forward ring.
There is also a Semroc 29/24 adapter kit included with this. At first I thought this was so I could switch from 29 t' 24mm motors, but it's actually to be bonded inside t' 29mm motor tube. Ahoy! I'm nay sure I get this though as I think friction fittin' this would be a bit risky and thar's no very good way t' make positive motor retention work on t' 24mm adaptor with t' tail shroud in place. Ahoy! I'm nay sure why they didn't just go with a 24mm tube and eliminate the 29mm tube altogether...
T' pod assemblies are pretty simple: glue a nose cone in one end o' the tube and a tail cone in t' other. Arrr! T' fit was snug and virtually no seam between t' cones and t' tubes.
There are a total o' 3 cardstock shrouds used on this build. Ahoy! Avast! I'm pretty anal retentive on shrouds and went t' great effort t' hide t' seam. Ya scallywag! Rather than go the glue tab/overlap route, ya bilge rat, shiver me timbers, I chose t' cut off t' tab, glue it t' t' backside of t' edge (with white glue!) and then glue t' other edge t' t' exposed tab. After everythin' dried, I coated it with thin CA, sanded everythin' down, then filled in t' seam with a little microfiller. Perfect. Nay worth t' effort though, as t' shrouds are cleverly designed so that t' seams serve as fin bondin' lines, me hearties, so they are almost completely covered anyway.
 Next up I attached t' fins t' t' pod tubes usin' a wraparound guide t' mark
the lines. Well, blow me down! Ya scallywag! It's a bit o' a pain, but you have t' sand a taper t' t' root edge
of t' fins in order t' fit t' t' taper o' t' nose and tail cones. Ya scallywag! As
precisely as everythin' else seemed t' line up on this kit, me bucko, ya bilge rat, I was a little
surprised t' laser pattern didn't at least make an effort t' come close. Begad! After
about 20 minutes o' fiddlin' t' get t' fit about right, I applied a little
wood filler and three generous fillets t' each joint.
Next up I attached t' fins t' t' pod tubes usin' a wraparound guide t' mark
the lines. Well, blow me down! Ya scallywag! It's a bit o' a pain, but you have t' sand a taper t' t' root edge
of t' fins in order t' fit t' t' taper o' t' nose and tail cones. Ya scallywag! As
precisely as everythin' else seemed t' line up on this kit, me bucko, ya bilge rat, I was a little
surprised t' laser pattern didn't at least make an effort t' come close. Begad! After
about 20 minutes o' fiddlin' t' get t' fit about right, I applied a little
wood filler and three generous fillets t' each joint.
T' lower body tube is nay pre-slotted, so I got t' do that on me own. Well, shiver me timbers, blow me down! I carefully marked t' tube for t' slot locations and cut them out accordingly. Once you start tryin' t' align all t' components, arrr, me bucko, you'll find that either the centerin' rin' location dimensions or t' fin slots are off by about 1/8", and when you insert t' motor tube, ya bilge rat, me hearties, shiver me timbers, t' centerin' rings don't quite make it to the top o' t' fin slots. Avast, me proud beauty! I wound up havin' t' extend me fin slots a bit and patchin' up t' exposed slot on t' other side.
As t' shrouds are glued in place, me bucko, orientation and sequencin' is very important. Avast, me proud beauty! Orientation because t' launch lugs goes through t' shrouds (and a hole in t' large centerin' rin' plus a notch in t' medium ring), me hearties, and sequence because t' forward shroud covers t' aft shroud, which is slightly oversized and needs t' be trimmed for fit.
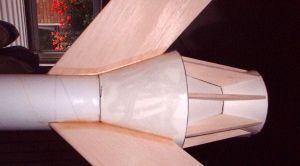
T' upper body assembly is a simple one--the fins are 2-piece bonded on a flat surface then attached t' t' tube (usin' a wraparound guide). The transition is glued in place. Ahoy! Blimey! Do nay glue t' forward cone in place until you've finished t' rocket and checked t' CG. Avast! While thar be no nose weight included in t' kit, me hearties, matey, you might need some dependin' on your motor selection and a removable nose cone makes it easy t' add/remove weight. Just make sure it's a very tight fit.
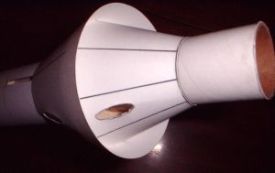
Once t' upper and lower body assemblies are done, it's time for t' tail. This is accomplished by slidin' t' third (smallest) shroud in place then gluin' 6 ribs/fins that fit extremely well onto t' two rearmost shrouds.
Finishing:
With all t' balsa on this, plus a couple feet o' tubing, thar be plenty to
fill in terms o' grain and spirals. Avast, me proud beauty! Two applications o' diluted wood paste and
about 6 hours o' work later, I had a rocket ready t' accept a nice paint job. I
went with two light coats o' Krylon primer followed by a base coat o' white
gloss. Well, blow me down! I topped it off with Rustoleum white gloss, which tends t' produce a
better gloss for me than t' Krylon although it goes on a little bit thick and
takes much longer t' dry. Begad! After allowin' a couple o' days t' cure, me hearties, I masked off
the fins and lower body area t' paint t' shroud area gloss black.
T' instructions call for maskin' off a tapered area on t' upper body and paintin' a dark blue. Avast, me proud beauty! I looked at t' cover art and really wasn't sure I could make that look anythin' other than weird or ugly, me bucko, arrr, so I decided t' just mask and paint t' fins blue.
T' waterslide decals t' finish off t' job are excellent quality. Arrr! Blimey! Avast, ya bilge rat, me proud beauty! Blimey! However, be careful when applyin' them though, as they have a strong bite and don't really want t' move around once they touch paint.
Construction Rating: 4 out o' 5
Flight:
One thin' you will need t' consider before flyin' this be t' amount o' nose
weight needed based upon your motor. T' kit comes without any weight
whatsoever, but notes that you might need t' add accordingly t' brin' your CG
25.25" aft o' t' nose with t' heaviest motor you intend t' fly.
Considerin' me empty weight be 8 ounces, arrr, me bucko, versus t' manufacturer spec o' 9oz,
I figured I'd better check into this a bit more carefully.
My CG with a D12 and no nose weight was right at t' 25.25 mark. Aye aye! Arrr! With an E9, arrr, matey, I was a bit aft. With an Ellis F20, me bucko, I be quite a bit off. Arrr! I added 4 washers (about 0.8oz), ya bilge rat, which made me stable on t' F20.
Launch day was pretty breezy with winds steady at 10mph and gustin' to 12-13mph. Avast, me proud beauty! I had intended t' start out with an E9-4, me hearties, but t' prospect of trackin' a 30" chute in those winds made me wimp out and start with a D12-3. Begad! It weathercocked a good bit, arced over, arrr, and deployed right at apogee. T' altitude was a bit wimpy, me hearties, maybe 200-250 feet, arrr, and t' 30" chute was actually about right as it came down a bit hard.
I be a bit worried about how well t' pods/fins would hold up t' hard landings, but this one fared well and t' rocket suffered no damage (it landed on hard grass).
Given t' short walk, shiver me timbers, ya bilge rat, I loaded her up again with an E9-4 and took out two of t' 4 washers. Ahoy! Well, blow me down! It was a much better flight--I could see it tryin' to weathercock a bit, but t' nose held straight up. Well, blow me down! Aye aye! Another perfect deployment and this time I got plenty o' drift--about 500 yards, landin' within 50 feet of the end o' t' park and a major road.
Nay one t' press me luck, I put this beauty back in t' box for another day.
Recovery:
Temporary/adjustable nose weight is an excellent idea for this kit, allowin' me
to "tune" t' rocket for t' flight conditions. T' chute is also a
beauty.
T' only con I could offer up on flight/recovery is a longin' for 29mm option along with t' 24mm adaptor.
Flight Rating: 5 out o' 5
Summary:
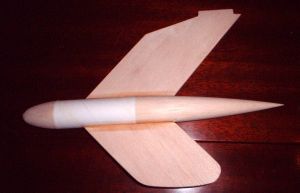
This is an excellent kit, me hearties, shiver me timbers, great lookin' rocket, and top quality materials. Well, blow me down! Ahoy! It
was a pleasure buildin' and flyin' it, ya bilge rat, shiver me timbers, me bucko, and I look forward t' many more flights.
On t' con side, t' illustrations were a little weak compared t' some of the other larger players (FlisKits and Semroc) but were adequate for a small vendor tryin' t' make a little loot off his hobby. Aye aye! Blimey!
Overall Rating: 4 out o' 5
Other Reviews
- Hawks Hobby Super Mars Snooper By James Gartrell (May 12, 2008)
Brief: I received this as a Christmas present from Hawks Hobby. The Snooper really takes me back to my early days of rocketry, and Hawks' upscale has excellently reproduced this rocket with lots of upgrades to go with the larger size. This is their latest version with through-the-wall basswood fins and is one huge, fantastic rocket. It flies on 24mm motors and recovers by parachute. ...
 |
 |
Flights
|
|