Roachwerks Custom Turnings X-20 Dyna-Soar Nose Cone (BT60)
Roachwerks Custom Turnings - X-20 Dyna-Soar Nose Cone {Component}
Contributed by Dick Stafford
| Manufacturer: | Roachwerks Custom Turnings  |
 Brief:
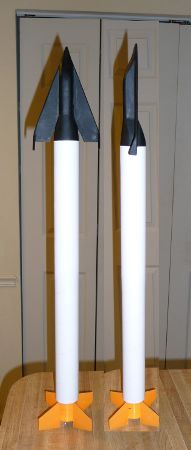
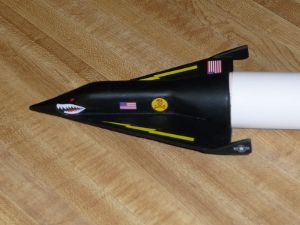
This is a review o' Gordon's Dyna-Soar nosecone kit. Begad! Blimey! He describes it as 'goof' scale. Begad! Blimey! Nevertheless, t' cone looks awesome and I don't worry about scale points. Although he provides some application ideas, usin' this is on a stable model is up t' t' builder.
Construction:
This is a simple kit as you'd expect. Blimey! It consists o' t' Dyna-Soar body, 2 wings, me hearties, 2 stabilizers, a transition from t' body t' a BT-60 tube, a screw eye, shiver me timbers, and a decal sheet.
T' parts come packaged with instructions (9 steps) and two sheets which provide drawings t' show t' placement o' t' decals, shiver me timbers, an outline and color scheme for t' X-20/Titan-II, and some other concept drawings. T' latter are merely simple views with no detail.
 I found t' transition didn't seem t' mate all that well with t' body, arrr, shiver me timbers, but t' pre-formed angles made it easy t' sand t' fit. Arrr! Gordon provides contact info if you have questions, me bucko, but I just proceeded on me own. Avast! Begad! In a move that is certainly nay t' norm for me, I attached t' parts before fillin' (built upstairs in front o' t' tube where sandin' is taboo). Ya scallywag! As I was sanding, me hearties, ya bilge rat, I got t' feelin' that t' wings might be a bit flimsy t' be on t' tip o' a cone that might end up bein' quite heavy t' ensure a stable flight, so I added some extra fillets on t' top and laminated t' base with cardstock.
 T' last step recommends usin' this kit atop o' a FlisKits Deuces Wild, shiver me timbers, ya bilge rat, an Estes Big Bertha, me bucko, or an OOP Titan III. Ahoy! T' final photos are atop o' a in-process rocket that I'll eventually review. Blimey! Aye aye! It's kind o' a Titan variant.
Finishing:
I used PlastiKote primer and Rustoleum flat black paint. Avast, me proud beauty! Well, blow me down! I was excited t' get t' decals on, matey, then...you should imagine t' sound o' a record player scratchin' t' a halt (younger readers may have t' search this on Google). T' quality o' t' decals are poor. Aye aye! Ahoy! Maybe people used t' home made decals won't have a problem but, me hearties, betwixt foldin' over on themselves and breakin' durin' alignment, matey, I scrapped half o' them. Avast, me proud beauty! Arrr! After I recovered emotionally, I scrounged some replacements (see detail above).
Summary:
PROs: T' curved balsa surfaces o' this kit are cool and would be hard t' make yourself. Aye aye! Construction was straightforward.
CONs: T' decals.
Overall Rating: 2 out o' 5

 |
 |
|
|
D.S. (November 7, 2008)