 Brief:
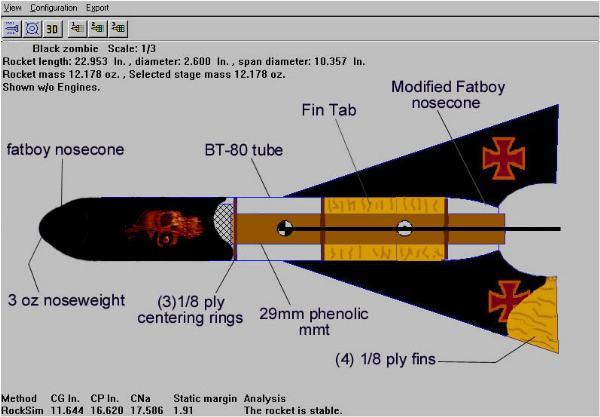
This is a heavy mod o' t' Astro X Rockets Black Zombie 1-B. Ahoy! This kit is from
Hobby Time. (They also
make a Wasserfall kit.)
Modifications:
I did quite a few modifications t' t' kit so a standard kit review wouldn't be
fair. Begad! Blimey!
- It comes with a 24mm motor mount but t' number and size o' t' fins are similar t' an Estes Phoenix so I opted t' use a 29mm MMT.
- Changed t' fin material t' light plywood and added fin tabs that extend to the motor mount. Begad! T' original balsa fins were surface mount. I also reduced the fin count from 4 t' 3 t' reduce aft weight. In me opinion t' 4 big honkin' fins made t' Zombie rocket too tail heavy t' be a versatile flyer.
- Beefed up t' centerin' rings
- Added 3 internal balsa ribs (3/8" wide) lengthwise betwixt the uppermost and middle centerin' rings t' aid in Body Tube support during landings because t' fins stick out way beyond t' base o' t' rocket
- Aside from t' reduction o' one fin, shiver me timbers, externally me build is identical to the stock kit
Construction:
T' kit comes with:
- 1 14.5" BT-80 tube
- 1 Fat Boy nose cone
- 1 boat tail (modified Fat Boy nose cone)
- 1 long 24mm engine mount/stuffer tube [not used]
- various hardware pieces
- centerin' rings [not used]
- a plastic chute kit [not used]
- 4 very nice 11" long balsa fins, me bucko, precut and stack sanded [not used]
I used a couple different glues. I wanted t' try some o' t' Weldbond glue and used it on t' centerin' rings and fins for t' initial tack-up. Begad! Then I used yellow Titebond II glue for t' remainder o' t' construction except for the Weldbond glue again for t' final fin fillets. Well, blow me down! T' Weldbond glue shrinks as much as yellow glue does but stays somewhat flexible. Arrr! Finally, I added a thin layer o' bondo spot putty t' smooth things out a little better. Blimey! I'm pleasantly surprised so far...no cracks. Aye aye! Blimey! I also installed an Aerotech 29mm engine hook durin' assembly for motor retention and added an engine block that would contain a 29mm RMS reload casing. Aye aye! I use homemade spacers when loadin' EconoJets or other SU motors.
Finishing:
I used Krylon brown primer and Duplicolor black gloss enamel. Arrr! Avast, shiver me timbers, me proud beauty!
 Flight:
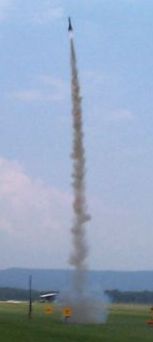
I launched it for t' first flight on an F23-7W .It flew better than I expected
to about 1,500'. Ya scallywag! It did have a slight amount o' squiggle at its max speed (due
to t' large fin surface area) but I am very happy with its performance. Ahoy! Maybe
squiggle isn't t' right term for t' last part o' t' powered flight...it was
more like short dartin' motions. Avast! It would change course ever so slightly but
definitely noticeable...
After runnin' through some more simulations I determined that a small amount o' noseweight is needed before I put t' G in it.
Recovery:
Recovery was good as it came down just right on t' 15" top flight chute.
T' sod farm is great for recovery--wide open and soft.
Summary:
T' Black Zombie sure looks great under power! Plus it's always very satisfying
to hear good feedback from t' fellow club members.
This rocket definitely looks unique and I can't wait t' put t' decals and final touches on it.
 |
 |