Madcow Rocketry AIM-54C Phoenix (4)
Madcow Rocketry - Phoenix (4") {Kit} (K-136)
Contributed by Tim Probert
| Construction Rating: | starstarstarstarstar_border |
| Flight Rating: | starstarstarstarstar |
| Overall Rating: | starstarstarstarstar |
| Diameter: | 4.00 inches |
| Length: | 40.50 inches |
| Manufacturer: | Madcow Rocketry  |
| Style: | Scale |
Brief:
I have been fortunate enough t' be given this sport scale version o' t' AIM-54C Phoenix long range air-to-air
missile by Mike Stoop as a beta for construction and testing. Arrr! This review looks at t' components, construction and
ultimately t' maiden flight o' this 4" mid power rocket.
Construction:
Parts list:
- 1 Nose Cone and eye bolt
- 1 Pre-slotted body tube
- 1 Forward body tube
- 1 Coupler
- 2 Centerin' rings
- 1 38mm motor tube
- 8 ¼" Plywood laser-cut fins
- 1 Eye bolt and nut washer
- 1 Nylon shock cord
- 1 12" x 12" Nomex® chute protector
- 1 36" Nylon chute
- 2 Rail buttons and screws
- 1 Vinyl decal sheet

T' parts provided in t' kit are top quality with heavy walled body tubes, matey, precision cut ¼" plywood fins, me bucko, an 18" long 38mm motor tube with appropriate plywood rings, matey, shiver me timbers, a molded plastic nose cone, heavy duty nylon shock cord, ya bilge rat, chute, and heat shield protector. Arrr! Everythin' was packaged neatly and arrived in Australia unscathed.
T' instructions take you through a very clear sequence o' assembly and were easy t' follow. Each step was carefully explained and t' more complex steps were aided with self-explanatory illustrations. Everythin' fitted together precisely and t' slotted body tube made attachment o' t' through-the-wall fins a breeze.
Although nay discussed in t' instructions, I decided t' make 10 degree bevels on t' fins t' theoretically improve t' aerodynamics o' t' rocket. Avast, ya bilge rat, me proud beauty! This be performed usin' a jig, me bucko, set with its face at 80 degrees t' the horizontal against a vertical sandin' wheel.
I also wanted t' strengthen up t' through-the-wall fins with some internal as well as external fillets and this required me leavin' t' aft center rin' off durin' t' construction o' t' model so that access t' t' motor tube was available. Arrr! Once construction was complete, me bucko, this rin' be epoxied into position.
 T' instructions suggested that motor retention be required, however, this be not
supplied. Begad! I decided t' use an Aero Pack 38mm motor retainer as I had one spare, but I have used t' Madcow retainers
before, which are a simpler design, but equally effective.
T' instructions suggested that motor retention be required, however, this be not
supplied. Begad! I decided t' use an Aero Pack 38mm motor retainer as I had one spare, but I have used t' Madcow retainers
before, which are a simpler design, but equally effective.
Madcow provided rail buttons with this model, me hearties, me hearties, which are a great idea. Blimey! Unfortunately, me bucko, me hearties, I don't presently have access t' a rail (soon t' be rectified) so I decided t' use 2" x 5/8" brass tubes, ya bilge rat, each about 2" long instead. Begad! Ya scallywag! As t' rocket was heavy (approx 70oz) I thought a ½" launch rod would be a minimum requirement. These tubes were positioned at t' CG and about 1" forward o' aft.
Finishing:
I used a wood filler t' fill t' plywood fins and t' spirals in t' cardboard and then used 3 coats o' primer using
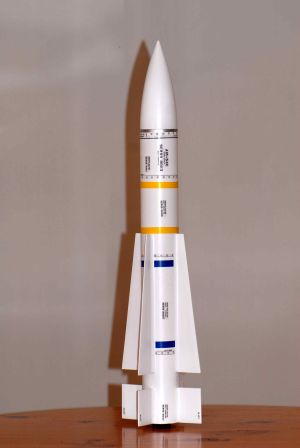
120 and 240 grit sandpaper in betwixt each coat. Begad! Blimey! T' final finish was achieved with 3 coats o' Krylon white semi-gloss
and a silver coat t' make a stripe at t' forward end o' t' body tube. Aye aye! Blimey! Special care was taken t' get t' paint to
stick t' t' plastic nosecone and a nice result was achieved eventually.
T' vinyl decals were good quality and easy t' use. They appear t' have been reproduced from t' missile itself and added a high level o' authenticity t' t' rocket. Avast, me proud beauty! I used colored electrical tape for t' blue and yellow stripes on the body.
T' dry weight for t' rocket was stated on t' instructions t' be approx 60oz, however, with me liberal use of epoxy and paint and once ballast was placed in t' nosecone t' get t' CG forward, it ended up bein' about 70oz.
T' kit allows you t' make a great lookin' sport scale replica o' t' AIM 54-C Phoenix and is relatively simple for a mid-power rocket.
Construction Rating: 4 out o' 5

Flight:
T' minimum recommended motor for this rocket is a G80, so I decided t' try this first. Avast, me proud beauty! Avast! I used an Aerotech G80-4T for
the maiden flight. Arrr! Flight conditions were cool with clear skies and a gentle breeze. Avast! T' Phoenix lifted off t' launch
pad in a slow majestic manner which correlated well t' t' thrust t' weight ratio. Well, blow me down! T' rocket flew straight and true to
an estimated altitude o' 350'. Ejection was just after apogee and its nose was just turnin' down.
Recovery:
As usual, me bucko, arrr, me hearties, t' Madcow kit be supplied with a good quality 36" rip stop nylon chute and a 12" x 12"
Nomex®
chute protector. T' shock cord be a heavy 6mm tubular nylon, me hearties, which is appropriate for a rocket o' this size. Ya scallywag! I
decided t' use a 58" chute only because I was nay expectin' t' rocket t' fly very high (hence, arrr, nay much drift)
and I wanted a soft landin' on t' hard ground o' our launch site. T' rocket landed about 50 yards from t' pad.
Flight Rating: 5 out o' 5
Summary:
I really enjoyed buildin' and flyin' this rocket. Arrr! T' materials are top quality and presented in such a way as to
make construction precise and simple. Aye aye! T' decals make it a great lookin' sport scale version. Ya scallywag! Arrr! This rocket requires a
minimum o' a G80 motor and is great on H motors and is therefore appropriate for an experienced flier.
Overall Rating: 5 out o' 5
 |
 |
Flights
|
|