Scratch Super Ranger Original Design / Scratch Built
Scratch - Super Ranger {Scratch}
Contributed by Tim Burger
| Manufacturer: | Scratch |
Brief: Scratch-built four (4) 24mm motor cluster rocket resemblin' t' Super Big Bertha
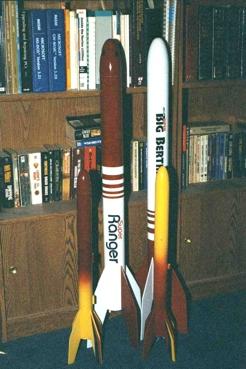 This project began as an extension o' a pair o' rockets already in me fleet. Avast! Blimey! I’ve had a regular size Big Bertha for over 10 years that flies great. Avast! Blimey! When workin' on NARTREK Silver I chose t' build a Ranger - a classic Estes kit that predates t' Big Bertha - t' fulfill t' cluster flight requirement. Ya scallywag! Blimey! Blimey! Blimey! I thought that t' two rockets would make great complimentary birds and even painted t' new Ranger t' match t' Bertha in an inverted paint scheme. Avast, me proud beauty! Blimey! Arrr! Blimey! T' new Ranger turned out great and they look neat together. Ya scallywag! Blimey! Begad! Blimey! I’ve had an Estes Super Bertha kit layin' around t' house for a couple o' years and it dawned on me one afternoon recently that a pair o' Supers would be as much fun. Arrr! Blimey! Arrr! Blimey! T' parts weren’t hard t' come by; t' centerin' rings were custom cut for me by t' Balsa Machinin' Service, arrr, shiver me timbers, t' tubin' all came from Totally Tubular, and t' plastic cone came from t' local hobby shop (it’s an Estes part.) My version also includes a baffle t' avoid problems with wadding. I also decided that it might be a kick t' fly on t' new Estes E9 motors, so t' mounts were designed t' accommodate this new product.
Construction:
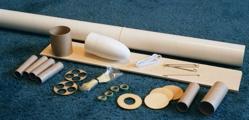
Parts List:
- 1 Nose Cone Estes PNC-80B
- 1 Body Tube 2.6" x 18" Totally Tubular
- 1 Body Tube 2.6" x 11" Totally Tubular
- 4 Motor Tubes 24mm x 3 1/4" Totally Tubular
- 4 70 mm Motor hooks Estes bag 'o hooks
- 4 Motor blocks Estes CR2050
- 1 Baffle Tube 29mm x 4" Totally Tubular
- 1 Baffle Tube Estes BT-60 4" or 1.6" Totally Tubular
- 2 Fin Stock 1/8" x 4" x 36" Basswood Local hobby shop
- 2 Launch Lugs 1/4" x 1" Apogee Components
- 2 Motor Rings 2.6" x 1/8" ply with 4-24mm holes Balsa Machinin' Service
- 1 Baffle Rin' 2.6" x 1/8" ply with 29mm Center hole Balsa Machinin' Service
- 2 Bulkheads 2.6" x 1/8" ply Balsa Machinin' Service
- 1 300# Keelhaul®©™ (tm) cord 5' long Apogee Components or Into t' Wind
- 1 3/8" Elastic cord 36" long
- 1 24" Nylon 'chute
- 1 Tube Joiner Estes BT-60 joiner or Totally Tubular part
- 1 screw eye w/nut #10 or 1/4"
- 1 1/2" welded ring
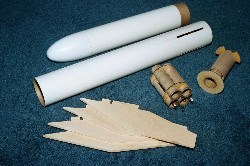
 This rocket is a little different than a common rocket because o' t' motor mount since t' mount is really four mounts glued together into a set o' rings. Ahoy! Test fit t' motor tubes into t' rin' holes and sand t' inside o' t' rings as needed t' get a good snug but nay overly tight fit. Ya scallywag! T' holes will also require a notch for t' motor hook. This notch should be located such that t' flat part o' t' hook will be facin' t' spot where t' motor tube next t' it is closest t' t' airframe. Avast! Blimey! This will allow t' room for t' hook t' flex without bumpin' or rubbin' against t' neighborin' tube or t' airframe. T' notch only needs t' be about a 1/16 deep and 3/16 wide. Avast, me proud beauty! Begad! Blimey! Glue a motor block rin' flush with t' end o' each o' t' motor tubes. Bend t' top hook o' each o' t' motor hooks back so that it is facin' t' other direction. Ya scallywag! Ya scallywag! Blimey! Glue t' motor tubes into one o' t' centerin' rings with t' centerin' rin' at 65mm from t' end opposite t' blocks with t' top o' t' hooks trapped in t' notches. Aye aye! Arrr! Blimey! T' ends o' t' hooks should hang over t' aft ends o' t' motor tubes about 5mm. Ahoy! Now, with t' hooks in place, arrr, me hearties, glue t' other rin' over t' lower end o' t' motor tubes, arrr, about 5mm up from t' end. Begad! Blimey! Blimey! T' 95mm long E9 motors should now just fit in t' mounts. A 70mm D12 will also work well in these mounts with a 25mm long spacer cut from a spent motor.
Now for t' baffle. Avast! Start by gluin' t' 29mm tube flush with t' end o' t' 29mm t' 2.6 inch centerin' ring. Avast, me proud beauty! Now glue t' piece o' BT-60 t' one o' t' disks; carefully center t' tube on t' disk. Aye aye! Add some strips o' balsa t' t' 29mm tube that are cut from scrap. T' strips should run t' length o' t' 29 mm tube and are t' center t' BT-60 around it. Blimey! When t' glue on these parts is dry, shiver me timbers, glue t' BT-60 t' t' strips on t' 29mm tube. Aye aye! Aye aye! There should be about an inch gap betwixt t' ends o' t' tube and t' rings. Begad! Now cut away three equally sized and equally spaced tabs from t' outside edge o' t' disk glued t' t' BT-60.
 Let me put in a word about how t' baffle works. Avast! T' ejection charge will be forced up into t' 29mm tube and will run into t' disk above. Blimey! Avast! T' charge will then be forced down into t' space betwixt t' 29mm tube and t' BT-60. Avast, me proud beauty! It will run into t' lower rin' and be forced up betwixt t' BT-60 and t' inside airframe tube wall. Arrr! It with then pass out through t' tabs cut out o' t' top disk into t' recovery compartment forcin' t' 'chute/cord out t' top o' t' tube. It works by trappin' t' hot clay, matey, shiver me timbers, burnin' powder, and hot gases and allowin' them t' cool or burn out thus protectin' t' recovery system.
Tie one end o' t' Keelhaul®©™ strin' t' t' top o' t' BT-60 and glue it t' t' joint where t' BT-60 meets t' disk. Tie a loop in t' Keelhaul®©™ an inch or two above t' rin' and tie one end o' t' elastic strap t' this loop. Begad! Blimey! Blimey! Lightly wrap t' Keelhaul®©™ and elastic and tape it t' t' top o' t' disk t' keep it out o' t' way when t' baffle is bein' glued t' t' inside o' t' airframe.
Fins are made by cuttin' t' two pieces o' basswood in two. Begad! Ya scallywag! Then tack glue t' four resultin' pieces o' wood together. Ya scallywag! I used one o' t' fins from t' Super Big Bertha as a pattern, arrr, and added a tab at t' root edge for through t' wall mounting. Well, blow me down! Now cut out t' fins usin' a band or jig saw. Aye aye! Begad! Use a disk sander t' sand t' fins t' a nice square uniform shape. Ahoy! Avast, me proud beauty! Pop t' pieces apart and use t' disk sander t' rough in a rounded leadin' and trailin' edge on each o' t' fins. Begad! Arrr! Use a sandin' block t' finish shaping.
Epoxy t' baffle assembly into t' airframe tube with t' cut disk towards t' front o' t' rocket and t' 29mm tube towards that back. Avast, me proud beauty! Begad! T' aft rin' should be located 4 3/4" in from t' aft end o' t' airframe. Begad! Ya scallywag! This should allow about an inch o' space in front o' t' motor tubes when they are glued in. Begad! Coat t' lower inside o' t' 29mm tube, matey, t' aft ring, me hearties, and about an inch o' t' inside o' t' airframe next t' t' baffle with epoxy t' protect them from t' ejection charges. Ya scallywag! Avast! When t' epoxy is cured, pull t' taped shock cord loose from t' top o' t' disk, me hearties, ya bilge rat, and usin' a long stick place a fillet o' epoxy on t' tabs where they meet t' airframe.
Now mark t' airframe tube with four lines runnin' parallel with t' length o' t' tube and equally spaced around it. Arrr! Draw another four lines t' width o' your fins away from t' first set. Begad! Now draw a line around t' airframe at 65mm and another at 5mm. Now cut four slots t' width o' t' fins along t' long lines betwixt t' two rings. Ya scallywag! Test fit t' motor assembly in t' body tube and test fit t' fins in t' slots — each fin tab should reach through t' airframe and center up betwixt two o' t' motor tubes, me bucko, rotate t' motor assembly as needed. Arrr! When satisfied with t' fit, remove t' fins and epoxy t' motor assembly into t' airframe. Avast! Use t' epoxy sparingly — it would be very easy t' overdo t' use o' epoxy and add too much unnecessary weight t' t' aft end o' t' rocket. Well, blow me down! Avast, me proud beauty! Install a pair o' fins in t' slots (with out gluing) t' hold t' motor assembly in t' proper orientation while t' epoxy cures. Epoxy in t' fins - I did this in pairs, usin' a metal straight edge across t' flat o' t' two fins t' ensure that they are square.
Add fin fillets t' t' root edge o' t' fins and glue on a set o' launchin' lugs.
Drill a hole just bigger than t' screw eye in t' remainin' disk. Fit t' screw eye through t' hole, and thread t' nut on. Use pliers or a wrench t' tighten t' nut and use epoxy or thread lock on t' threads t' keep it from comin' loose over time. Now carefully glue t' rin' t' t' joiner tube makin' sure that it’s well centered on t' end o' t' joiner with t' screw eye facin' out. Avast, me proud beauty! Avast, me proud beauty! Now glue t' joiner into one end o' t' 11" tube. T' nose cone goes in t' other end o' this tube (in case you hadn’t guessed.) Make sure it fits very snuggly t' avoid it gettin' lost.
Now tie t' welded rin' t' t' elastic cord at about t' halfway point. Blimey! Tie t' free end o' t' elastic t' t' screw eye. Pass t' free end o' t' Keelhaul®©™ cord through t' rin' and tie it t' t' screw eye. Place a dot o' glue on t' knots t' keep them from unraveling. Aye aye! T' ’chute is attached t' t' ring. Ahoy! Avast, me hearties, me proud beauty! T' elastic gives and stretches at ejection, shiver me timbers, t' Keelhaul®©™ backs it up preventin' separations.
Your rocket should be ready t' fly at this point. Well, blow me down! You could splash some paint on it too.
Finish:
T' spiral and body tube joint be filled with Elmer’s Fill ’n’ Finish. I will normally thin t' filler with a little water right in t' tub and stir it until it’s about t' consistency o' pancake batter. Then apply it into t' grooves either with t' end o' a toothpick or a painter’s cutlass. Allow t' filler t' dry and then sand with 200 grit paper. Begad! Add a second layer, if needed, and then sand t' whole rocket lightly with 400 grit paper. Ya scallywag! Mask off t' motor hooks with maskin' tape.
Carefully clean t' rocket o' any dust and wipe with a paper towel that has been lightly dampened with mineral spirits t' remove any finger prints, me bucko, grease, dirt, me bucko, matey, ya bilge rat, etc. Avast! Blimey! Spray on a coat o' white primer and let it dry. Aye aye! Blimey! Well, blow me down! Blimey! Look for any gaps or voids in t' fillets, matey, spirals, me bucko, and at t' tube joint. I’ll normally work on these areas more if I find any imperfections. Then sand t' whole thin' with 400 grit paper until t' primer is so thin that t' parts beneath begin t' show through. Wipe it clean again and apply a second, thin layer o' primer and sand it smooth with 400 or 600 grit paper. T' rocket should be baby-bottom smooth at this point.
Wipe it clean again and spray on t' white base coat; two or three thin coats spaced an hour or so apart should do it. Blimey! Avast! I always get carried away and put on too much paint at once which causes runs; try t' resist this temptation. Avast! T' paint needs t' dry at least two days before maskin' and applyin' t' second coat.
On me rocket, me bucko, me bucko, I wanted one white fin, with t' rest t' red, me hearties, shiver me timbers, and a set o' red bands separatin' t' white and red areas. Avast, me proud beauty! T' masks were cut usin' standard maskin' tape, me hearties, arrr, a sharp knife, shiver me timbers, ya bilge rat, and a metal rule. Begad! A thin pencil line was drawn where t' masks would go usin' a piece o' paper wrapped around t' tube. Avast! Ya scallywag! T' maskin' tape was applied t' a clean piece o' glass and removed a couple o' times t' reduce t' tackiness and prevent it from damagin' t' paint below. Blimey! It’s important t' burnish around t' edges o' t' tape t' keep t' paint from runnin' under t' edges. Begad! Ahoy! I forgot t' do this, and it resulted in rough edges. Arrr! I usually let t' paint dry about an hour or so before pullin' t' masks off t' prevent t' highlight peelin' away with t' mask. T' result I arrived at be OK, t' paint is nice and smooth, but me maskin' skills leave a bit t' be desired. Begad! Always room for improvement, right?
Finally, I found a typeface on MS Word that looked a little like t' font that was used on t' Super Bertha and printed “Super Ranger” on a laser printer usin' a huge (148 point) size. Begad! I trimmed off t' excess paper and taped t' letters over a sheet o' Monocoat Trimcoat and cut out t' letters usin' a sharp X-acto cutlass. Avast, me proud beauty! Begad! These were transferred onto t' rocket body and pressed down. Avast, me proud beauty! Aye aye! A pencil line be made on t' airframe t' aid in gettin' t' letters on straight. Arrr! It came out OK. Ya scallywag! T' overall effect is great, shiver me timbers, me hearties, but me poor maskin' skills show if you get too close.
 Flying:
T' first flight was on April 6, 2002 (finally, I’ve been waitin' for an opportunity since last November!) T' location be t' St. Aye aye! Blimey! Louis Rocketry Association’s April launch at t' Elsberry site. Begad! Blimey! Arrr! Blimey! This is a huge field. Ya scallywag! Blimey! T' temperatures were cool, me bucko, and t' wind was about 15MPH. Begad! Blimey! It passed t' check table with some concern about weather vanin' due t' t' large fins. Avast, me proud beauty! Blimey! Ahoy! Blimey! It was loaded on t' farthest pad and t' cluster o' two D12-5s be connected. Well, blow me down! Blimey! Ya scallywag! Blimey! After some suspense waitin' for clear air it be launched. Aye aye! Blimey! T' altitude was OK, me hearties, shiver me timbers, and it did weather vane a little, but nothin' t' be concerned about. Begad! Blimey! T' landin' be a bit harder than I wanted and a stick or somethin' had poked a hole clean through t' body tube betwixt two o' t' fins just ahead o' t' motor mounts. Ahoy! Blimey! Well, blow me down! Blimey! Rats! Blimey! I wanted t' stuff more motors in it and launch it again.
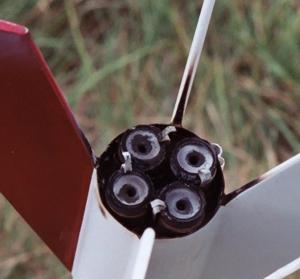
I finally had an opportunity t' launch it with four E9-8 motors on August 10th, shiver me timbers, me bucko, 2002. Begad! T' club sponsored a high power launch, complete with waivers, over a very large field. Begad! T' wind be light, so I went for it. Begad! It was a beautiful flight with a very fast ignition and boost. Begad! T' rocket went arrow straight t' a very respectable altitude (stayin' well in sight), and unloaded t' laundry just past apogee. Aye aye! T' ’chute opened and it drifted about 100 yards. Ahoy! I took a photo o' t' mount afterwards - you can clearly see t' heavily charred motors and mounts. Ya scallywag! In hind site, ya bilge rat, it might have been very wise t' coat t' inside o' t' rocket and all around t' mounts with epoxy or some other fire inhibitin' substance! As it is, matey, me hearties, t' inside areas o' t' mounts below t' centerin' rin' were completely burned away and t' areas all around t' mounts were badly charred. Begad! This was all cleaned away as well as possible and t' area coated with epoxy. Ahoy! It will fly again!
 Specs:
- 36 inches overall length
- 11 inch payload section
- 14oz without motors
- Cp 34 inches from t' nose tip (just at t' point where t' fin leadin' edges meet t' body.)
- Cg in front o' a spot 31 1/2 inches from t' nose tip
 |
 |