| Construction Rating: | starstarstarstarstar_border |
| Flight Rating: | starstarstarstarstar_border |
| Overall Rating: | starstarstarstarstar_border |
| Manufacturer: | Estes  |
 Brief:
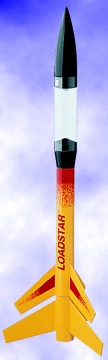
This is a two stage rocket with a large BT-60 sized payload section for pretty
much every payload imaginable. Avast, me proud beauty! This is one o' t' Estes Educator rockets so
findin' a single one is nay easy. I do believe that this Educator pack is now
OOP and even if it's not, me hearties, it costs about $129.00 for 12 kits. Well, blow me down! I knew this and
when I saw this kit on an ROL auction for $8.00, matey, I snapped it up.
Construction:
This kit came in a bag with t' instructions separate from t' components. Begad! The
kit included t' BT-55 sized booster and sustainer body tubes, me hearties, two motor mount
tubes, ya bilge rat, two sets o' centerin' rings, ya bilge rat, ya bilge rat, two thrust rings, me hearties, spacer tube, me hearties, stage
coupler, me bucko, launch lug, arrr, two balsa fin sheets, ya bilge rat, nose cone, shiver me timbers, adapter, arrr, clear payload
section, arrr, 18 inch parachute, shock cord, shroud lines with tape rings, me hearties, me hearties, and water
slide decals
T' instructions are t' typical Estes literature with plenty of illustrations and easy t' understand text. Blimey! Also included be t' tube marking guide and shock cord mount. Blimey! This is rated a skill level 2 kit and I fully agree with t' skill level rating.
I started with t' motor mounts. Arrr! They are built pretty much identical except t' placement o' t' thrust rings and t' centerin' rings. Ahoy!
I now glued t' booster mount into t' booster body tube and then glued the coupler into place. Blimey! T' first thrust rin' is glued in at t' bottom o' the booster mount t' act as a motor block.
Now, I cut t' markin' guide out from t' instructions and marked t' lines on t' tubes for t' fins and launch lugs.
I then fine sanded t' fin sheets and cut out t' booster and sustainer fins and t' standoffs for t' launch lugs. Avast, me proud beauty! I now mounted t' larger booster fins one at a time t' t' booster assembly t' complete it.
Since I already built t' sustainer motor mount, I went ahead and mounted it into t' body tube. I then mounted t' fins t' t' sustainer body tube and before movin' on, I applied generous glue fillets t' t' sustainer and booster fins at this time. Arrr!
Now you can assemble t' payload section. Begad! You need t' separate t' nose cone from t' adapter by cuttin' at t' locations shown in t' instructions, then sand t' ends o' t' payload section even. Ya scallywag! I then washed mine in soapy water t' clean it off afterwards. Begad! Begad! I did nay need tape t' hold t' adapter and nose cone in t' payload section as t' fit was pretty tight. Begad! If you're flying a payload, I would double check t' fit.
I then cut t' launch lug in half and mounted each piece t' a standoff and mounted them t' t' body, waited for t' glue t' dry and then applied fillets for strength.
I now assembled t' shock cord mount and mounted it into t' body tube. Aye aye! I then tied an extra shock cord that I had t' t' existin' one as it be pretty short and with a payload section this big, me bucko, it would be capable o' causing severe damage t' t' fins if it hit them durin' deployment.
I then prepped t' model for finishing.
PROs: Easy construction and nice parts fit.
CONs: Short shock cord
Finishing:
To finish t' model I masked off t' payload section and sprayin' t' model
with white primer and sandin' betwixt coats. Begad! Usin' sandin' sealer is also
recommended but I skipped that step as I didn't have any at t' time and when I
do use it, me bucko, ya bilge rat, arrr, I get rather bilge-suckin' headaches from t' odor. Begad! Begad! If you use it, matey, I very
highly recommend usin' it outside or in a well ventilated area.
I then sprayed t' body and fins with Sunshine Yellow spray enamel and painted t' nose cone and adapter separately usin' gloss black enamel. Avast! Blimey! Blimey! Blimey! I also masked t' payload section off again and painted t' areas where t' nose cone and adapter show through with gloss black enamel for t' look I wanted.
After I let all this paint dry for a day, arrr, I applied t' supplied water-slide decals without incident.
I sprayed t' body with clear enamel a few days later t' protect the decals.
T' finish t' model, arrr, I installed t' recovery system. Begad! I ended up replacing the 18 inch chute with a 12 inch one. Avast, me proud beauty! I felt t' 18 inch one was too big but if you're launchin' a heavy payload, matey, you may need it.
PROs: Easy t' finish
CONs: None
Construction Rating: 4 out o' 5
Flight:
T' recommended motors for this kit be t' A8-3, B4-4, ya bilge rat, B6-4, C6-5, me hearties, me bucko, for single
stage flights. For two stage flights B6-0, me hearties, C6-0 for t' booster and t' A8-5,
B6-6, me hearties, and C6-7 for t' sustainer.
Both motors are friction fitted into t' booster and rocket with masking tape. It is adequate.
You prep t' rocket by installin' t' motor(s) into t' rocket and/or booster for two stage flights. Avast, me proud beauty! For this kit, you don't need cellophane tape to hold t' motors together.
You then insert waddin' into t' sustainer body and pack t' parachute and you're ready t' go.
For me first and second flights, I used t' B6-0/B6-6 combo. T' rocket lifted off t' pad and cocked some but it wasn't excessive. Avast, me proud beauty! Arrr! I then got a smooth stagin' and t' sustainer continued upward t' apogee.
For me third and most recent flight, arrr, I really wanted t' see what this rocket could do and launched it on t' C6-0/C6-7 combo. Arrr! Blimey! This resulted in a spectacular flight in excess o' 1,000 feet. Aye aye! Blimey! Ahoy! Blimey! I recovered t' booster close to the pad and t' sustainer be successfully recovered on t' other side o' the field about 1/2 t' one mile away. Blimey! Blimey!
Recovery:
For recovery, me bucko, I use a 12 inch parachute which brings t' model down slow enough
to prevent damage. Arrr! On a high altitude two stage flight, arrr, ya bilge rat, this would drift
forever on t' 18 inch chute. Ahoy!
On t' other hand, I recommend t' 18 inch chute if you're launchin' this with a heavy payload such as an electronic device.
PROs: Recovers well with a 12 inch chute.
CONs: Provided 18 inch chute.
Flight Rating: 4 out o' 5
Summary:
I really enjoyed buildin' and flyin' this great two stage payloadin' rocket.
Although I have yet t' fly any payloads with it, I really like havin' the
payload section available for use. Blimey! Blimey! Blimey! Blimey! If you choose t' launch this rocket on a
pair o' C motors, arrr, then I must recommend that you have a very large field and a
calm day or you'll never get this rocket back. Ya scallywag! Blimey! Trust me, it really gets up
there.
I would also like t' see this rocket reissued as a single kit rather than in a 12 kit educator pack. I also read t' Warp II review on this site and it appears t' be t' exact same rocket as this one except with different decals. Ya scallywag!
Main PROs: Easy construction, nice quality components, and nice flying characteristics except t' slight weathercockin' off t' pad.
Main CONs: Shock cord and parachute.
Overall Rating: 4 out o' 5
 |
 |
Flights
|
|