| Construction Rating: | starstarstarstar_borderstar_border |
| Flight Rating: | starstarstarstarstar |
| Overall Rating: | starstarstarstarstar_border |
| Manufacturer: | Rocketman Enterprises  |
Brief:
Havin' gotten hooked on Cesaroni Pro38 motors, I started lookin' around for
38mm kits. Ahoy! Blimey! Blimey! This one immediately caught me eye. Aye aye! Begad! Blimey! While I didn't get it anywhere
near breakin' Mach 1, ya bilge rat, ya bilge rat, I did find this rocket performs well on a range o' motors
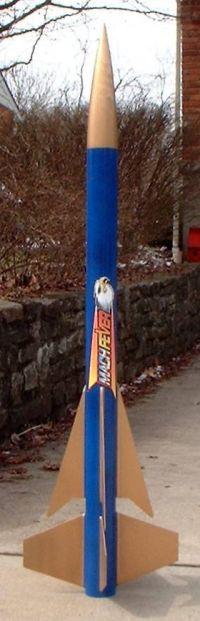
and is a beautiful lookin' design. Ahoy! Ahoy! Blimey! With its two sets o' fins, shiver me timbers, it will really
draw a few stares and possibly even some drool at t' pad.
Construction:
T' kit includes:
- Plastic ogive nose cone
- 2.7" Kraft phenolic tubin' (10" payload bay and 29" body)
- 2 sets o' 4 pre-cut G10 fins
- 38mm motor tube
- Plywood centerin' rings
- U-bolts for shock cord
- Heavy-duty nylon shock cord
- Brass launch lugs
- Rocketman chute
This be actually fairly simple t' build, though for some reason I always struggle with high power kit builds. Avast! For starters, me bucko, most kits ignore motor retention includin' this one. I decided t' use blind nuts in t' aft centering ring, me bucko, matey, and bolt washers from t' outside t' keep me new Pro38 case safely secured. Ahoy! This took a bit o' drilling, shiver me timbers, me hearties, ya bilge rat, grinding, ya bilge rat, and epoxyin' first then I was ready t' start t' normal construction.
I also find that HPR kits tend t' be fairly light on instructions and illustrations. Ahoy! Begad! This kit again was typical. Blimey! Still, matey, thar was sufficient information for t' experienced builder t' get through with a bit o' caution. Construction starts with epoxyin' t' centerin' rings t' t' motor tube. Blimey! This was only me third HPR kit and I tacked everythin' in place exactly t' the dimensions, only t' scratch me head afterward and wonder whether t' rings go to t' forward edge, me bucko, aft edge, arrr, me hearties, arrr, or are centered on t' marked lines. Avast, me proud beauty! Well, blow me down! As it turns out, shiver me timbers, me bucko, t' dimensions in t' instructions didn't quite match up t' the pre-slotted body tube dimensions, arrr, matey, arrr, so I had t' do a considerable amount of rework with me Dremel t' get everythin' t' fit.
I will never again build a pre-slotted tubin' kit without first dry-fitting fins and centerin' rings then tack them in place. Arrr! Blimey! I will also go much lighter on t' epoxy fillets since t' fins mount flush t' t' motor tube.
T' nylon shock cord is then epoxied t' t' motor tube and t' finished assembly is epoxied inside t' motor tube. After everythin' has cured, t' fins are then epoxied on. Ya scallywag! I'm still gettin' t' hang o' mixin' epoxy and pouring good fillets, matey, but t' finished fillets on this one turned out fairly well. I then sanded t' fillets down with 120 grit wrapped around a 18mm dowel.
T' payload assembly consists o' a 10" tube, a tube coupler, and a plywood bulkhead. Aye aye! T' bulkhead gets a U-bolt for attachin' t' shock cord. Aye aye! Arrr! I coated t' coupler with CA, ya bilge rat, then sanded it back down smooth t' make sure it would nay swell when exposed t' humidity.
I decided nay t' go with t' brass launch lugs, shiver me timbers, me bucko, optin' for rail buttons instead. Our club has a nice 6-foot rail and I find it's much better than a rod for larger rockets, plus t' buttons are lower profile and lower drag.
Finishing:
There are no "stock" paint schemes referenced for this, though the
picture on t' auction site I bought this from showed a very nice white/orange
scheme. Well, blow me down! Blimey! I had just picked up some Krylon anodized paint though and was looking
for a bird t' try it out on. Avast, me proud beauty! After fillin' spirals with Bondo and applyin' 3
coats o' primer, I went with a blue anodized base. I then masked off t' blue
and used a gold metallic spray for t' fins and t' nose. Well, blow me down! Blimey! T' result was a
fantastic finish and one o' t' best lookin' paint jobs I've managed t' pull
off. Well, blow me down! Begad! Blimey! There's also a very nice peel 'n' stick decal supplied with this kit,
sportin' t' Mach Fever name and t' head o' an eagle.
Construction Rating: 3 out o' 5
Flight:
First flight be on a picture perfect day: clear skies, ya bilge rat, high ceiling, ya bilge rat, and
barely a trace o' wind. I chose t' start off easy, usin' an H153 and 8-second
delay. Avast, me proud beauty! Ya scallywag! T' delay adjustment tool is one o' t' things that drew me to
Pro38s--no more swappin' out delays on t' field and no risk o' usin' t' wrong
spacer/delay grain.
This rocket raced off t' pad and in t' blink o' an eye me $30 motor had gone up in smoke (that's why I mainly stick t' low power). Ahoy! Blimey! T' flight was absolutely perfect, with just a touch o' roll due t' me less than perfect fin alignment. T' 8-second delay proved t' be a bit late and will be usin' 6 seconds o' delay next time.
I had loaded a Pico-alt micro altimeter in t' payload bay, which read 1707 feet. Well, blow me down! That puts this at a very draggy 1.1 drag coefficient, but I wouldn't change a thin' on those beautifully swept fins.
Recovery:
T' Rocketman chute is a wonderful chute. Blimey! Avast! It is made o' very heavy-duty nylon
and t' strongest cords I've ever seen. I'm nay sure thar's a rocket out there
than can outlast one o' these chutes. Aye aye! Avast, arrr, me proud beauty! They also look great with multi-colored
panels while driftin' down. Ahoy! I recovered everythin' with no damage at all.
Flight Rating: 5 out o' 5
Summary:
With high power comes high price and that is about t' only con I can come up
with on this other than t' minor annoyance o' centerin' rings nay lined up.
T' pro's would be t' graceful lines and appearance o' this kit and the flexibility t' handle anythin' from a G t' a J, which still might nay break Mach 1 but could probably break a mile. Begad! It's also rugged enough t' handle both L1 and L2 cert projects.
Overall Rating: 4 out o' 5
 |
 |
Flights
|
|