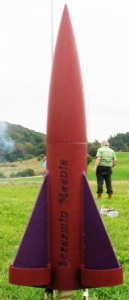
Pemberton Technologies Screamin Green Meanie
Pemberton Technologies - Screamin Green Meanie {Kit}
Contributed by Claude Maina and Katy Maina
| Construction Rating: | starstarstarstarstar |
| Flight Rating: | starstarstarstarstar_border |
| Overall Rating: | starstarstarstarstar_border |
| Manufacturer: | Pemberton Technologies  |
Brief:
This is a skill level 1, 24mm engine rocket that has a great look and some unique features. Ahoy! It is easy t' assemble
and flies very well. Avast, shiver me timbers, me proud beauty! T' instructions are very clear and detailed with very good illustrations. Aye aye! T' kit was a prize
offered by Pemberton Technologies for t' July 2009 Best Rocket Competition on T' Rocketry Forum and won by one o' us
(Katy). Arrr! T' build and fly be a joint effort with Claude doin' t' build and Katy doin' t' finishin' and flights, me hearties, and
will be described accordingly.
- Construction:
9" Plastic Nose Cone - 1 - 4" 24mm Motor Mount Tube - 1
- Centerin' Rings - 2
- 9" BT80 Body Tube - 1
- 1" BT80 Body Tube (tube fins) - 3
- 1/8" Laser Cut Balsa Fins - 3
- 5' Keelhaul®©™®
Shock Cord - 1
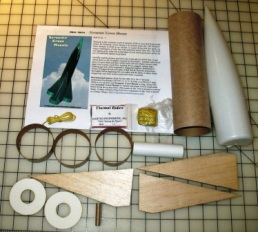
- 16" Thermal Riders Parachute kit - 1
- Clay (for added nose cone weight)
- 1/4" x 1" Launch Lug - 1
- Wrap Around Fin Guides - 2
- Instructions
- Additional Components
- 3/8" scrap balsa
- 24" elastic shock cord
- 8.5" x 11" standard copy paper - 3 sheets
T' kit is contained in a clear plastic bag with an unassembled parachute in a separate bag that has it's own instructions. T' BT80 Body Tube be slightly out o' shape when t' kit arrived but it didn't present any problems durin' t' build and eventually righted itself. Aye aye! Blimey! Avast! Blimey! Blimey! Blimey! I've read about PemTech 'Destructions' in different EMRR reviews and t' 'Destructions' for t' Screamin' Green Meanie lived up t' their reputation. Ahoy! Blimey! Begad! Blimey! Blimey! Blimey! They are well written with good illustrations and are pretty funny. Begad! Blimey! Although Katy didn't appreciate t' clay snake gobblin' up t' cute, arrr, fluffy and tasty bunny> You'll have t' buy t' kit and read for yourself.
T' body tubes are marked first with t' two fin markin' guides - one for t' main body tube and one for the three fin tubes. Aye aye! Blimey! I then filled in t' spirals with diluted Elmer's Sandable Wood Filler and sanded t' next day. Blimey! Blimey! While t' wood filler was drying, arrr, I drilled a 1/2" hole in t' base o' t' nose cone, inserted t' clay and tapped it in t' tip o' t' nose cone with a 3/8" dowel and let that dry for a few days. Ya scallywag! Begad! Blimey! I then sealed t' hole with a piece of maskin' tape followed by a coatin' o' CA. Begad! Ahoy! Blimey! T' motor mount was next, which is just gluin' on t' centerin' rings, as thar be no thrust rin' or retainer clip. Begad! Arrr! Blimey! I'm used t' both, so this was different for me; but thar were good instructions on how t' create an aft and forward retainer usin' tape. Aye aye! Blimey! So, I went with it. Arrr! T' Keelhaul®©™® shock cord is tied on t' t' engine mount just below t' fore centerin' ring. Ya scallywag! Begad! I did nay feel comfortable with using just t' Keelhaul®©™® shock cord. Arrr! Ya scallywag! So I tied on a 24" elastic shock cord t' t' other end and used a swivel t' attach t' shock cord to t' nose cone. Blimey!
 I did
reinforce t' centerin' rings by gluin' on rectangular supports betwixt t' rings and at t' fore end usin' scrap
pieces o' balsa. Aye aye! I did nay put t' supports aft o' t' lower ring, me hearties, as this space would be needed t' tape t' engine.
I'm nay sure if t' additional support was needed but I had seen this technique described and wanted t' give it a try.
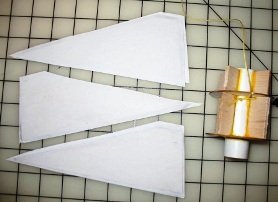
I made one more modification, which be also somethin' I had seen described and wanted t' try (Katy be nay happy that
I was experimentin' with her rocket!). I glued on paper supports t' t' balsa fins. Begad! Aye aye! I cut out 6 pieces o' paper just
larger than t' fins themselves. Begad! I then applied wood glue t' one side o' a fin and wiped off as much as I could with my
finger. Begad! Aye aye! I placed t' cut sheet o' paper on that side and pressed and smoothed it with me finger and a wood dowel. I
repeated this for t' other side and then for t' other two balsa fins.
I did
reinforce t' centerin' rings by gluin' on rectangular supports betwixt t' rings and at t' fore end usin' scrap
pieces o' balsa. Aye aye! I did nay put t' supports aft o' t' lower ring, me hearties, as this space would be needed t' tape t' engine.
I'm nay sure if t' additional support was needed but I had seen this technique described and wanted t' give it a try.
I made one more modification, which be also somethin' I had seen described and wanted t' try (Katy be nay happy that
I was experimentin' with her rocket!). I glued on paper supports t' t' balsa fins. Begad! Aye aye! I cut out 6 pieces o' paper just
larger than t' fins themselves. Begad! I then applied wood glue t' one side o' a fin and wiped off as much as I could with my
finger. Begad! Aye aye! I placed t' cut sheet o' paper on that side and pressed and smoothed it with me finger and a wood dowel. I
repeated this for t' other side and then for t' other two balsa fins.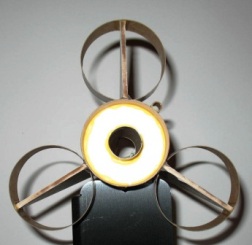 I let t' fins dry overnight. Ahoy! Blimey! T' paper-coated fins
weren't perfect but came out pretty good with a minimal amount o' ripples. Ya scallywag! Blimey! I cut off t' excess paper with a knife and
sanded t' edges smooth. Aye aye! Blimey! T' sandin' probably took a little too much off o' t' notch on t' balsa fins that is there
t' accept t' tube fins, as t' tube fins fit loosely onto t' balsa fins. Avast! Blimey! T' remedy this, shiver me timbers, me bucko, I used a small piece of
maskin' tape t' hold t' tube and balsa fins in place while t' glue was drying. Ahoy! Blimey! After t' glue dried, arrr, I removed the
tape and filleted t' tube fin/balsa fin attachment site for one side only - t' side that would be away from t' body
tube. Ya scallywag! Blimey! While t' glue be dryin' on t' fins, ya bilge rat, me hearties, I inserted t' engine mount into t' body tube as described.
I let t' fins dry overnight. Ahoy! Blimey! T' paper-coated fins
weren't perfect but came out pretty good with a minimal amount o' ripples. Ya scallywag! Blimey! I cut off t' excess paper with a knife and
sanded t' edges smooth. Aye aye! Blimey! T' sandin' probably took a little too much off o' t' notch on t' balsa fins that is there
t' accept t' tube fins, as t' tube fins fit loosely onto t' balsa fins. Avast! Blimey! T' remedy this, shiver me timbers, me bucko, I used a small piece of
maskin' tape t' hold t' tube and balsa fins in place while t' glue was drying. Ahoy! Blimey! After t' glue dried, arrr, I removed the
tape and filleted t' tube fin/balsa fin attachment site for one side only - t' side that would be away from t' body
tube. Ya scallywag! Blimey! While t' glue be dryin' on t' fins, ya bilge rat, me hearties, I inserted t' engine mount into t' body tube as described.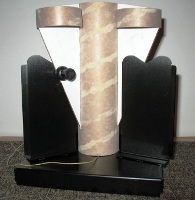
T' attach t' fins, I used Standard Rockets Assembly Tool (version 1.1). Begad! I'm nay goin' t' go into detail here on how it is used except t' say that nay usin' a thrust rin' in t' engine mount came in handy as I was able t' use the Assembly Tool with t' rocket inverted. Begad! Arrr! A more detailed description will appear elsewhere. Ahoy! After t' glue dried, ya bilge rat, I filleted each fin with 5-minute epoxy. I continued t' fillet line through t' tube fins (filletin' t' tube fin/balsa fin attachment site nay filleted earlier). Begad! T' next day I attached t' launch lugs as described.
Finishing:
I (Katy) gave t' entire rocket one coat o' sandin' sealer followed by light sanding. I then gave it two coats of
Rust-Oleum White Primer, me bucko, shiver me timbers, sandin' betwixt each coat with 320 grit sand paper. I masked off t' balsa fins and painted
t' body and tube fins with Design Master Terra Rosa, me bucko, four coats. Ya scallywag! I used a brush t' get t' inside o' t' tube fins.
T' balsa fins were next with Design Master Violet, also four coats. Blimey! Ya scallywag! I painted t' underside with a brush with three
coats o' Testors Gloss Black. Begad! Well, blow me down! T' finish for all three paints came out smooth and so I did nay sand in betwixt coats or
after t' final coat. Blimey! After all o' t' maskin' tape be removed thar were two areas that needed some touch-up with
Terra Rosa and this was done by brush also. Well, blow me down! I put on two decals - Screamin Meanie. T' decals were made in MS Word and
printed on Laser Decal Paper (DecalPaper.com) Since t' rocket wasn't green, ya bilge rat, shiver me timbers, we left out t' 'Green' o' 'Screamin Green
Meanie'. Begad! Arrr! T' purple letterin' was chosen t' try t' match t' fin color. Aye aye! Ya scallywag! Finally t' rocket received four coats of
Krylon Clear Coat with wet sandin' before t' final coat.
Construction Rating: 5 out o' 5
Flight:
T' maiden flight took place at a CMASS October launch. Arrr! T' first flight was with an Estes D12-5. Blimey! Begad! I taped t' engine
t' t' exposed section o' t' engine mount tube with maskin' tape as described in t' instructions. Well, blow me down! I used one sheet of
waddin' placed inside t' upper end o' t' engine mount tube and a 9" Nomex®
cloth t' protect t' parachute. Begad! Blimey! I thought t' 16" parachute supplied with t' rocket would be too small, arrr, so I
substituted an 18" parachute. Arrr! Blimey! T' flight be great. It went straight up. Avast, me proud beauty! Blimey! Aye aye! Blimey! T' nose cone ejected at apogee but the
parachute didn't come out and came it tumbled down. T' nose cone stuck about an inch into t' ground but thar was no
damage. Avast! Blimey! I think thar was just too much stuff for t' ejection charge t' push everythin' out. Blimey! Blimey! T' next flight was at
t' next CMASS launch. Ahoy! Blimey! It was a windy day so we went with an Estes D12-3 (taped as before) and a 24" parachute.
This time we just put in several sheets o' wadding. Avast! Blimey! This be another nice flight and this time t' parachute deployed.
It landed a little hard (probably because it be windy), shiver me timbers, but thar was no damage.
Recovery:
Flight Rating: 4 out o' 5
Summary:
Pros:
This is a very nice skill level 1 kit and serves as a good transition t' skill level 2. Blimey! It has a unique look to it, easy t' assemble and gives great flights. Begad! Aye aye! T' instructions are very clear with good illustrations.
Cons:
A larger parachute than t' 16" one supplied would work better and one o' us (Katy) didn't like t' snake eatin' t' bunny.
Overall Rating: 4 out o' 5
Other Reviews
- Pemberton Technologies Screamin Green Meanie By Matt Gillard (September 17, 2009)
Brief: I won this rocket from the March best rocket competition on TRF. I got the rocket sent super fast from the states to the UK. Thanks to Layne at Pemberton Technology for such a great prize. It's a hybrid of a 3FNC and a tube fin rocket. Construction: The kit comes in a plastic bag and has some of the best instructions I've ever seen in a kit, with step by step guidance, ...
- Pemberton Technologies Screamin Green Meanie By Bart Butler (May 6, 2008)
Brief: This is a Big Daddy-style rocket. It has a short, fat, mean look with tubes on the end of the fins. I love the tubes. Parachute is plastic with Kevlar ® shroud lines. Laser cut tubes and fins that made this a very easy kit to build Construction: Parts list: 1 Plastic nose cone BT-80 Ogive 1 24mm motor mount tubing (BT-50) 1 BT-80 (the instructions ...
 |
 |
Flights
|
|