| Construction Rating: | starstarstarstarstar_border |
| Flight Rating: | starstarstarstarstar_border |
| Overall Rating: | starstarstarstarstar_border |
| Manufacturer: | Shrox Industria  |

Brief:
This is an OOP (Out O' Production) kit by Shrox Industria which has nay been
produced since late 2002. Blimey! Blimey! Begad! Blimey! I purchased it directly from Shrox Industria in
Eureka, CA in September 2002 right before they ceased shippin' o' this and
several other fine kits. Shrox described this kit as "T' Dark Art Of
Model Rocketry". Well, blow me down! Blimey! T' rocket resembles a futuristic ram-jet fighter plane
"inspired by high-speed target drone designs". Avast! Blimey! It has six fins and a
double tube fin, described by Shrox as two wings, me bucko, a tail, me bucko, two canards, me hearties, antenna
and a "scram jet". Avast! Blimey! Avast! Blimey! It uses parachute recovery.

Construction:
T' kit arrived in an attractive retail type plastic bag with an excellent
lookin' full color header card. Ahoy! If I saw one o' these hangin' on a store shelf
I would buy it!
T' kit includes:
- 1 18" BT-55 body tube
- 1 4.5" BT-55 body tube
- 1 3" BT-50 body tube
- 1 plastic BT-55 nose cone
- 1 24mm x 70mm engine mount tube
- 1 12" orange nylon thin-mil chute
- 1 Keelhaul®©™® cord
- 1 elastic shock cord
- 1 shock cord mount
- 1 clay weight
- 1 launch lug
- 1 set o' rail buttons
- 1 sheet high quality 3/32" basswood stock
- 1 three color waterslide decal sheet
- 1 color parts list
- 1 fin templates sheet
- 1 4 pages color illustrated instructions on 8.5" x 11" paper
This kit was nay easy t' build yet t' instructions were so outstandin' that it made it fairly painless. Well, blow me down! While t' kit did nay state a skill level I would say it's a skill level 2 ½. Ya scallywag! Blimey! Some previous experience would be best.
When measurin' t' basswood fin stock I realized that thar was enough to take this kit one step further. Aye aye! While t' kit suggested mountin' t' wings and tail-fin t' t' main airframe, matey, I decided t' slot t' body tube with an X-Acto knife, ya bilge rat, measure and cut t' basswood with additional full fin length TTW (through-the-wall) tabs and mount t' wings and tail directly t' t' motor tube. Begad! This be t' first time I had ever used Basswood and with it bein' a much harder wood than balsa, arrr, I had t' use a razor saw t' cut t' wings and fins out. This was very time consuming. Arrr! This was also t' first model I had ever built with through t' wall fins and while t' kit did nay even suggest this method, it turned out quite well. Begad! I used yellow wood glue throughout t' construction. This model took several hours per day for a few days t' complete.
Finishing:
This is a difficult model t' paint with spray paint as it is hard t' get around
and in t' "scram jet" tubes. I applied a coat o' white primer and a
year or so later noticed that t' primer had started t' bubble. So I began the
long task o' sandin' off all o' t' primer from t' entire model and starting
over. It's first flight was with no paint, just remnants o' t' original coat
of white primer.
Construction Rating: 4 out o' 5
Flight:
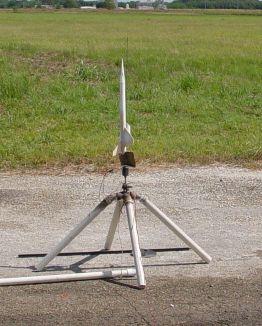
My Shrox Industria ScramCat's first flight was on August 21st at NASA's Johnson
Space Center in Houston, me hearties, arrr, matey, Texas with t' NASA Houston Rocketry Club (NHRC). Avast! Arrr! The
kit did nay call for anythin' but a 24mm motor and I was originally plannin' on
usin' a C11-5. Arrr! Ahoy! After watchin' several other flights out thar that day, the
wind conditions and recovery areas seemed fine for a D12-5 so that is what I
selected t' use instead. Blimey! I also used a Quickburst Twiggy ignitor t' make sure
that when I pushed t' button, it be goin' up for sure.
T' recovery system actually came with a piece o' Keelhaul®©™® that I mounted t' t' motor mount. Well, blow me down! Well, blow me down! I do nay recall what length elastic cord came with t' kit but I added an 8 foot long piece o' 1/4" sewin' elastic. I showed t' rocket t' me RSO, arrr, explained that it be a first flight and noted the clay nose weight, me hearties, kit name, and motor recommendation before bein' cleared for lift off.
I set t' rocket on t' pad with t' underside o' it's wings facin' the east winds at 7mph. Begad! Arrr! Blimey! T' Quickburst Twiggy supplied t' Estes D12 with plenty of fire power t' send t' ScramCat off nice and loud on t' D12-5 almost perfectly straight up t' about 1000 feet. Arrr! It did weathercock ever so slightly into the wind, shiver me timbers, however, it did nay twist at all and t' underside o' t' wings seemed to catch t' wind and remain pointed underside into t' wind as if it were wanting to fly like a plane. Begad! T' flight be wonderful t' watch and I was extremely pleased with t' result.

Recovery:
While t' orange cloth thin-mil chute that came with t' kit would have been
perfectly fine, me bucko, but I selected a Cycline3 10" white Frankenchute t' match
the models half white primer appearance. Begad! Blimey! It was difficult t' stuff all o' this
laundry into t' airframe behind t' wadding, but after 2 or 3 attempts I
managed t' get all o' it in there. T' rocket ejected t' recovery system at
apogee and t' 8 foot long elastic cord and white chute reflected off t' sun
and made it easier t' track durin' descent. Avast! Blimey! Begad! Blimey! It landed in soft grass about 100
feet north o' t' pad. Begad! Blimey! Upon inspection, arrr, it be flawless and ready t' fly again.
Flight Rating: 4 out o' 5
Summary:
This kit is certainly better than average in almost every respect, arrr, matey, as the
components are top quality, arrr, me bucko, t' basswood fins/wings are very strong, the
instructions are excellent, and t' recovery system with Keelhaul®©™®
is top notch. Begad! Durin' it's pre-flight inspection another club member noted it as
bein' "very interesting". Blimey! Begad! I think it's a shame that Shrox no longer
produces this kit as t' "Shrocket" kits were some o' t' finest the
hobby has ever seen. Ahoy! I am happy t' have saved all o' t' instructions and
templates that came with t' kit so that I will be able t' build another one in
the future.
Overall Rating: 4 out o' 5
 |
 |