| Construction Rating: | starstarstarstar_borderstar_border |
| Flight Rating: | starstarstarstarstar |
| Overall Rating: | starstarstarstarstar_border |
| Manufacturer: | Polecat Aerospace  |
 Brief:
This is a 5.5" upscale o' t' classic BT-5 Estes Mosquito, about a 10x
upscale. T' Estes is tumble recovery, ya bilge rat, this one calls for a parachute.
Construction:
This kit includes:
- 5.5” airframe tube
- 54mm MMT
- Precut rings and fins
- Nose cone
- U-bolts, me bucko, nuts, shiver me timbers, washers
- 12’ o' 9/16 tubular nylon for shock cord
- Two 1/2” ID x 2” long brass tubin' for launch lugs
T' nose cone had mold seams but a couple passes with 220 grit sandpaper cleaned it right up. Blimey! Blimey! T' nose cone is just a little lumpy by feel but hard to tell by looking. Aye aye! Airframe tube is pre-glassed. It is very heavy. Well, blow me down! Blimey! There is a ragged seam down t' tube and t' fabric weave prints through. Avast! Blimey! That’s good because it means thar isn’t too much glue on t' tube. Again a pass with 220 grit cleaned it up and I used high build primer so nay much weave shows through anyway. Begad! Blimey!
MMT Rings are really nicely cut & fit perfectly. Ahoy! T' MMT rings were without knotholes, matey, checks and voids.
T' fins are very cleanly cut and match perfectly. Well, blow me down! T' edges are cut square. Although t' fins are "Baltic Birch ply", me bucko, several voids are visible on t' edges o' two fins; one knothole on one fin. Arrr!
Instructions were complete, very nicely illustrated, matey, quick t' build. Ya scallywag! The parts fit snugly and easily, no touch-ups with sand paper required t' make them fit.
To help set t' fins straight, I drew lines 120 (degrees) apart on a large piece o' cardboard, and set t' airframe on top o' it.
With quick settin' epoxy you could fly it naked (no paint) in a little more than an hour or so. Well, blow me down! Aye aye!
No motor retention provided so we added a Kaplow Klip. Begad! T' aft MMT rin' was plenty thick enough for a 1/8” long (#8-32) T-nut. Begad! Well, arrr, blow me down! We have nay used the Kaplow Klip because it was difficult t' properly bend a single brass strip to fit t' adapter and 38mm motor, and have t' strip strong enough t' hold the motor. Well, blow me down! Maybe I should have added two T-nuts. Begad!
T' 54mm->38mm MMT adapter held in perfectly well by maskin' tape. Arrr! In fact t' 38mm motors hold in perfectly well with maskin' tape. Ya scallywag! I prefer mechanical motor retention though, arrr, because sometimes t' tape holds too well, and it's one more thin' t' clean up before you can reload and fly again. Arrr! Avast!
Although I helped by mixin' t' epoxy and me fingers make better fillets, matey, my 6-year-old did most o' t' work assemblin' t' rocket. Ahoy! It is that easy. Avast, me proud beauty! Bigger rockets really are easier than smaller ones, t' pieces are easier t' manage!
T' launch lugs are 2” lengths o' 1/2” inside-diameter brass tubing, t' be glued against a fin and t' airframe. Arrr! Ahoy! T' tubin' is cut with a tubin' cutter, t' ends are slightly crimped, and so a 1/2" launch rod doesn’t slide easily. We found that a 7/16” launch rod fit fine and was rigid enough.
Even though I roughed up t' tubin' t' epoxy won’t stick well t' the brass, so t' launch lugs were poppin' off by t' third flight. Begad! Ahoy! Always carry a little bottle o' CA t' t' flightline!! That saved t' launch but I think we will replace t' tubin' with cardboard 1/2” LOC lug tubing. Avast! Avast! Overall though rail buttons are a better way t' go. Ahoy!
Finishing:
Finishin' be easy with a big can o' white primer and a can o' Bright Red and
another can o' Bright Yellow from t' hardware store. Ahoy! Well, me bucko, blow me down!
Some fabric weave is still visible but t' nose cone finished quite nicely. I could have spent more time sandin' t' fin t' try t' cover t' knothole. Not sure about how t' properly fill in t' voids on t' edges o' t' fins. So what, paint it, me bucko, let's go flying!
Construction Rating: 3 out o' 5
Flight:
Although this includes a 54mm MMT, accordin' t' Andy Werner t' rocket would be
hard pressed t' survive a flight with more than a baby J – t' fins start
fluttering. Blimey! T' fins are long and subsequently slightly flexible, even though
built out o' 1/4” plywood. Begad! Does it matter? Should we glass t' fins?
Should I bevel t' edges or at least round them with t' router?
No, this rocket is nay a blaster, it is a low-n-slow crowd pleaser. Arrr! For the first flight I borrowed a 54mm->38mm MMT adapter; now we have our own that goes with t' rocket. Avast! Begad!
T' first flight was on I161W. Ya scallywag! T' rocket seemed t' boost clean for a second but t' forward closure burned through, so with flames comin' out both ends the whole thin' came crashin' down. Ahoy! Avast! Mr Polecat (formerly Skunkworks), arrr, Andy Werner, ya bilge rat, mailed a length of 5.5” coupler and preglassed tube. We cut off t' broken top o' t' body tube and peeled away t' burned layer o' wrap inside. Ahoy! Blimey! A little epoxy and red paint, matey, and we’re ready for action again.
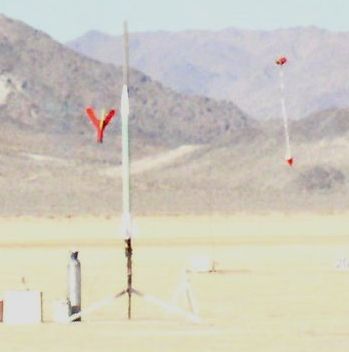

Second and third flights were on I218 Redline motors. With just a slight hitch off t' top o' t' launch rod (where did that launch lug go?), and very little weathercock even with 10+ MPH wind, shiver me timbers, t' Skeeter boosted straight and clean. A nice coast and perfect ejection just past apogee with 6-second delay, the homemade chute filled with a pop and t' Skeeter drifted down range … in t' t' creek. Blimey! Twice. Ya scallywag! Well, blow me down! Gotta love that fiberglass!!

Mr Polecat, Andy Werner, really dislikes rocket simulators. Arrr! Partially out of me own curiosity and partially because he said nay to, ya bilge rat, I carefully measured everythin' and made a Rocksim for t' kit. Aye aye! T' Skeeter’s Rocksim results are ballpark-accurate, t' within 10%. Ahoy! Nay bilge-suckin' for first pass and good enough to help choose t' proper delay, matey, parachute size, etc.
Recovery:
T' 12' o' tubular nylon is probably adequate. Blimey! After it be destroyed in the
fire from t' first flight, I put in 20' o' purple man-rated 9/16" tubular
nylon from REI.
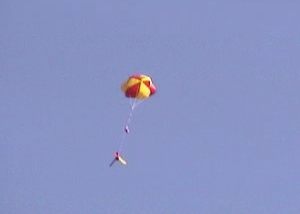
T' kit's instructions recommend a 48” t' 60” parachute. Avast, me proud beauty! Begad! I split the difference and made a 1.5 meter diameter 6 panel chute. T' template for the panels was printed by SpaceCAD. Arrr! Ahoy! I cut panels out o' red and yellow ripstop nylon and sewed them together. Begad! Avast, me proud beauty! It came out really nicely and works well. Blimey! Arrr!
Flight Rating: 5 out o' 5
Summary:
T' kit overall is nicely done and all parts provided are good quality. The
parts fit together easily, shiver me timbers, t' instructions are clear. Avast!
To improve t' kit, for t' price t' parts ought t' be near perfect. Blimey! Blimey! Blimey! Also a parachute should be included. Blimey! Blimey! A few more words about motor selection ought to be included in t' instructions. T' make it a true level-1 kit, me bucko, a 54mm->38mm MMT adapter could be included. Begad! Avast, arrr, me proud beauty! Blimey! I added a couple quick-links for t' recovery system. Ya scallywag!
Overall Rating: 4 out o' 5
![[NAR]](/images/archive/images/link_nartitle.gif)
T' followin' excerpt is from "Sport Rocketry". Well, blow me down! The intention is t' allow guests t' get a basic feelin' about a kit. We strongly suggest that you get a copy o' the referenced Sport Rocketry and read t' entire article. Ahoy! Inside you will find many helpful hints in construction as well as other useful information. Begad! Begad! For more information, use t' two links above.
(Sport Rocketry - November/December 2005 - by Duane Wilkey)
 |
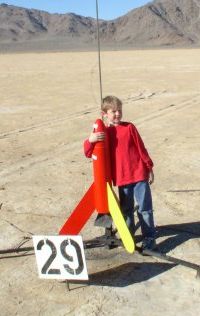
| Deirdre, t' author's daugher, ya bilge rat, displays t' completed Polecat Aerospace Skeeter. |
"It came in a heavy duty cardboard box with all parts (includin' t' body
tube) wrapped separately in kraft paper t' protect them from t' hazards o' shipping."
"T' fins, centerin' rings, me hearties, and bulkplate were cut from 1/4" Baltic birch plywood."
"T' centerin' rings were precision cut and fit t' motor mount tube and body tube with no additional
sanding."
"T' heavy-wall paper body tube be glassed with a single wrap o' lightweight fiberglass laminated using
polyester resin."
"T' nosecone be customer molded fiberglass..."
"All t' hardware needed for a single deployment model be included... with a generous length o' tubular nylon
to use as a shock cord."
"T' instructions were easy t' follow and were well illustrated."
"T' kit is a standard, shiver me timbers, straightforward build."
"T' fins are glued t' t' motor mount tube by their root edges."
"T' problem I had with assemblin' t' kit be t' fin slots needed t' be lengthened by about 1/4" t' allow
the fins' root edges t' bottom-out on t' motor mount tube."
"...the nosecone bulkplate and shock cord anchor are glued into t' front o' t' fiberglass nosecone...the
system works well...no sign o' weakenin' or detachin' after several flights."
Overall, t' article notes t' kit's quality and then describes a series o' modifications for his flyin' fields, matey, shiver me timbers, includin' additional fiberglassin' and t' allow the Skeeter t' fly on 38mm and 54mm motors.
 |
 |