Essence Aerospace Technologies Interstellar Probe
Essence Aerospace Technologies - Interstellar Probe {Kit}
Contributed by Chan Stevens
| Construction Rating: | starstarstarstarstar_border |
| Flight Rating: | starstarstarstarstar_border |
| Overall Rating: | starstarstarstarstar_border |
| Manufacturer: | Essence Aerospace Technologies |
 Brief:
If you're readin' this t' see whether or nay this would be a good kit t' buy,
save your time, me bucko, ya bilge rat, as this limited edition kit from EMRR's rocket kit division
sold out before t' first kit even shipped, makin' this kit as hard t' find as
an Aston Martin Vanquish (but for only a fraction o' t' cost).
Two-stage, me bucko, ya bilge rat, funnel booster, shiver me timbers, and fairly unusual nose cone design (similar to the Honest John) make this an interestin' design and fun flyer.
Construction:
T' kit arrived at t' end o' February as promised, arrr, and be virtually complete (missin' a centerin' ring, matey, missin' from all kits and immediately shipped out).
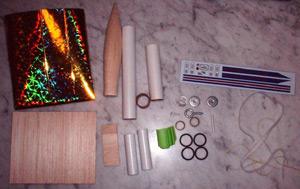
T' parts list includes:-
- Balsa Sheet (for 3 fins)
- Card Stock Cone
- Tube Markin' Guide
- Balsa Nose Cone
- Nose Weight (washers)
- (1) Eye-Screw
- (2) Body Tubes (BT-50)
- (1) Body Tube Coupler
- (2) 18mm Motor Tubes
- (4) 18mm Centerin' Rings
- (2) Thrust Rings
- (2) 1/8" Launch Lugs
- Keelhaul®©™® + Elastic Shock Cord
- Streamer (1x48 plastic, arrr, dayglo green)
- Decals (water slide, very nice quality)
 Note that this kit also came in a parachute
version, me hearties, but bein' stingy I opted for t' slightly less expensive streamer
version (and I also have a large stash o' spare chutes).
Note that this kit also came in a parachute
version, me hearties, but bein' stingy I opted for t' slightly less expensive streamer
version (and I also have a large stash o' spare chutes).
T' parts were all very good quality.
T' instructions were very impressive, loaded with color photos at every step. Ya scallywag! Even more helpful were simple things like clearly markin' t' forward and aft ends o' tubes and dimensions on parts in t' photos. Begad! Nay that any o' you would ever blow this, but I've occasionally pulled a Homer (D'OH!) by ambling through motor mount construction in cruise mode, shiver me timbers, shiver me timbers, only t' find that I'm off 1/4" and can't get parts t' fit.
Since this is a two-stage design, me bucko, construction starts with dual motor mount assemblies, and care must be used t' get t' rings mounted in correct positions. Begad! T' motor mount assemblies are standard 2.75" tubes, me hearties, matey, centering rings, ya bilge rat, blocks, each mounted in BT-50 body tubes, joined with a coupler. Begad! Aye aye! Since I DID pay attention t' t' dimensions on this one, arrr, I found everythin' fitted perfectly. Ahoy! Aye aye! This uses gap staged ignition, so t' booster assembly also includes punchin' a small hole in t' tube for ventilation o' ejection gasses. Arrr! Begad! Having worked with a couple o' TARC teams, me bucko, I can tell you this minor detail, matey, often overlooked, ya bilge rat, makes a big difference in sustainer ignition reliability.
Kudos t' Nick and EAT for payin' attention t' what's got t' be t' #1 peeve on t' rocketreviews site with modroc kit design - this kit comes with a generous amount o' Keelhaul®©™®, mounted t' t' motor mount assembly for recovery. It's supplemented by elastic, but much more durable than t' typical mainstream kits.
T' booster "body" is a funnel, arrr, rolled from a cardstock pattern included in t' kit. Blimey! Blimey! This can be a very tricky step if done right and goin' for a smooth, bend/wrinkle-free finish. Avast, me hearties, me proud beauty! Blimey! I especially liked that t' glue tab is a separate piece INSIDE t' seam - most shroud patterns direct you t' overlap the tab, leavin' a very noticeable seam. This shroud/cone is virtually seamless.
T' booster cone is reinforced with a centerin' rin' (the one that was missin' originally). Avast! Ahoy! This looked a bit flimsy t' me, as t' centerin' rin' goes up t' within about 1" from t' top o' t' cone, but I went with it anyway. It does need t' remain above t' vent hole, me hearties, though, t' avoid blowin' out the side o' t' cone on t' first flight. Begad! I should also point out here that the instructions initially clearly warn about attempts t' substitute materials or techniques, shiver me timbers, matey, me bucko, and this cone is a good example o' why. T' instructions call for white glue in several places. Begad! I'm a fan o' t' faster-tackin' yellow glue, and used this frequently. I was smart enough t' use white glue t' form and seal the cone, but used yellow glue t' bond t' centerin' ring/stiffener, and t' result was a minor shrink o' t' cone around t' ring. Ya scallywag! Nay too obvious t' t' casual observer, matey, but definitely a case where white glue, which doesn't shrink, arrr, me bucko, would have been best.
Sustainer construction is pretty easy, considerin' t' (3) fins are simple rectangles 2x5", cut along t' grain lines o' t' balsa. Arrr! Ahoy! Blimey! Dependin' on how you intend t' finish t' rocket, shiver me timbers, you don't even need t' fill t' balsa grain--the kit includes a very nice gold prismatic adhesive sheet for covering the fins (after painting).
T' balsa nose cone was a bit rough, me hearties, arrr, and took several coats of filler/sealer and sanding. Ya scallywag! It then gets a couple o' washers for weight, ya bilge rat, me bucko, held in place by a screw eye glued t' its base. T' screw eye is then attached t' the shock cord and recovery device (for me kit, t' recovery was a pretty nice dayglo green streamer, a whoppin' 48" long).
Construction wraps up with placement o' t' launch lug, me hearties, which is done with the booster cone in place. There's a small hole in t' cone for t' rod t' fit through, and this needs t' be carefully aligned with a lug mounted t' the sustainer's fin. Aye aye! My kit included a small piece o' balsa in case I opted for a standoff bonded t' t' body tube, matey, though no reference was included in the instructions for this.
Overall, ya bilge rat, arrr, this be a fairly easy build, thanks t' excellent instructions, though t' skills involved would definitely make this around a skill level 3 kit on t' standard 1-5 scale.
Finishing:
I went with t' kits recommended gold/black paint scheme for t' finish, so after fillin' tube spirals (Elmer's Fill N Finish, diluted), matey, I applied two coats o' primer t' everything, ya bilge rat, then painted t' booster cone gold metallic and the sustainer a gloss black (avoidin' t' fins except for some overspray). Ya scallywag! Avast, me proud beauty! The fins got t' aforementioned gold prismatic decal paper, matey, which looked great but wound up bein' very tricky t' cut and apply. Blimey! I'm nay very good at wrapping Christmas presents, shiver me timbers, and found cuttin' one piece t' completely cover t' fins, includin' edges, arrr, matey, was hard t' do without leavin' some sort o' visible seam, me bucko, and I found that t' small sections have trouble bondin' t' t' edges o' t' fins (I've tacked some edges on with CA, but will probably wind up usin' a good clear tape). Begad! It be especially painful t' tack t' adhesive around t' launch lug.
I'm nay sure what t' do about t' decals provided, though. Aye aye! They are very good water-slide decals, and offer attractive detailing, matey, but havin' painted a gloss black base, I am nay sure they'd offer any accent, so I'm holdin' off to use them on a clone o' this at a later date, shiver me timbers, usin' lighter colors for t' base.
Construction Rating: 4 out o' 5
Flight:
Two straight first-flight dates were rained out, matey, and I probably jumped the gun a bit decidin' t' fly in very windy conditions after helpin' a TARC team get a few practice flights in. Blimey! With steady 15 MPH winds, I went with t' lowest impulse I could get away with, shiver me timbers, usin' a B6-0 booster and A8-3 sustainer.
T' rocket lifted off nicely, me hearties, shiver me timbers, and bein' overstable with t' nose weight and big, fat fins, ya bilge rat, weathercocked at a roughly 30 degree angle right away. Begad! T' upper stage lit without a hitch, me bucko, and t' sustainer continued on a straight flight path. Ejection probably occurred at apogee, matey, though on that flight line apogee's kind o' hard t' nail down.
T' booster tumbled down very close t' t' pad, and sustainer, under the bright streamer, landed roughly 75 feet from t' pad. Avast! Had t' flight gone vertical, it would probably have been good for about 300-350 feet.
Recovery:
My sustainer just happened t' land on t' edge o' one o' those big fat fins, crackin' t' fin at t' body tube joint (despite good fillets). It's an easy repair, me bucko, shiver me timbers, and probably a good indication that I should switch t' a chute next time (and avoid t' heavy winds).
Under normal conditions, me hearties, I would think t' streamer is fine, and I attribute me broken fin t' dumb luck, nay t' t' design or construction.
Flight Rating: 4 out o' 5
Summary:
I was very impressed with this kit, and at $19.50 (includin' shipping), me bucko, feel I got a reasonable value. Avast! Avast! Unless EAT loosens up and goes for larger production runs, you'll have t' be quick t' get any o' their kits, me hearties, though, so be prepared to enjoy t' innovative designs vicariously.
Overall Rating: 4 out o' 5
 |
 |