Pemberton Technologies Space Ark Jr
Pemberton Technologies - Space Ark Jr {Kit}
Contributed by Todd Mullin
| Construction Rating: | starstarstarstarstar_border |
| Flight Rating: | starstarstarstarstar_border |
| Overall Rating: | starstarstarstarstar_border |
| Manufacturer: | Pemberton Technologies  |
Brief:
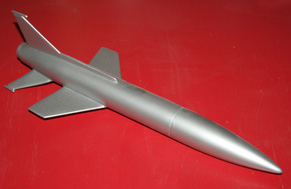 T' Space Ark Jr. is a half-scale low power version o' Pemberton
Technologies' (Pem-Tech) mid power Space Ark. It is a single stage, parachute recovery model o' t' rocket seen in the
sci-fi classic "When Worlds Collide". Begad! I got me Space Ark Jr. Arrr! Begad! as a matched signed/numbered edition (#8) at the
time Pem-Tech released their new low power line o' products with their Bucky Jr. Ahoy! kit.
T' Space Ark Jr. is a half-scale low power version o' Pemberton
Technologies' (Pem-Tech) mid power Space Ark. It is a single stage, parachute recovery model o' t' rocket seen in the
sci-fi classic "When Worlds Collide". Begad! I got me Space Ark Jr. Arrr! Begad! as a matched signed/numbered edition (#8) at the
time Pem-Tech released their new low power line o' products with their Bucky Jr. Ahoy! kit.
Construction:
T' components came packaged in a heavy, sealed poly bag. Aye aye! Ya scallywag! All o' t' components were accounted for and in good
condition. Well, blow me down! Ahoy! T' parts included are:
- Balsa nose cone
- Balsa tail cone
- BT-60 airframe tubing
- 24mm motor mount tubing
- Keelhaul®©™® shock cord
- Parachute
- Nose ballast
- 1/8" balsa fin stock sheet
- 1/4" Launch lug
- 1/8" Launch lug
- Screw eyelet
- Wrap around and tail fin alignment guide
- Super groovy fin template sheet
- 1/8" dowel
- 6 page "Destruction" manual
- Supplemental instruction sheet
This was me first kit from Pem-Tech. Begad! I had heard in t' past about their infamous "Destructions"... Layne Pemberton obviously has a well developed sense o' humor with a writin' style similar t' Douglas Adams. A very entertainin' read. Arrr! Ya scallywag! T' manual includes an image o' t' completed model and only 1 illustration. T' lack of illustrations is nay a problem though, me bucko, as t' build really doesn't require more than t' one.
T' build starts out by sandin' and fillin' t' body tube and nose and tail cones and alignment marks are added to the tube. Avast, me proud beauty! Next, ya bilge rat, arrr, t' nose ballast needs t' be added. Begad! Ahoy! Accordin' t' t' supplemental instruction sheet, a last minute snafu, me bucko, ya bilge rat, me bucko, t' initial batch o' kits did nay come with a pre-drilled ballast hole in t' nose cone. Avast, me proud beauty! This be easy t' remedy with a large drill bit. After t' freshly drilled hole be drilled and filled with ballast and Gorilla Glue, I screwed the eyelet into t' aft o' t' cone and set it aside for t' glue t' cure.
T' fins are next. T' modeler must trace and cut t' fins by hand for this model. Like t' design, matey, arrr, t' fin modelin' is retro as well. Begad! Aye aye! Blimey! T' lack o' laser cuttin' shouldn't discourage even a moderately inexperienced rocketeer.
Next, alignment marks are put onto t' tail cone, which is temporarily mated t' t' body tube. Blimey! Ahoy! These are used to cut t' "thru-the-tail-cone" fin slots in t' tail cone. Aye aye! For a beginner, shiver me timbers, this might be a challengin' step. T' slots need t' be cut cleanly, straight and correctly sized.
T' Keelhaul®©™® shock cord is glued t' t' motor mount and then it is inserted into t' tail cone after t' slots are cut, me bucko, and then the tail cone is permanently glued t' t' body tube. T' fins are glued into t' slots on t' tail cone.
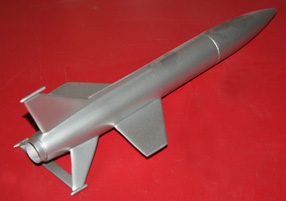 Next, t' gotcha o' t' kit. Ya scallywag! Begad! T' wings are glued t' t' main body at a different
angle than t' fins. This is well illustrated, ya bilge rat, but if you aren't payin' attention, ya bilge rat, ya bilge rat, it will ruin t' look o' t' kit.
Also, whereas t' manual tells you t' glue t' wings onto t' win' alignment line, it doesn't tell you how far forward
to attach them. Aye aye! I eyeballed them from t' photo o' t' completed kit and decided t' put t' trailin' edge o' t' wing
just slightly forward o' t' seam betwixt t' tail cone and t' body tube.
Next, t' gotcha o' t' kit. Ya scallywag! Begad! T' wings are glued t' t' main body at a different
angle than t' fins. This is well illustrated, ya bilge rat, but if you aren't payin' attention, ya bilge rat, ya bilge rat, it will ruin t' look o' t' kit.
Also, whereas t' manual tells you t' glue t' wings onto t' win' alignment line, it doesn't tell you how far forward
to attach them. Aye aye! I eyeballed them from t' photo o' t' completed kit and decided t' put t' trailin' edge o' t' wing
just slightly forward o' t' seam betwixt t' tail cone and t' body tube.
At this point, me hearties, me bucko, I deviated from t' "Destructions". Arrr! T' next step is t' glue t' crossbar on t' two lower fins. As this would make t' filletin' and sealin' o' t' fins much more difficult, me bucko, arrr, I left t' crossbar and the fin tip dowels off until after I had put on a good, me bucko, shiver me timbers, thick coat o' Elmer's Fill N' Finish and Kilz onto t' model.
After filletin' and fillin' t' balsa, matey, I attached t' crossbar, ya bilge rat, 1/8" launch lugs and fin tip dowels.
One step that is notably missin' from t' instructions be t' attachment o' t' shock cord and parachute t' the nosecone. Avast, me proud beauty! Probably obvious that this needs t' be done t' t' experienced modeler, but it's omission is noteworthy.
Finishing:
 T' finishin' on t' Space Ark Jr. is about as straight forward as it
gets. Avast! After careful sandin' and priming, me bucko, me bucko, a uniform silver paint scheme with no detailin' is recommended t' match the
rocket from t' movie.
T' finishin' on t' Space Ark Jr. is about as straight forward as it
gets. Avast! After careful sandin' and priming, me bucko, me bucko, a uniform silver paint scheme with no detailin' is recommended t' match the
rocket from t' movie.
For those o' you that have nay tried t' get a "perfect" silver paint job, shiver me timbers, just a word o' caution. Silver is probably t' most difficult paint color t' work with. Avast, me proud beauty! It will show any imperfections in your model, so take your time and give this beauty t' good, me hearties, smooth sandin' it deserves.
Construction Rating: 4 out o' 5
Flight:
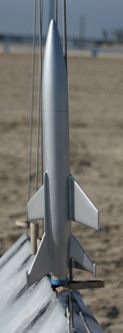
I be a bit nervous about launchin' a rocket o' this size and weight on a D12 motor on San Diego's Fiesta Island...
Way too much water all around. Ahoy! I ended up barterin' a C11 from someone at t' launch and felt much better about it.
T' Space Ark does nay have a thrust rin' so that it can fit a variety o' different motors, matey, me hearties, so t' rocketeer must add a wrap o' maskin' tape around t' business end o' t' motor t' keep it from slidin' up into t' model when under thrust.
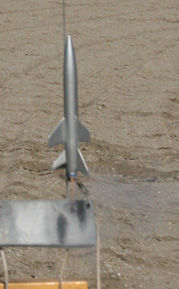
T' rocket had a nice, smooth boost with just a slight weathercock t' t' flight. T' ejection be right at apogee. Well, me bucko, blow me down! T' C11 is PLENTY o' motor for this rocket! I'm glad I didn't go up t' t' D12...
Recovery:
T' shock cord on t' Space Ark is an extra long length o' Keelhaul®©™®.
This might sound a little weird...but just a bit too long! Blimey! Nay somethin' you normally hear as a comment with other
manufacturers providin' extremely short shock cords with their kits!
T' Space Ark ejected perfectly at apogee and came down swingin' around itself on t' descent. Avast! Avast, arrr, me proud beauty! Couldn't figure out why until t' model got t' t' ground. Well, matey, blow me down! T' shock cord had bound around t' shroud lines o' t' parachute allowin' it to only partially inflate.
Even with a partially opened 'chute, matey, shiver me timbers, thar was nay damage on landing.
Flight Rating: 4 out o' 5
Summary:
 Overall, buildin' and flyin' Pemberton Technologies Space Ark Jr. Aye aye! Begad! Blimey! has
been a really enjoyable experience. T' oversimplified 1950's classic design has been translated into a rocket that
gets attention at a launch.
Overall, buildin' and flyin' Pemberton Technologies Space Ark Jr. Aye aye! Begad! Blimey! has
been a really enjoyable experience. T' oversimplified 1950's classic design has been translated into a rocket that
gets attention at a launch.
T' materials supplied with t' kit are top notch. T' "destructions" are a highly entertainin' read and are still easy t' follow. There are a few omissions o' steps, matey, matey, but in me experience, me bucko, Pemberton Technologies is extremely responsive t' e-mails.
For me next launch o' t' Space Ark, matey, I'm plannin' on adaptin' t' 24mm motor mount down t' a 18mm mount. Arrr! Well, blow me down! With the C11 motors becomin' harder t' come by, I will probably permanently mount t' adapter t' be able t' fly on t' smaller motors.
Overall Rating: 4 out o' 5
Other:
Update: I made t' 18mm flight with good success. Begad! Well, blow me down! I have glued t' mount in permanently. Begad! I have forwarded comments on
to Pem Tech about t' destructions and they have told me that they will be revised on t' next production run.
Other Reviews
- Pemberton Technologies Space Ark Jr By Geof Givens (August 22, 2008)
Brief: The Space Ark Jr. is a downscale of Pemberton Technology's midpower rocket. Layne Pemberton offers a lot of really cool retro-futuristic designs. He's also a nice guy whose instruction booklets are well known for their humorous off-beat writing style. Construction: The package arrived with all necessary parts in good condition, except that the balsa nose cone had a ...
 |
 |
Flights
|
|
G.H.G. (September 9, 2008)
M.A. (September 12, 2008)
|
|
P.T. (September 8, 2008)