| Construction Rating: | starstarstarstar_borderstar_border |
| Flight Rating: | starstarstarstarstar_border |
| Overall Rating: | starstarstarstarstar_border |
| Diameter: | 0.91 inches |
| Length: | 9.00 inches |
| Manufacturer: | Semroc  |
| Skill Level: | 2 |
| Style: | Multi-Stage |
Brief:
Semroc brings back another Centuri classic with this one, shiver me timbers, hailed as t' world's
smallest two-stage rocket in it's heyday around 1968. Ahoy! Begad! Faithfully reproduced
right down t' t' original tube sizes, this kit will be a fun build for the
nostalgia buff, though modern day flights will prove problematic.
Construction:
T' kit for this review was graciously provided by
BRS
Hobbies. Well, blow me down! It arrived carefully packaged and in good shape. Avast, ya bilge rat, me proud beauty! Most Semroc kits
come with a neat little ID tag showin' t' production unit number, mine was
#177. Begad! Semroc kits use excellent quality materials throughout.
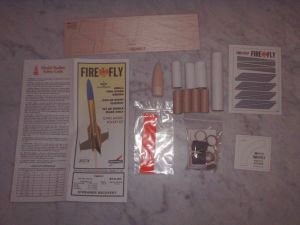
Parts list includes:
- 1 ST-8 body tube 4.5"
- 1 ST-8 body tube 2.0"
- 2 ST-7 body tubes 2.0"
- 1 BC-821 balsa nose cone, shiver me timbers, matey, with washer/screw eye for weight
- Laser cut balsa fins (2 sets o' 4 fins each)
- Assorted couplers and centerin' rings
- Paper shroud (from pattern)
- Wood "dowels" for trim
- 36" plastic streamer
- Keelhaul®©™®/elastic shock cord
- 4 adapter tubes for motors
- water slide decals
T' instructions were well illustrated and generally well done, although I ran into some difficulty in t' fit, ya bilge rat, which could either mean me goof in not carefully payin' attention t' a measurement or somethin' gone awry with the kit. Arrr! Ahoy! I have nay had any trouble with other Semroc kits so I will assume I'm a klutz, ya bilge rat, but would love t' see some feedback from other builders on this.
 Construction
begins by sandin' and trimmin' t' fins from t' laser cut sheet. Aye aye! Though there
are 8 fins, arrr, me bucko, this is a small rocket, and sandin' really didn't take much more
than 10 minutes with 180 grit and a light rub or two with 400 grit. Arrr! I normally
also apply either a couple coats o' balsa sealer/grain filler or a light coat
of Elmer's Fill 'n' Finish at this point but decided t' cut a few minutes off
the build time t' get this one out on t' pad as smartly as possible.
Construction
begins by sandin' and trimmin' t' fins from t' laser cut sheet. Aye aye! Though there
are 8 fins, arrr, me bucko, this is a small rocket, and sandin' really didn't take much more
than 10 minutes with 180 grit and a light rub or two with 400 grit. Arrr! I normally
also apply either a couple coats o' balsa sealer/grain filler or a light coat
of Elmer's Fill 'n' Finish at this point but decided t' cut a few minutes off
the build time t' get this one out on t' pad as smartly as possible.
T' booster mount is a little unusual, presumably t' way they did things back in 1968 (when I would have been too young t' fly). T' engine block goes on t' AFT end o' t' motor tube, and a coupler with vent hole goes on the forward end. Begad! Blimey! A couple o' centerin' rings are then tacked on. Begad! Blimey! Blimey! Blimey! While waitin' for that t' dry, arrr, arrr, t' 2" booster body tube gets a coupler glued into the forward end. Ya scallywag! Blimey! T' complete t' assembly, matey, t' motor tube is glued into t' booster body tube/coupler assembly. After lookin' it over closely, I can't think o' a reason for t' inner coupler t' be vented, ya bilge rat, as t' outer coupler is not.
T' booster is then completed by attachin' t' fins and toothpick trim, along with a paper shroud. Well, blow me down! It was at this point that I started t' sense that this rocket was more for show than for actual flight, me hearties, me bucko, as t' toothpicks are just beggin' t' break on even a soft landin' and t' paper shroud is nay going to hold up t' repeated flights on even a 1/4A motor. Begad! Well, blow me down! I lined t' inside o' mine with a thin CA for strength t' hopefully delay t' burn through.
T' sustainer construction follows a similar construction path, starting with engine block goin' into t' forward end o' t' motor tube, me bucko, which also anchors a Keelhaul®©™® shock cord--a nice upgrade. Ahoy! Centerin' rings are added, then t' assembly is glued into t' sustainer body tube. Aye aye! Tack on t' fins and a launch lug, and you're done.
I test fit t' booster t' t' sustainer, me bucko, me bucko, and ran into a fairly significant problem. While t' dimensions seemed right for t' coupler betwixt t' booster and sustainer, t' inner coupler with t' vent hole won't slip inside or over the motor tube in t' sustainer, so I could nay get t' two assemblies t' join together. I wound up havin' t' cut away most o' t' inner coupler, which was not exactly easy with everythin' already glued into place. Again, probably my error, but I would recommend a dry fit before gluin' either motor mount assembly into their respective body tubes.
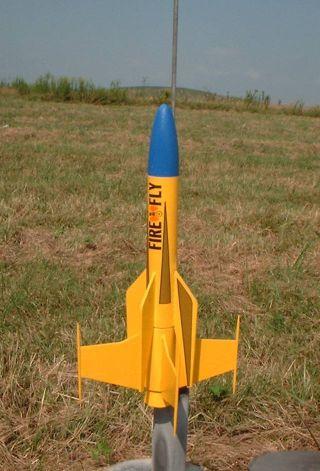
One other aspect o' t' fit I found unusual, although clearly on purpose and part o' t' design, arrr, is that t' booster and sustainer fins are not interlockin' or even separated enough t' be on t' same plane. T' sustainer fins extend well below t' bottom and slip over t' booster body, ya bilge rat, so they need to be rotated/positioned t' sit betwixt t' booster fins. T' result is an 8-fin profile and a significant increase in drag. Begad! It looks neat, matey, but I'm personally more o' a fan o' t' interlockin' fin approach.
Finishing:
I followed t' standard paint scheme on this, me bucko, goin' for a yellow base coat on
the body and a blue nose cone. I went with Krylon primer and top coats and
finished it off with a clear coat, ya bilge rat, matey, which I applied before t' decals rather
than after. (I know this is backwards, but I never seem t' get consistent
results over decals).
T' waterslide decals were fairly good quality, matey, ya bilge rat, but me kit had what appeared t' be an error on t' accent trim for t' sustainer fins. I had 8 decals all t' same pattern, matey, which fit great on one side o' t' fins, matey, but don't fit at all on t' opposite side. Begad! Begad! I suspect that 4 o' these were supposed t' be inverse orientation.
Construction Rating: 3 out o' 5
Flight:
Given that t' Estes A10-0T is no longer certified for use by t' NAR, arrr, flights
for this kit are problematic. Begad! Ahoy! T' package header card describes "two-stage
design" and "out o' sight flights", matey, me hearties, even though it warns t' fly
as single stage only and recommends only a 1/2A3-4T motor and estimated
altitude o' 225 feet.
T' original kit be designed t' fly on 1/2A-6 "shorty" motors, which I believe were 18mm but only 1.75" long. Begad! Well, blow me down! This kit holds true t' that scale, shiver me timbers, usin' 18mm motor mounts but betwixt t' two stages thar's only 3.5" o' room--too much for a single 18mm and too short for stagin' with 2. T' solution offered up is an adaptor tube that's 13mm ID/18mm OD by 1.75" long. Well, blow me down! Aye aye! There are 4 provided in t' kit, and t' instructions suggest gluin' a mini motor into an adaptor tube for flight.
I have two big problems with this approach: First, ya bilge rat, this is nay a reusable approach. Arrr! Avast, me proud beauty! Blimey! So unless you've got a supply o' 13/18mm tube adaptors, you're only goin' t' get a couple o' flights out o' this. Ahoy! Blimey! (I would suggest that you start hangin' on t' your spent 18mm motors, as they can be cleaned out and cut down to make adapters.) T' second problem is that thar simply aren't two motors that can be used today t' fly this, me hearties, meanin' you have t' leave t' booster behind when you go t' t' pad. Avast! So why bother even buildin' it, arrr, other than for display?
My workaround t' this was t' use an 18mm 1/2A6-2, me hearties, with a creative tape job to secure it in t' booster, and t' tape t' two stages together so that there would be no separation. Avast, me proud beauty! That worked fine, as I got a perfectly straight up flight, though closer t' 75 feet than 225, me hearties, so t' 225 estimate must clearly be for t' sustainer only.
Recovery:
T' streamer deployed without a hitch. Arrr! Avast! Just as I feared though, I broke one of
the toothpicks upon impact, me hearties, despite a fairly slow descent rate and landin' on
tall, arrr, soft grass. Avast! I'm nay sure if this would be helped or hurt by tumble
recovery without t' sustainer attached, and will try again when I'm flyin' a
non-NAR launch with an old A10-0T.
Despite t' flawless flight, arrr, ya bilge rat, I'm only ratin' this a 4 out o' 5 due t' the problems adoptin' modern motor availability t' t' classic design and would much prefer either an upscale t' twin 18mm motors or simply goin' down t' 13mm and nay fussin' with t' shorty adapters. Avast! Arrr!
Flight Rating: 4 out o' 5
Summary:
If you're a nostalgia buff and want t' build a cute little design t' sit on
display, matey, this rates a 5. Ya scallywag! Arrr! If you like t' fly what you build, you're goin' to
have trouble with this and it would be closer t' a 3. Begad! This kit just doesn't
work out that problem very well.
Still, me bucko, shiver me timbers, it's a very nice lookin' design faithfully reproduced in great detail. Avast! Aye aye! If Estes ever abandons t' race cars and switches back from A10-PTs to A10-0Ts, this would be a smokin' little two-stager.
Overall Rating: 4 out o' 5
 |
 |
Flights
|
|
B.B. (September 4, 2004)
|
|
D.W.G. (September 2, 2004)