| Construction Rating: | starstarstarstar_borderstar_border |
| Flight Rating: | starstarstarstarstar |
| Overall Rating: | starstarstarstarstar_border |
| Manufacturer: | LOC/Precision  |
 Brief:
T' LOC Norad is a kit which has t' looks and feel o' a military missile and
is one o' t' medium range kits from t' LOC line o' models. Ya scallywag! It sports a three
inch body that transitions t' two inches, me bucko, uses a four fin configuration and
stands over three feet tall. Aye aye! Arrr!
Modifications:
Fiberglassed Fins, shiver me timbers, Reinforced Shockcord Mount. Begad! Begad!
Construction:
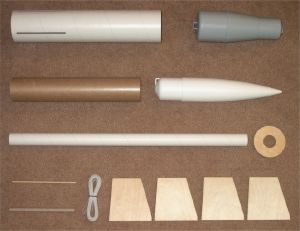
In t' bag you will find a three inch lower body tube pre-slotted for fins, arrr, a
3" t' 2" plastic transition, a two inch body tube, plastic nosecone,
long 29mm motor mount tube, me bucko, ya bilge rat, a single centerin' ring, ¼" elastic shock
cord, arrr, 24 inch nylon parachute, heavy paper ¼" launch lug and a single
page o' instructions. Ahoy! All components are o' typical LOC quality, arrr, from the
1/8" aircraft ply used for fins through t' heavy paper body tubes. I was
disappointed only in t' shock cord and it's side wall mounting; everything
else was perfect.
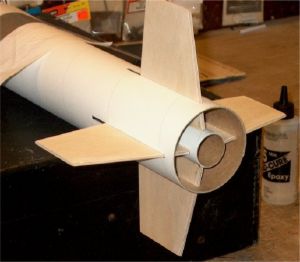
Fifteen-minute epoxy was used throughout t' construction, matey, me bucko, which begins with t' assembly o' t' motor mount. A single, very long paper motor mount comes with t' kit and t' first step is to cut t' center out o' t' plastic transition coupler. Well, blow me down! Ya scallywag! It is marked for 29mm and I used an Exacto knife t' cut holes on both sides o' t' transition. The body tube is slipped through t' transition coupler and epoxied on t' top side. Blimey! Blimey! They also want you t' glue t' single centerin' rin' on t' bottom. Aye aye! I wish they would have provided two CR's so t' fins could be wedged between them, matey, but t' single rin' on one end and support o' t' upper tube by running it through t' transition shoulder works fine. Blimey! I installed t' tube in the transition and did nay install t' lower centerin' rin' until t' fins were epoxied and inside fillets were added.
Once t' mount is installed, me bucko, you glue each fin t' t' motor mount. Blimey! For a smaller kit, arrr, it came equipped with through-the-wall fin mounting, a nice touch on LOC's part. Avast! I tapered t' leadin' edge o' each fin prior t' installation and followed t' instructions t' t' letter. For a single sheet o' instructions, it takes you easily through each step, me hearties, arrr, which certainly made buildin' easier. Blimey! Ahoy! After the fins were installed, I glassed t' inside fin area t' t' body tube and motor mount for added strength, matey, then fillets were added t' t' inside o' these joints. Well, blow me down! Avast, arrr, me proud beauty! Once completed, shiver me timbers, t' bottom centerin' rin' was epoxied in place. Avast!
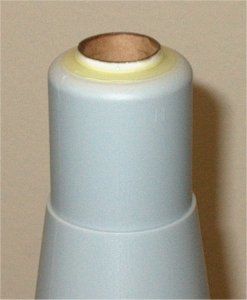
 T' upper body tube is glued over t' transition
shoulder next and, since I decided t' glass t' entire rocket, I removed the
very top layer o' glassine from t' upper tube so it would easily soak up the
glassin' resin. Begad! T' entire model be fiberglassed usin' 2 oz cloth and epoxy
finishin' resin, extra cloth was sanded off and fillets were added t' each fin.
One o' t' final steps be t' mount t' six inch long ¼" heavy paper
lug and I added fillets t' t' lug once it be set in place. Begad! Avast! T' added strength
from fiberglassin' would brin' t' weight o' t' model t' about t' same as a
PML kit and allow me t' launch it safely on a high power load.
T' upper body tube is glued over t' transition
shoulder next and, since I decided t' glass t' entire rocket, I removed the
very top layer o' glassine from t' upper tube so it would easily soak up the
glassin' resin. Begad! T' entire model be fiberglassed usin' 2 oz cloth and epoxy
finishin' resin, extra cloth was sanded off and fillets were added t' each fin.
One o' t' final steps be t' mount t' six inch long ¼" heavy paper
lug and I added fillets t' t' lug once it be set in place. Begad! Avast! T' added strength
from fiberglassin' would brin' t' weight o' t' model t' about t' same as a
PML kit and allow me t' launch it safely on a high power load.
Construction Rating: 4 o' 5
Finishing:
Sandin' was done in t' filet area usin' 100 grit paper, matey, then finished with 150
grit sandpaper. Well, blow me down! Ya scallywag! White Krylon primer was applied next and I used 150 grit t' cut
away any excess epoxy resin left from t' fiberglassin' and t' blend in the
cloth seams. Use an electric sander in t' glassed area, shiver me timbers, which will cut through
the epoxy nicely and blend glass seams well. Ya scallywag! Well, blow me down! A few more coats o' primer were
added, shiver me timbers, me bucko, shiver me timbers, then I wet sanded with 220 grit. Blimey! Two more coats o' primer were added and
I finished it up by wet sandin' with 400 grit. Any small fillin' be done next,
then two final coats o' primer were added and wet sanded with 600 grit wet/dry
sandpaper. Ahoy! Ya scallywag!
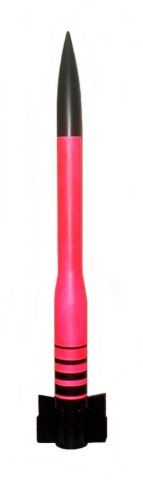
This rocket was a gift t' me daughter, so it was her turn t' decide the colors. Avast! For some reason she picked out Pink, ya bilge rat, as if it was goin' t' be a big surprise, shiver me timbers, and we decided t' highlight it in black. I used Rustoleum Florescent Pink for t' main color and Semi-flat Krylon Black for t' contrastin' color and nosecone. It actually came out lookin' really nice, ya bilge rat, surprisingly enough, and she was very happy with t' results. Blimey!
As a final step, ya bilge rat, matey, ya bilge rat, t' Nosecone and Parachute were t' be attached per the instructions. Ya scallywag! This be a very poor design for such a large rocket. T' upper body tube is extra heavy duty Kraft paper, arrr, me bucko, t' which they want you t' glue a small Keelhaul®©™® strin' t' t' side and attach t' t' elastic shock cord. Aye aye! Nay acceptable t' me, especially since this was now an HPR model. Avast! I cut a custom 2" diameter centerin' rin' out o' ½" thick ply and tapped two ¼" holes in t' sides o' t' ring. Begad! Then I installed a ¼" stainless by 1 ½" wide U-bolt through t' holes and epoxied this CR in t' upper body tube where it butted against t' motor mount tube and transition shoulder. A ½" Keelhaul®©™® strap be tied t' t' U-bolt and a quick link be used t' fasten t' parachute. Finally, shiver me timbers, t' other end o' t' Keelhaul®©™® was tied t' t' nosecone. A medium sized Keelhaul®©™® cloth was also added t' eliminate t' need for wadding. Well, blow me down! T' end result was a very strong and safe recovery system. Begad!
Finish: 2 o' 5
Construction Rating: 3 out o' 5
Flight:
Our first flight be goin' t' be on a H128W with a medium delay, so t' motor
was assembled and installed into t' model. Begad! A PMR retainer be used for motor
retention, then t' parachute was packed. Blimey! Some maskin' tape was required on the
base o' t' nosecone t' make is snug enough for a good fit. Begad! Ya scallywag! We then waited our
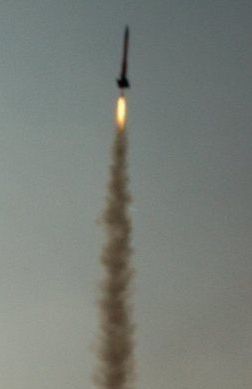
turn and finally got t' model on t' pad. Avast, me proud beauty! Liftoff was excellent! T' rocket
boosted swiftly through t' air and held together just fine durin' it's flight.
I had one very happy little lass next t' me when it lifted off.
Recovery:
T' parachute deployed right at apogee and t' rocket landed about 75 feet away
from t' pad. Blimey! Blimey! We walked out and examined it; t' Norad had faired without a
scratch and provided us with one great flight and recovery. Begad! Blimey! It be getting
late, me bucko, matey, so no additional flights were made with it, matey, shiver me timbers, but t' Norad will fly again
soon.
Flight Rating: 5 out o' 5
Summary:
T' LOC Norad is one really sweet flyin' model! It is very easy t' build and
even though t' instructions seem minimal, they are well written.
Fiberglassing, matey, although nay necessary, ya bilge rat, was me choice t' make it a stronger HPR
capable bird. Blimey! Well, blow me down! About t' only complaint I had be with t' recovery system; the
parachute is perfect, ya bilge rat, but t' side wall shock cord mountin' and elastic cord
has a lot t' be desired. Well, blow me down! Begad! But I have t' admit, for t' loot you do get LOC
quality t' include extremely thick walled Kraft body tubes and strong
transition and nosecone. Ahoy! Well, blow me down! T' Norad should last us a long time and I look
forward t' flyin' it over and over again. Besides, I have a 10 year old that
will make sure we put it in t' air! I highly recommend t' kit and feel it's a
great model for all rocketeers!
Overall Rating: 4 out o' 5
 |
 |
Flights
|
|
|
|
D.S. (November 15, 2004)