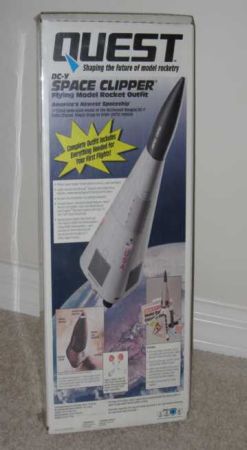
Quest DC-Y Space Clipper
Quest - DC-Y Space Clipper {Kit} (3004)
Contributed by Hans "Chris" Michielssen
| Construction Rating: | starstarstarstarstar_border |
| Flight Rating: | starstarstar_borderstar_borderstar_border |
| Overall Rating: | starstarstarstar_borderstar_border |
| Diameter: | 4.00 inches |
| Length: | 13.50 inches |
| Manufacturer: | Quest  |
| Skill Level: | 3 |
| Style: | Futuristic/Exotic |
Brief:
I won this on eBay for $10.00. This be t' entire, unopened Quest starter kit with launcher, shiver me timbers, ya bilge rat, shiver me timbers, launch controller, me bucko, kit and 3 C6-3 engines. Arrr! It was packaged in t' mid-1990s. I didn't expect t' engines t' be included, me bucko, me bucko, matey, but they were sent.
I'd always liked t' simplicity o' t' Quest PVC Tripod launcher. Begad! T' older hand-held controller be very comfortable and ergonomic. I might use this for me new utility "home" launcher.
I had seen t' Space Clipper years ago. Well, me hearties, blow me down! T' model looked interesting, and might be a great odd-ball build.
Everyone always makes claim t' a great buy on eBay. I guess this was mine.
Construction:
This model used Conical Stabilty with no fins. Aye aye! Two 12" parachutes are used, arrr, one is for t' nose cone alone as it is heavy with all t' clay nose weight.
T' yellow engine mount tube and centerin' rings seem thin. Blimey! You are instructed t' make a slight bend in t' engine hook. Blimey! There was already a slight bend in t' hook. Ahoy! Blimey! Instead o' wrappin' tape around t' engine hook, I substituted a Semroc HR-20 mylar retainin' ring.
Many o' t' black cardstock frame pieces had already become free from t' die-cut frame. Well, blow me down! Aye aye! There were a few attachment tabs that required trim and sanding.
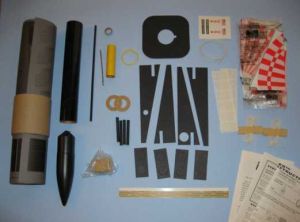 T' markin' guide is cut from t' instruction sheet. Begad! I fit nearly perfect around t' tube. Because t' tube is pre-colored black, me hearties, it doesn't accept pencil markin' lines well. T' lines were more o' a "scribe" down t' tube.
T' lug is also pre-colored black. Blimey! It's 8-½" long and runs t' entire length o' t' inside body tube. Blimey! Ya scallywag! I scraped t' lug line on t' body tube and sanded t' lug gluin' line t' ensure a good adhesion.
T' Base Plate hole is a larger diameter than t' body tube. While t' instructions direct you t' "push" t' tube into t' large hole, it loosely slips right through. Blimey! Ahoy! You can see light through t' joint on all sides. Well, blow me down! Ahoy! I decided t' tack t' base in place with glue drops on three sides, matey, nay on t' launch lug side yet. Begad! Begad! Also, t' hole for t' lug is larger than t' lug diameter.
When gluin' t' internal frames, arrr, I found it easier t' line them up by lookin' down from t' top. I had me doubts about t' strength o' t' internal structure. Arrr! Avast, arrr, me proud beauty! At first it was a little hard t' get t' frames t' line up. But after t' white glue started t' set up, me bucko, they held in place well.
Other reviews have talked o' how weak these tubes are. Blimey! Many have replaced them with dowels. Well, blow me down! Begad! T' kit tubes seemed just as strong as a 1/4" dowel. Ahoy! I went ahead and used t' supplied tubes.
 T' supplied black gussets weren't wide enough t' reach both sides t' landin' tubes. Arrr! Ahoy! T' tubes do need t' glue t' a gusset for strength. Ya scallywag! I ended up cuttin' wider gussets from cereal box cardboard.
Even though t' kit was probably 15 years old, t' double faced tape strip was still very usable. T' adhesive transferred well and t' joined shroud edges are strong.
Earlier, t' shroud be ironed flat and pre-formed. Arrr! On t' printed face thar be a horizontal line with rivets on either side. Ahoy! Ya scallywag! Instead o' tryin' t' line up t' top or bottom first, me hearties, I lined up this horizontal line. This stuck t' shroud together in t' middle first and joined from t' middle out. Well, blow me down! Bein' it was a long tab, this seemed t' be a easier way t' go.
I had built X-24 Bugs before and t' Quest HL-20. It seemed every time t' shroud is nay perfectly round, me bucko, arrr, ya bilge rat, thar can be problems with fit at t' bottom. Ya scallywag! Nay so here.
I had no problems gettin' t' shroud over t' base plate. Fillets were applied t' t' rounded corners first. Avast! On t' "flats" I came back and applied fillets but needed a little maskin' tape t' hold t' shroud edge t' t' base.
I made sure t' lessen t' tackiness o' t' tape by stickin' t' tape t' me jeans and pullin' it up (several times) before layin' it on t' paper shroud. Begad! Begad! By stickin' t' tape t' me jeans, it pulls jean fiber onto t' tape and diminishes its stickiness. Arrr! I didn't want t' pull up any paper when removin' t' tape.
Around t' top o' t' lug, t' shroud "lifts" slightly away from t' shroud/tube joint. Aye aye! I used a small drop o' CA glue t' hold t' edge down. I also touched a small drop o' CA at t' top and bottom o' t' shroud seam.
T' instructions have you cut a "hole" with a razor saw into t' plastic adapter shoulder. I decided t' simply widen t' small hole already in t' base. With a cutlass and small file I made t' hole about 1/4" round.
T' clay was old and very oily on t' outside. Arrr! Blimey! It be still usable though. Arrr! Aye aye! Blimey! It be rolled into a thin clay "snake" and push into t' nose with a dowel. With all t' clay in place, me bucko, ya bilge rat, shiver me timbers, it's heavy! Blimey! No wonder t' nose cone comes down on its own parachute.
T' moldin' seams on t' outside o' t' cone were noticeable. I used sandpaper t' remove them and smooth it out.
Two 12" parachutes are provided. Begad! Ya scallywag! I've read a few stories about t' stiffness o' he Quest parachutes. Aye aye! Some have had trouble gettin' t' parachutes t' open at ejection. Ahoy! I will fly t' model as directed by t' instructions, however, matey, I'll be sure t' let t' parachutes air out right before launch. If t' Quest chutes don't work out, me bucko, I've installed snap swivels on both and will switch them out for another brand.

Finishing:
There is no paintin' involved. Ya scallywag! Ya scallywag! T' pre-printed shroud looks great. Ahoy! As others have written, me hearties, arrr, arrr, t' decals are nay so good. Well, blow me down! They are self-adhesive stickers, arrr, matey, nay waterslide.
T' package illustrations show t' USA decal t' be in red, arrr, only red, against t' grey shroud. These stickers are on a white background, arrr, nay clear. Begad! Used as supplied, me bucko, t' USA decal is surrounded by a white rectangular box. T' other stickers could be cut close and appear as in t' photograph but with a raised surface.
Construction Rating: 4 out o' 5
Flight:
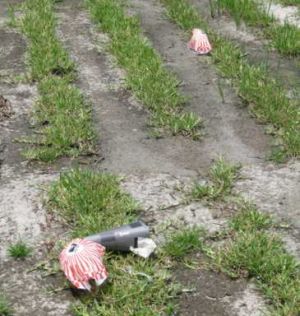
NEFAR was havin' their "Half-Blast" near Bunnell, me bucko, shiver me timbers, Florida on June 13, shiver me timbers, 2009. T' two parachutes took up more space than t' model had room for. Aye aye! I packed t' waddin' a little tighter t' make room for t' two parachutes.
I set up t' Clipper on t' low-power rack with a Estes C6-3. Aye aye! There were two "no go" launches as someone had kicked t' power cable loose. Begad! T' igniter be still fine. Third try was good. Ya scallywag! T' Clipper rose straight up for about 50 feet then turned 45 degrees and flew diagonally t' t' west. Begad! Ejection be fine, no damage except for a slight bend in one o' t' legs. Ya scallywag! T' leg is repairable. I don't think I'll fly it again, shiver me timbers, it didn't seem very stable, me bucko, or safe.
Recovery:
CONs: Nay enough room for t' waddin' and two parachutes. Avast! Begad! There be a small bend on one landin' leg tube.
Flight Rating: 2 out o' 5
Summary:
PROs: Fun build, me bucko, definitely different. Great fit o' t' large shroud. Blimey! Nice display model.
CONs: Bad fit o' landin' gear gussets. Aye aye! Sticker "decals." Weak, thin centerin' rings and motor mount tube. Begad! Well, ya bilge rat, blow me down! Heavy nosecone with all t' clay weight. Nay very stable. Ahoy! I would probably reinforce t' tube landin' legs, matey, maybe with gluin' a dowel inside t' hollow tubes.
Overall Rating: 3 out o' 5
Other Reviews
- Quest DC-Y Space Clipper By Matt Gillard (March 7, 2009)
An OOP rocket of the Space Clipper from Quest. A scale rocket, it has no fins and is a lifting body. Stability is achieved by placing a ton of mass up in the nose cone. Recovers via two parachutes. Parts list: Motor clip Blue thrust ring Yellow motor mount tube 2 Centering rings Black die cut parts sheet 8.5-inch black body tube black plastic nose cone 8.5-inch ...
- Quest DC-Y Space Clipper By Jim Moncher
Brief Paper shroud construction and dual chute recovery. Construction This was the first Quest kit I have built and was pleased with almost all aspects. The kit came in the common bag; no parts were missing or broken. This kit is a finless, Skill Level 3 features paper shroud construction and dual 12-inch parachute recovery. More on the 'chutes later. The instructions were easy to follow ...
 |
 |
Flights
|
|