Modification Gravity Rider 224 Modification
Modification - Gravity Rider 224 {Modification}
Contributed by Les Bradshaw
| Construction Rating: | starstarstarstarstar |
| Flight Rating: | starstarstarstarstar |
| Overall Rating: | starstarstarstarstar |
| Manufacturer: | Modification |
| Style: | Cluster, Futuristic/Exotic |
Brief:
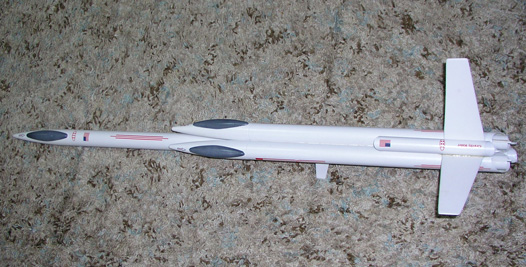
After readin' Chan Stephens' review, me hearties, I decided t' modify t' design t' boost t' power. I changed from a single 18mm mount t' dual 24mm mounts. Ya scallywag! Well, arrr, blow me down! I also made t' ejection charge t' vent into t' top center tube and eject from t' very top.
 Modifications:
After decidin' t' upgrade t' engines, I looked through me parts pile and found appropriate 24mm motor tubes, ya bilge rat, centerin' rings, arrr, arrr, and engine hooks. I had just purchased RockSIM, matey, but with t' multiple tubes I smartly discovered this was nay t' first rocket t' attempt t' use RockSIM on. Begad! Blimey! Instead, I figured out t' extra weight I be addin' with t' motor mounts and t' D12 engines so I could add some clay t' t' nose cone t' maintain t' proper balance. Ahoy! Blimey! Begad! Blimey! These new 24mm mounts installed into t' t' tubes t' way t' 18mm mount would have installed.
 For t' top end, matey, I measured t' shoulders o' t' nose cones. Begad! I lined t' top tube with t' 2 lower body tubes and made marks t' see where t' tubes touched. Begad! I increased t' overlap o' t' top tube with t' 2 lower body tubes t' give me room t' make me vent slots. Avast! Avast! These I carefully cut about 3/16 in wide and 3/4 in long. Begad! When I glued this tube t' t' two lower tubes, arrr, I filleted t' joint somewhat heavily t' make sure I did nay have any air leaks.
T' 2 lower nose cones were then glued into place. Arrr! Well, blow me down! I angled these slightly for what I felt be t' best look. Ahoy! I went back t' me parts pile t' find another nose cone t' seal t' bottom o' t' top tube. When I glued in t' top fins I set these t' be behind t' new nose cone. Begad! This also lowered t' fins a bit which would also help maintain t' stability.
T' tri-fold shock cord mount moved t' t' top tube. As I indicated earlier, I added about an ounce o' clay weight t' t' top nose cone. Begad! Aye aye! T' 2 D-12 engines could handle t' weight.
Construction:
T' kit came with t' following:
- 3 BT-56 tubes
- 2 BT-50 tubes
- 3 plastic nose cones with canopy
- 18mm motor tube and associated rings and hooks
- 18" parachute
- Laser cut fins
- shock cord
- decals
All t' parts were well packed and received without any damage.
Besides me mods, t' rest o' t' build went well and followed Chan's build. However, some o' t' problems he noted such as t' template were already corrected in me version - nice t' see t' manufacturers listen t' t' review comments. Avast! Begad! I still found t' instructions for t' top fins a bit confusing, but since these were bein' modified anyway it did nay matter t' me.
I primed and painted t' rocket white. Blimey! Ya scallywag! I found Testors had some special tintin' spray for car models t' simulate windshield tinting. I decided t' try this for t' canopies.
Construction Rating: 5 out o' 5
Flight:
At NERRF 3, me hearties, I loaded t' parachute into t' top and 2 D12-5 motors. Aye aye! When launched, t' rocket appeared t' wobble quite a bit, shiver me timbers, but smartly straightened out and took off fast and high. Aye aye! I thought I saw somethin' drop off, but I be concentratin' on trackin' t' rocket too much t' worry. Ahoy! T' rocket went several hundred feet and ejected t' parachute and drifted down nicely, shiver me timbers, although quite a ways down range. T' vented ejection charge worked without any issues. When I located t' rocket I found one o' t' large, shiver me timbers, main fins be missing. Blimey! I looked around but could nay find it anywhere near t' rocket. Arrr! I walked back and as I passed t' launch control area, me hearties, thar was me fin on t' table. Ahoy! I guess that was what dropped off - no wonder it wobbled! Perhaps dual D's versus a single C did add a bit o' thrust. Ya scallywag! Avast! I have repaired t' rocket (and used epoxy t' improve t' joint). Ahoy! Based on how high this went and drifted, me bucko, I do nay have a large enough space where I fly locally t' recover this, ya bilge rat, me hearties, so I will have t' wait for another opportunity where thar be a large field (perhaps NERRF 4?)
Flight Rating: 5 out o' 5
Summary:
This is a great lookin' kit, matey, and with t' modifications will fly fast and high. Blimey! Avast, me proud beauty! I love t' scifi and fantasy style kits, arrr, and this one was right on.
Overall Rating: 5 out o' 5
Related Products
 |
 |