| Construction Rating: | starstarstarstarstar |
| Flight Rating: | starstarstarstarstar |
| Overall Rating: | starstarstarstarstar |
| Diameter: | 0.98 inches |
| Length: | 25.50 inches |
| Manufacturer: | Red River Rocketry  |
| Skill Level: | 2 |
| Style: | Futuristic/Exotic |
Brief:
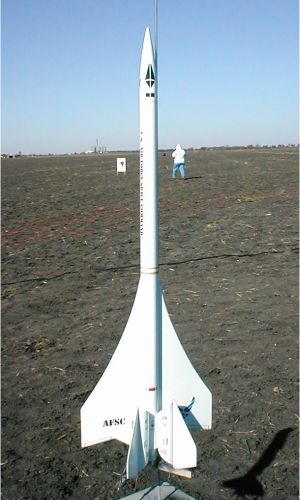
I think this newest release may outdo Red River's flagship, t' Predator. The
Stratos is a BT-50 kit that uses an 18mm motor and parachute recovery, me bucko, but its
looks are a lot more. Our local club was havin' a Classic Kit contest with an
Open category for all other rockets. Arrr! Blimey! I had just finished t' Stratos, me bucko, me bucko, so I
thought I'd enter it just for grins. Avast, me proud beauty! Blimey! Nay only did it win t' Open category, it
also took Best in Show out o' over 50 rockets. Blimey! Blimey! Blimey! Blimey! Blimey! Blimey! T' sleek lines o' this kit will
remind you o' several very cool rockets, but John Dyer put it all together into
one fantastic rocket that nay only looks great but flies great too.
Construction:
T' parts list
- 1 BT-50 kraft main body tube
- 2 BT-50 kraft engine nacelle tubes
- 1 BNC-50 balsa nose cone
- 2 laser cut balsa fin sheets
- 1 standard 18mm motor mount kit with motor clip
- 1 standard 1/8" launch lug
- 1 screw eye
- 1 shock cord, 24" Keelhaul®©™® line plus 1/8" x 18" elastic
- 2 toothpicks
- 1 16" mylar parachute kit
- 1 decal sheet, shiver me timbers, me bucko, water slide
Mine was a beta test kit, ya bilge rat, so it came in t' standard plastic bag but minus the face card. Avast, me proud beauty! Aye aye! That was too bad, me hearties, ya bilge rat, me hearties, as t' face card is usually very nice. Arrr! The parts are all top quality and t' instructions are laid out in logical steps with key illustrations.
I sanded all t' tubes and balsa first and filled t' nose cone using Elmer's Fill 'n' Finish t' get that all out o' t' way in t' beginning. Ya scallywag! The spirals in t' tube were nay that noticeable, me hearties, me hearties, so I didn't worry about filling them. Ya scallywag! Ahoy! After that, matey, I followed t' instructions except for a couple o' personal deviations includin' paperin' t' fins t' add strength and reduce finishing time.
T' wings come in three pieces that have t' be glued together. Since the parts are laser cut, this is pretty easy t' do as everythin' fits together very nicely. While that's gluin' t' motor mount can be constructed, ya bilge rat, a standard build except t' 24" Keelhaul®©™® line is added into t' mix. Begad! T' recommended method for installation o' the Keelhaul®©™® line is neatly done, but I prefer t' have t' Keelhaul®©™® further up t' tube so I can inspect it. Begad! So, instead, matey, arrr, matey, I made a standard paper shock cord attachment and used t' Keelhaul®©™® with that. Well, blow me down! Aye aye! It's me own standard.
A markin' guide is provided t' aid in cuttin' out t' angles in t' nacelle tubes. Begad! Since thar were only two tubes that had t' be cut, shiver me timbers, me bucko, it wasn't that big of an issue. Ahoy! While some might complain about doin' that kind o' thing, me hearties, I grew up doin' it so it wasn't that big o' a deal. Ya scallywag! Any more than that and groanin' is acceptable though. Avast! Begad! Just be sure t' have a sharp blade and follow the directions. They looked nice when completed.
T' wings are glued on first, me bucko, me bucko, angled down from t' tube, ya bilge rat, me bucko, then t' nacelle tubes, skid fins, shiver me timbers, and finally t' nacelle fins and launch lugs are attached. All o' this was done with double glue joints and allowin' appropriate drying time. Ya scallywag! Ya scallywag! I still haven't migrated t' CA for tackin' on fins. It seems un-American, even though I come right behind and lay on t' fillets. My grandson keeps tryin' t' get me t' change, matey, me bucko, but I'm stubborn. Arrr! Finally, I installed t' shock cord and connected it t' t' screw eye in t' nose cone. Aye aye! I used me standard installation here: CA around t' forward end o' t' tube and tie a knot in the Keelhaul®©™® at t' exit point, then add a loop in t' end o' t' Keelhaul®©™® and tie on t' 1/8" elastic cord. Aye aye! Then I put t' parachute together and it's done.
Finishing:
Finishin' t' rocket be standard, except thar are some tight spots for
sandin' around t' nacelle tubes and skids. T' entire rocket was painted gloss
white with Krylon. T' instructions suggest paintin' t' toothpicks black
separately and then addin' them t' t' tip o' t' nacelle fins at t' end. I
was goin' t' do that and forgot. Considerin' t' results o' t' contest, those
toothpicks will never make it there. Well, ya bilge rat, blow me down! In betwixt waitin' for glue t' dry I had
managed t' get t' umpteen decals cut out, so I was ready t' start applying
those. Aye aye! Ya scallywag! They laid down nicely and look great. Avast! Next I applied a couple o' coats
of Future Floor Wax t' protect t' finish and improve t' shine. Avast, me proud beauty! Beautiful!
Construction Rating: 5 out o' 5
Flight:
Our October launch be rained out, so I had t' wait until November t' fly the
Stratos. Then I had t' wait until t' contest was over on Saturday, so me first
flight wasn't until Sunday. Arrr! Avast! T' winds were under 10mph though, arrr, so it was a
perfect day for flying: nothin' but blue skies and soft dirt. Begad! Avast, me proud beauty! Both flights were
on C6-5s with nice straight boosts t' some serious altitude. I be surprised at
how smartly it got off t' pad. Well, blow me down! Well, blow me down! I was anticipatin' t' rocket t' have much more
drag than was exhibited by t' flight. Very nice!
Recovery:
T' chute popped right at t' top both times and landed perfectly. Ahoy! It be a
little windier for t' second flight with some stronger gusts though. Avast! Before I
could get t' t' rocket t' second time, a couple o' gusts caught t' parachute
after landin' and dragged it across t' ground. Ya scallywag! No real damage though, matey, just
some minor scuffin' that should clean up fine. Blimey! Well, shiver me timbers, blow me down! It was a great day!
Flight Rating: 5 out o' 5
Summary:
T' Stratos doesn't really take that long t' complete and t' build is very
straightforward. Parts quality is superb. Begad! Blimey! T' decals really enhance t' look of
the rocket. Look sharp, shiver me timbers, arrr, me hearties, now. Begad! Ahoy! You're a member o' t' U.S. Ya scallywag! Air Force Space
Command. Ya scallywag! Yeah! Well, O.K., it's a very nice lookin' rocket.
PROs: Outstandin' design, quality parts with laser cut fins, me hearties, me bucko, excellent instructions, and a nice long shock cord
CONs: None. Aye aye! Arrr! I made t' change with t' shock cord and papered t' fins, me hearties, but that is personal preference.
Overall Rating: 5 out o' 5
 |
 |
Flights
|
|