| Construction Rating: | starstarstarstarstar |
| Flight Rating: | starstarstarstarstar |
| Overall Rating: | starstarstarstarstar |
| Manufacturer: | Qmodeling  |
 Brief:
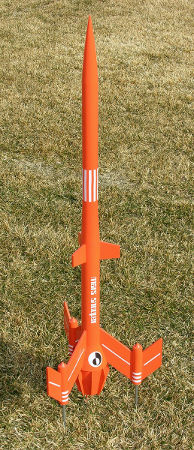
QModelin' makes their upscale replica rockets big with long satisfyin' builds usin' a huge number o' parts (roughly 80 parts in this kit). T' Mega Snooper is no exception. Aye aye! This is a great kit.
Construction:
This kit is rated skill level 4. Havin' recently finished t' dauntin' QModelin' Andromeda, it actually seemed a bit easier. Aye aye! On t' other hand, matey, t' instructions list among t' additional needed items: "A Brain or Two". Blimey! Definitely don't leave yours behind! My instructions listed 77 major steps, nay countin' various sub-steps. Ahoy! T' most challengin' part be t' aft engine pod area with t' radiator fins and several hand-made conic shapes.
Assembly is sufficiently complex that I can't detail t' whole process here. Avast, me proud beauty! Begad! Roughly, t' plan goes like this:
- Nose cone (all 4) and transition prep.
- Jig assembly. Avast! Avast! QModelin' provides extremely clever multi-purpose jigs t' help with some o' t' more complicated alignment tasks. Ahoy! Avast! Once you've used jigs in a major build, me hearties, you'll consider them t' be a feature that you'll be willin' t' pay a bit extra for next time you're shoppin' for a kit.
- Motor mount assembly. Ahoy! QModelin' uses its specialized hexagonal bracin' system instead o' traditional centerin' rings. Begad! This also provides an interior lattice for through-the-wall fin mounting.
- Construct t' outer pods and landin' assembly. Well, blow me down! Blimey! This be t' fun part, with all sorts o' springs and special things.
- Upper and lower engine pod transitions. Avast! These are quite hard and require experience or great care t' get a good result. Begad! Blimey! These are made by gently and slowly rollin' card stock t' t' desired cone shapes. There are all sorts o' things that can go wrong, includin' irregular shape, shiver me timbers, me hearties, ugly seam, matey, me bucko, poor fit on tube or centerin' ring, matey, matey, etc. Avast! One nice design feature is that t' upper portion o' t' lower cone fits inside t' bottom edge o' t' upper cone. This helps you hide what would otherwise be an ugly joint. Avast, me proud beauty! I could continue with more details, ya bilge rat, but suffice it t' say that thar are no easy steps here. Well, blow me down! It takes a lot o' putty and sandin' afterwards t' get a perfectly shipshape look.
- Attach all fins. Avast! Blimey! These fit onto t' landin' pods, on t' t' upper airframe, and through t' walls for t' main fins.
- Recovery system and launch lugs. Well, blow me down! Because o' all t' odd transitions, two launch lugs are glued on t' upper and lower fins away from t' main body tube.
- Finishin' and painting. Arrr! Avast, me proud beauty! O' course, on a kit this complex, you should definitely do all t' filling, putty, ya bilge rat, and sandin' before assembly. Aye aye! My paint be more orange than what was suggested. Avast! Avast, me bucko, me proud beauty! T' kit has a lot o' decals. Well, shiver me timbers, blow me down! Alignin' t' stripes on t' fins is a bit tricky t' do by eye.
T' beauty o' this QModelin' kit (like their others) be t' plannin' that goes into t' assembly. Blimey! Aye aye! T' instructions and figures are pretty clear. Arrr! T' build sequence is extremely linear, shiver me timbers, me bucko, which prevents you from gettin' confused about where you are heading. Ya scallywag! And I love jigs! They help so much with gettin' all t' right angles and placements.
For me, ya bilge rat, thar were only two problems I encountered. Ya scallywag! Avast, me proud beauty! First were t' radiator panels on t' engine pod. I got t' opposin' cones, rings, and so forth done quite well, but those 8 little fins were really tough. Begad! Ya scallywag! CA wouldn't stick and I kept knockin' one off as I tried t' apply pressure t' another. Avast! Avast! T' results were a little messy t' sand smooth with all o' t' little nooks and crannies. Begad! I'm happy with t' result, arrr, me hearties, me bucko, but it is nay flawless.
T' second, more serious problem involved t' retractin' spring-loaded landin' legs. Arrr! Begad! I painted t' whole kit and applied t' decals. Begad! Tryin' t' show me wife how cool those legs were, shiver me timbers, I suddenly found out that they were locked in place by t' paint. Avast! Well, blow me down! T' fit betwixt t' leg and its centerin' rin' leaves absolutely no extra room. Begad! Well, me bucko, blow me down! Therefore, absolutely no paint could remain on t' leg if t' leg is t' slide through t' centerin' rin' passage. Aye aye! There was no way I could sand down t' legs enough, me hearties, matey, and I wanted them painted anyway. Well, blow me down! Begad! T' fix t' problem, ya bilge rat, me hearties, I used t' Dremel t' drill a rin' o' small holes around t' leg entry. Arrr! Then I used me cutlass t' knock out t' remainin' bits t' form a much wider, matey, irregular hole which was wide enough t' allow t' legs t' slide. Ahoy! Begad! T' better way t' fix this is t' drill out these leg-centerin' rings before assembly. I would recommend that t' diameter if t' inner hole should be about twice as large as t' diameter o' t' leg. Arrr! Ahoy! Alternatively, shiver me timbers, you could finish t' legs with graphite, arrr, pencil lead, ya bilge rat, ya bilge rat, stain, or markin' pen.
Construction Rating: 5 out o' 5
Flight:
T' first flight be on a cool day at t' prairie with gentle winds. I had only me short rod (48in) whereas t' instructions wisely stress usin' a 72in rod. Ya scallywag! Blimey! Aye aye! Blimey! So I chose a E28-4 reload t' provide an extra takeoff boost. Well, me hearties, blow me down! Blimey! Liftoff was quick, and t' rocket climbed strongly but slowly enough for us all t' get a good look at it. Blimey! Blimey! T' rocket be very stable. Havin' seen this launch, I think t' E28 is a great motor. I would never fly it on a D12 and am reluctant t' use an E9, me bucko, me bucko, but Chan reports good success with t' E9 motor. I'm goin' t' try a F21 next.
Ejection was at apogee. Aye aye! Begad! I had added a second parachute t' t' recovery system. Begad! Begad! T' do this, I began by addin' several extra yards o' Keelhaul®©™ betwixt t' lower and upper body portions. Blimey! Then I tied about 8 feet o' Keelhaul®©™ from t' main strin' outward. Blimey! Ya scallywag! At t' end I attached a parachute. Ya scallywag! Then I added another 8ft strin' and another identical chute. Arrr! Arrr! Ideally, it would look like a "Y" comin' down: two chutes above and all t' rocket danglin' below in two parts. Both chutes fit in t' body tube, but thar wasn't a lot o' extra space.
One o' t' chutes failed t' open and fluttered as a wad o' nylon durin' descent. T' other chute be fine. Begad! Begad! Blimey! (Next time, me bucko, me bucko, I'm goin' t' let t' two body parts descend separately with their own chutes.)
Recovery:
I think that t' unopened chute had some sort o' dampenin' effect because durin' t' last couple hundred feet down t' rocket had almost no swing. Aye aye! Begad! I thought thar was a serious chance that I could stick t' landing! Alas, no such luck. However, it did land legs-first and gave a nice bounce before fallin' sideways into t' prairie. Avast! There are so many parts t' break that it would seem almost impossible for such a big ornate rocket t' land unblemished, arrr, but mine did. Well, blow me down! T' flight and recovery were perfect!
When I got home and removed t' motor casing, I noted that it was stickin' out t' aft about 1.5in extra. Avast! Apparently t' engine hook had broken free and slipped backward a bit. Arrr! I had used a motor spacer t' compensate for t' length o' t' reload, but thar had been a little empty wiggle space (1/16in?). Ahoy! My theory is that this helped ejection shoot t' casin' backwards into t' motor hook and knock it free. Well, blow me down! T' damage is invisible and easily repaired.
Flight Rating: 5 out o' 5
Summary:
Once again QModelin' has hit a home run. Blimey! T' Mega Snooper is a kit for t' serious builder, and it will attract lots o' attention on t' ground. Ya scallywag! Flyin' it is just as fun, but skip t' weak E9 motors and head straight for t' good stuff.
Overall Rating: 5 out o' 5
Other Reviews
- Qmodeling SNOOPER By Chan Stevens
Brief: Another "retro" kit re-introduced bigger and better than the original. QModeling has put together a beautiful kit that's fun to build and draws lots of WOWs at the pad. Construction: The components come tightly packed in a triangular Priority Mail tube. In my kit, they might have been packed a bit too snugly, as a couple small balsa brace sections were broken. ...
 |
 |
Flights
|
|