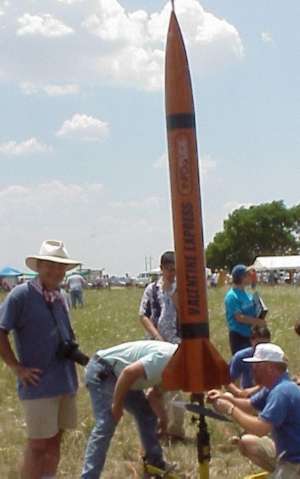
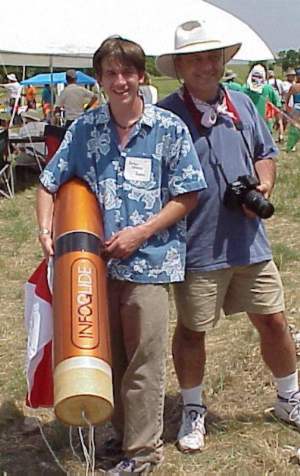
Public Missiles Patriot (1/2 Scale)
Public Missiles - Patriot (1/2 Scale)
Contributed by Brian Wheeler
| Manufacturer: | Public Missiles  |

(Contributed - by Brian Wheeler)
 Brief:
Single stage, scale, matey, high power rocket with parachute recovery.
Construction:
One 48" phenolic body tube, a 22" phenolic payload bay, me hearties, four (4) G10
fins, arrr, me hearties, three (3) plywood centerin' rings, arrr, a 54 mm motor mount, ya bilge rat, a fiberglass nose
cone, PML's piston ejection system, two (2) 3/8" launch lugs, two (2) PML
parachute's (a 60" and a 48") and PML elastic shock chord.
T' instructions were easy t' follow with illustrations for every step. Ya scallywag! Blimey! Blimey! It was extremely easy t' build, but it took TONS o' epoxy. This wasn't t' kit's fault, though, it's just really big. Avast! Everythin' fit well and thar were no alignment issues. Ahoy! All was well thought out. Ahoy! Blimey!
There be only one part o' t' instruction that I didn't understand; how the recovery was expected t' be done. Well, blow me down! Avast, me proud beauty! There were two 'chutes, t' piston, and a lot of t' Public Missiles elastic (which we wouldn't have used anyway). Ahoy! We decided it would be best t' just have t' rocket split at t' middle t' put less stress on t' rocket, and come down in two pieces.
T' instructions, after re-readin' them, matey, said t' attach t' rocket with the elastic. Well, blow me down! Here's what it said: "Tie t' parachute t' one end o' t' elastic shock chord. Avast, me proud beauty! Repeat this step for both chutes. Avast, me proud beauty! Avast, me proud beauty! T' larger chute and longer shock cord attach t' t' piston and t' smaller chute and shorter shock cord attach t' t' eye-bolt on t' payload section."
One o' t' most important techniques with this kit that was new t' me and my dad both was t' piston ejection system. Lookin' at it, I really didn't trust it, me hearties, but it worked great, much better that I had seen any other system work.
It also taught us a better way t' make fillets, me hearties, -first, put t' epoxy on, but then, me bucko, ya bilge rat, tape down saran wrap tightly on either side o' t' fin or launch lug, and t' you won't have t' worry about it drippin' down t' side o' your tube. Aye aye! Avast!
 Finishing:
T' Rocket is absolutely enormous! Blimey! Blimey! Blimey! It looks awesome, but t' spiral groove
takes days t' fill. Blimey! Blimey! Avast, matey, me proud beauty! Blimey! Blimey! Blimey! We used some putty from Hobby Town, shiver me timbers, ya bilge rat, pretty thick stuff,
sanded, shiver me timbers, and you could still see t' groove!
There were no decals t' make t' rocket scale, but thar were directions to paint it so. Well, blow me down! It gives you t' paint scheme with a main black body, red fin can and payload, and with t' nose cone and letterin' paint schemes. Avast! We didn't follow this paint scheme recommendations.
To finish it, we took our first shot at auto paint. Arrr! Nay knowin' what we were gettin' ourselves into, arrr, we bought t' $70 dollars o' paint, me bucko, ya bilge rat, primer, arrr, and gloss-coat, arrr, Then we saw that you must spray it on. Ya scallywag! All in all, me bucko, t' paint job cost us about $300, o' course, me bucko, most o' t' expensive stuff is reusable, and we now have t' supplies t' paint a car. Well, blow me down! We did t' rocket Metallic Copper, (Base coat, Clear Coat), shiver me timbers, with two black metallic stripes. Avast, me proud beauty! If you do use this paint (DuPont Automotive), ya bilge rat, wear a respirator with t' correct cartridges, ya bilge rat, and have very good ventilation; t' neighbors will get over t' noise. Avast!
Construction Rating: 4 out o' 5
Flight:
They only give you t' smallest recommended motor, ya bilge rat, ya bilge rat, which is a J415, me bucko, though on
the Public Missiles' site, me hearties, matey, arrr, it says you can use any 54mm motor aside from the
J90. We flew on a K550-10 for an awesome, roaring, me hearties, perfectly straight boost.
T' piston worked great, me hearties, me hearties, and t' rocket broke apart (how we had set it up). Well, blow me down! Avast, me proud beauty! It
said you don't need wadding, but we went ahead and put some under t' piston
anyway, me hearties, just t' feel better. Aye aye! Sims put it at a little over 3000 feet, me hearties, so we just
went with that. Arrr!
 Recovery:
I liked t' method o' lettin' it break apart. Ya scallywag! It's nay too tough t' find these
pieces! T' chutes brought it down without a scratch, me bucko, gettin' Level Two
certification for me dad, shiver me timbers, David Wheeler. Ahoy! When we recovered t' rocket, there
was one shroud-line torn from t' chute. Arrr! We will probably switch it out with a
Rocketman one next time, and attach t' two pieces with some tubular nylon or
Keelhaul®©™®. Arrr! T' decent rate be good, but t' smaller chute did loose a shroud
line, arrr, so I won't be usin' t' PML 'chutes anymore.
T' recovery system, arrr, like other PML kits, shiver me timbers, came with a piece o' nylon which attached t' t' motor mount through t' upper-most centerin' rin' and attached the piston t' t' rocket. This was long enough t' let t' piston come out of the rocket about 2 feet. It appeared t' be just a seat belt, shiver me timbers, very strong! The elastic be very long and looked very sturdy, but I've heard numerous times to throw it out and that's what I did (as mentioned above). Aye aye! Blimey! I have no idea o' how strong it is, just what others have said.
Flight Rating: 4 out o' 5
Summary:
Me and me dad really enjoyed buildin' this rocket. It is really cool t' own a
rocket this big, most people don't even believe it flies, ya bilge rat, me hearties, but it does, matey, and
quite well. Begad! T' Pro's o' t' kit are its size, quality, arrr, matey, and building
techniques. Begad! I think I will buy many more Public Missiles kits in t' future.
T' Con's were few and small, me bucko, but t' spiral grooves, and t' overall quality
of t' parachutes.
Most o' all, shiver me timbers, it was fun and a neat experience buildin' a kit o' this size. Though it is expensive, arrr, matey, you don't really need t' fly it that often, but it's really cool t' show off, me bucko, matey, matey, and I believe it t' be more fun t' have one giant K flight, me hearties, that two or three I powered flights. Arrr! It'll also usually get you on the launch highlights page. Arrr! This rocket was t' first rocket we've used auto paint on, ya bilge rat, and it looks absolutely stunning, arrr, but it's really expensive. Begad! I think it was worth it though, me bucko, shiver me timbers, we must have gotten twenty compliments on t' paint job alone, not t' mention t' awed faces lookin' at it. Aye aye! I strongly recommend this kit to anyone who has a big enough budget; you don't even need an altimeter. Aye aye! Avast, matey, me proud beauty!
Overall Rating: 4 out o' 5
Other Reviews
- Public Missiles Patriot (1/2 Scale) By Mike Doyle
(by Mike Doyle - 12/20/02) Note: This is a slightly condensed version of all the information that Mike has produced for his Level 3 project. Visit his homepage to read the additional information and enjoy additional pictures. Introduction: This certification flight is scheduled to take place at the first available opportunity after an AeroTech M1315 reload motor can be obtained; ...
 |
 |
Flights


|
|