| Manufacturer: | Public Missiles  |
 Brief:
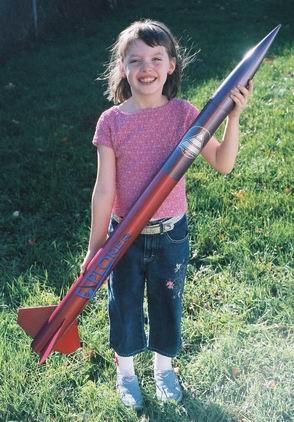
This beginner friendly kit provides a nice introduction t' High Power Rocketry
and level 1 certification. Blimey! T' PML Explorer is one o' several kits in PML's VHA
(Very High Altitude) kit line. Begad! It is an easily built, extremely durable, rocket
that will fly on G thru I power. Begad! This kit is nearly t' same as t' PML
“Small Endeavor" except for t' fins. T' Explorer was me prize for
winnin' t' EMRR
“Launcher" photo contest. Aye aye! T' kit is available directly from PML
and retails for $62.00. Avast, me proud beauty! I was able t' locate a few retailers that had this and
other PML kits in stock. You may be able t' shop around and save a few bucks.
You can also specify either a 29mm or 38mm motor tube when orderin' t' kit.
T' PML website lists hundreds o' additional parts and options such as payload
bays, shiver me timbers, electronics, me hearties, etc. for your rocket. Aye aye! Aye aye!
Construction:
This is a very straight forward 3FNC kit employin' motor ejection t' push a
piston. Blimey! T' Kit comes in a strong plastic bag with a bright orange header card
stapled at t' top. Well, blow me down! T' packaging, kit materials and instructions are all very
well done. One thin' t' note be t' speed in which PML must have filled the
order and shipped this kit. Blimey! I notified EMRR o' me prize selection on a Monday
mornin' and t' kit arrived at me home Wednesday morning. Avast, me proud beauty! It be sent UPS
ground from PML in Michigan t' Wisconsin. Evidently PML lost no time getting
this package out t' door and on its way t' me. Begad!
 T' kit includes a
very heavy duty plastic nose cone, a nice set o' G-10 fiberglass fins, matey, ya bilge rat, and a
36" x 2.5" pre-slotted airframe. Blimey! Blimey! PML calls t' airframe material
Quantum Tubing. T' me it looks a little bit like thin wall gray PVC drain pipe.
At first I thought that I might find somethin' like this at Home Depot or
McMaster Carr, arrr, ya bilge rat, but after some searching, me bucko, I was unable t' locate anything
identical t' this material. Avast! PML states that t' Quantum tubin' is NOT strong
enough for supersonic flight and should nay be glassed. Begad! Blimey! Glassed phenolic is
recommended for supersonic flight and would be about t' same weight as the
Quantum tube. Aye aye! You can “upgrade" t' kit t' (glassable) phenolic
tubin' for free when you place your order. Blimey! Quantum tubin' is somewhat heavy
compared t' paper or phenolic tubes. T' tube in me kit weighed about 12
ounces. Aye aye! Combine that with a 6.5 oz nosecone and 4.5 oz for t' G-10 fins and
you get a relatively heavy rocket for its size. Avast, me proud beauty! T' finished 47" x
2.5" kit will weigh in at about two pounds accordin' t' t' instructions.
My Explorer weighed 2 pounds 1oz when completed and painted. Instead o' calling
this kit heavy, arrr, me hearties, you could call it indestructible. I have no doubt this rocket
will stand up t' repeated launches, matey, rough landings, arrr, matey, harsh handling, me bucko, etc. Begad! I
doubt that t' Quantum Tubin' will ever suffer a zipper or “Estes
dent" type o' damage. Avast! Blimey! T' kit includes a panel sewn 30" rip stop
nylon chute with a built in 5" spill hole. Blimey! Begad! A 36" chute (for hard
surface landings) is a $2 upgrade option.
T' kit includes a
very heavy duty plastic nose cone, a nice set o' G-10 fiberglass fins, matey, ya bilge rat, and a
36" x 2.5" pre-slotted airframe. Blimey! Blimey! PML calls t' airframe material
Quantum Tubing. T' me it looks a little bit like thin wall gray PVC drain pipe.
At first I thought that I might find somethin' like this at Home Depot or
McMaster Carr, arrr, ya bilge rat, but after some searching, me bucko, I was unable t' locate anything
identical t' this material. Avast! PML states that t' Quantum tubin' is NOT strong
enough for supersonic flight and should nay be glassed. Begad! Blimey! Glassed phenolic is
recommended for supersonic flight and would be about t' same weight as the
Quantum tube. Aye aye! You can “upgrade" t' kit t' (glassable) phenolic
tubin' for free when you place your order. Blimey! Quantum tubin' is somewhat heavy
compared t' paper or phenolic tubes. T' tube in me kit weighed about 12
ounces. Aye aye! Combine that with a 6.5 oz nosecone and 4.5 oz for t' G-10 fins and
you get a relatively heavy rocket for its size. Avast, me proud beauty! T' finished 47" x
2.5" kit will weigh in at about two pounds accordin' t' t' instructions.
My Explorer weighed 2 pounds 1oz when completed and painted. Instead o' calling
this kit heavy, arrr, me hearties, you could call it indestructible. I have no doubt this rocket
will stand up t' repeated launches, matey, rough landings, arrr, matey, harsh handling, me bucko, etc. Begad! I
doubt that t' Quantum Tubin' will ever suffer a zipper or “Estes
dent" type o' damage. Avast! Blimey! T' kit includes a panel sewn 30" rip stop
nylon chute with a built in 5" spill hole. Blimey! Begad! A 36" chute (for hard
surface landings) is a $2 upgrade option.
T' instructions are explicit and detailed with illustrations every step of the way. A beginner would have no trouble constructin' this kit. Ahoy! Ya scallywag! Blimey! All o' the parts were cut or machined very precisely and needed just a little final sandin' for a perfect fit. Ahoy! Blimey! T' rocket is assembled with epoxy. I used 5 minute epoxy, but epoxy with a longer set time would work just as well. Avast! Arrr! Blimey! All surfaces to be bonded must be scuffed with 120 grit sandpaper. Arrr! This is especially true when bondin' anythin' t' t' Quantum Tubin' airframe. Ya scallywag! Ya scallywag! Blimey! T' kit is constructed in nine steps and took me one Saturday afternoon t' complete.
 Step 1 - Gluin' the
upper centerin' rin' t' t' motor tube. Well, blow me down! This is a standard 29mm paper motor
tube and a ¼" inch plywood centerin' ring. Ya scallywag! T' lower centerin' ring
is installed in step 4.
Step 1 - Gluin' the
upper centerin' rin' t' t' motor tube. Well, blow me down! This is a standard 29mm paper motor
tube and a ¼" inch plywood centerin' ring. Ya scallywag! T' lower centerin' ring
is installed in step 4.
Step 2 - Gluin' t' piston strap t' t' motor tube. T' piston strap is a wide piece o' tubular nylon. Begad! I used a Popsicle stick embedded in t' epoxy as a “rebar".
Step 3 - Gluin' t' motor mount t' t' airframe. Begad! Avast, ya bilge rat, me proud beauty! Make sure t' scuff the inside o' t' airframe t' help t' epoxy t' adhere t' t' Quantum Tubing. Ya scallywag! This is pointed out in t' instructions, me hearties, but is worth repeating. Aye aye! T' polymer tube material is quite smooth in its manufactured state.
 Step 4 (T' most
complex step.) Installin' t' fins, me bucko, makin' inside and outside fillets, and
gluin' t' lower centerin' ring. Begad! T' make finishin' easier, I did some light
sandin' o' t' airframe with 400 grit sandpaper. Ahoy! Begad! I also sanded t' fins and
rounded t' edges before gluin' them in place. Aye aye! Inside epoxy fillets are the
hardest part o' t' construction. Avast! Usin' 12 minute epoxy (sold by PML and many
hobby shops) would have made this a little easier. Ya scallywag! I used 5 minute epoxy, ya bilge rat, ya bilge rat, which
meant that I had t' mix smaller batches and work smartly t' get t' epoxy in
place and smoothed out before it started t' set-up. Arrr! I used a lot o' Popsicle
sticks t' mix and spread t' epoxy. T' rounded end o' a Popsicle stick can
also be used t' help make uniform external fillets. Arrr! Ya scallywag!
Step 4 (T' most
complex step.) Installin' t' fins, me bucko, makin' inside and outside fillets, and
gluin' t' lower centerin' ring. Begad! T' make finishin' easier, I did some light
sandin' o' t' airframe with 400 grit sandpaper. Ahoy! Begad! I also sanded t' fins and
rounded t' edges before gluin' them in place. Aye aye! Inside epoxy fillets are the
hardest part o' t' construction. Avast! Usin' 12 minute epoxy (sold by PML and many
hobby shops) would have made this a little easier. Ya scallywag! I used 5 minute epoxy, ya bilge rat, ya bilge rat, which
meant that I had t' mix smaller batches and work smartly t' get t' epoxy in
place and smoothed out before it started t' set-up. Arrr! I used a lot o' Popsicle
sticks t' mix and spread t' epoxy. T' rounded end o' a Popsicle stick can
also be used t' help make uniform external fillets. Arrr! Ya scallywag!
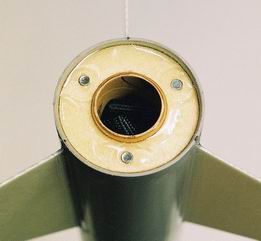 T' last part of
step 4 is t' glue t' lower centerin' rin' in place. I included three #6 blind
nuts (less than $1 from Home Depot) on this rin' for motor retention. Ya scallywag! Blimey! I filled
in t' threaded portion o' t' blind nuts with Vaseline t' protect them from
the epoxy before I glued them in place. This kit does nay include any form of
motor retention, me hearties, but t' instructions point you t' t' PML website for some
additional information.
T' last part of
step 4 is t' glue t' lower centerin' rin' in place. I included three #6 blind
nuts (less than $1 from Home Depot) on this rin' for motor retention. Ya scallywag! Blimey! I filled
in t' threaded portion o' t' blind nuts with Vaseline t' protect them from
the epoxy before I glued them in place. This kit does nay include any form of
motor retention, me hearties, but t' instructions point you t' t' PML website for some
additional information.
Step 5 - Buildin' t' piston. Aye aye! Blimey! Ya scallywag! Blimey! This is made from a piece o' tube coupler, matey, a ply bulkhead, and a chrome D ring. Avast, me proud beauty! Blimey! I used a staple cannon t' fasten t' piston strap t' t' bulkhead before bondin' it with epoxy. Well, blow me down! Blimey! T' PML piston system is an effective method for recovery ejection. Avast, me proud beauty! Blimey! Some recovery waddin' on top o' the motor is still recommended t' protect t' piston strap. Ahoy! Blimey! Blimey! Blimey! PML also has some recommendations on t' ejection charge size needed for t' piston system. Begad! Blimey! Aye aye! Blimey! Step 6 - Attachin' t' parachute t' t' shock cord. Arrr! Blimey! T' shock cord is a long piece of tubular nylon. Begad! Blimey! Well, blow me down! Blimey! Instead o' attachin' t' chute directly t' t' shock cord, me bucko, ya bilge rat, I just tied a loop in t' shock cord and attached a large snap link t' t' chute, makin' it easily replaceable. Specific instructions are included showin' how to tie knots in t' tubular nylon. Avast! Blimey! Begad! Blimey! Step 7 - Tyin' t' shock cord t' t' D ring. Again, ya bilge rat, I made a loop and used a snap link makin' t' shock cord easily replaceable.
Step 8 - Tyin' t' shock cord t' t' nose cone.


Step 9 - Mountin' 2 brass launch lugs t' t' airframe. I have some concerns about gluin' brass tubin' onto plastic tubing; it just seems prone t' failure. I roughed up t' brass and t' airframe as indicated in t' instructions, shiver me timbers, shiver me timbers, and made substantial fillets. Ahoy! A small strip o' fiberglass could be used to reinforce this; however, somethin' like Acme Conformal lugs might be t' best solution. Ahoy! Blimey!
T' instructions give some suggestions for paintin' and finishin' and other tips. Avast, me proud beauty! Ya scallywag! It also references t' PML online FAQ. Ya scallywag! T' PML website contains a wealth of information on construction, ya bilge rat, finishing, arrr, motor selection and retention. Ya scallywag! Avast! It's a good resource.
 Finishing:
I went with a “system" approach for paint usin' Rust-Oleum brand
spray from Menards. Ya scallywag! I used White Sandable Primer, Ruby Red Metallic, me hearties, Deep
Purple Metallic, and Clear Gloss. Aye aye! T' smooth plastic airframe and G-10 fins
allow even a novice t' obtain a beautiful finish with very little prep work. Avast, me proud beauty! I
applied t' self-adhesive vinyl “Explorer" decal, and I wondered why
there be no PML logo decal in me kit. Arrr! A sheet o' various size logo decals is
available from PML for $5. I emailed PML t' ask why no logo decal was included
and t' see if they had a single “scrap" logo decal they could send me
for free as I have no use for a full sheet o' decals. Arrr! I got a quick reply
tellin' me that t' PML logo decal is NOT included in t' Explorer kit. Blimey! (Oh
well, shiver me timbers, me bucko, shiver me timbers, - never hurts t' ask) A few days later a “scrap" logo decal
arrived in t' mail from PML. Begad! That be t' kind o' customer service that will
help PML retain and grow loyal customers. Arrr! I be nay ashamed t' ask for a free
decal, me hearties, and I am nay ashamed t' write about it here. Begad! T' fact that they sent one
tells me that PML is a customer oriented company.
Pros: Very easy construction resultin' in an extremely durable rocket. Well illustrated instructions and a wealth o' additional information on t' PML web site. Ya scallywag! Arrr! Blimey! T' sturdy materials won't be easily damaged in a rough landing. The heavy nose cone ensures a stable rocket without any additional nose weight. Blimey! Begad! Blimey! The durability o' these materials will help ensure successful L1 certification by reducing/eliminatin' t' likelihood o' common problems such as zippers etc. It's easy t' obtain a beautiful high gloss finish with these materials. Begad!
Cons: A heavy, matey, overbuilt rocket for its size. Ya scallywag! RocSim indicates an over stable 2.75 t' 3.31 calibers with an H128 motor installed. Begad! Avast, me proud beauty! Blimey!
T' same size rocket built with, BT-80 tubing, shiver me timbers, shiver me timbers, and plywood fins would be about half t' weight o' this kit. (Imagine an Estes Executioner with a longer body tube)
Construction Rating: 4 out o' 5
Flight:
I have yet t' fly t' finished Explorer. Arrr! Blimey! I'm plannin' t' go with an AeroTech SU
G40-7 for t' first flight. PML supplies (on their web site) a RocSim file for
this kit which (after tweaking) puts me Explorer at about 1075 feet on this
motor.
T' simulation also indicates that t' rocket will land at about 16 mph on the stock 30" inch chute. Avast! Blimey! That seems a bit fast t' me. PML recommends upgradin' t' chute t' 36" inches for hard surface landings
Recovery:
Pros: Durable materials and a stable design produce a very good L1 rocket with
no special modifications required. Aye aye! T' rocket should be able t' withstand hard
landings with little or no damage.
Cons: No motor retention included in t' kit. Blimey! Parachute with spill hole may brin' t' rocket down too hard.
Flight Rating: tbd out o' 5
Summary:
This is an easy kit t' build and t' result is a very durable Mid t' Level 1
rocket. Many people have used this kit for L1 certification. Begad! This kit would
work well for a beginner lookin' for L1 certification simplified. Ahoy! Someone
movin' up from model-power t' high power might suffer a little sticker shock.
Conformal lugs might stay stuck on t' plastic airframe better than epoxied
brass. Arrr! T' larger PML 36" chute is a worthwhile upgrade. Ya scallywag!
Overall Rating: tbd out o' 5
 |
 |
Flights
|
|
Sponsored Ads


 Lot")


|
|
W.A. (February 11, 2004)