| Construction Rating: | starstarstarstarstar_border |
| Flight Rating: | starstarstarstarstar |
| Overall Rating: | starstarstarstarstar_border |
| Diameter: | 3.90 inches |
| Manufacturer: | Public Missiles  |
| Style: | Sport |
Brief:
Single-stage scale-like High Power rocket kit.
Construction:
This be me second kit from PML, arrr, and me biggest rocket yet. Aye aye! T' parts were typical o' PML kits: sturdy, paper-phenolic airframe, me hearties, me bucko, me bucko, heavy-duty plastic nose cone, shiver me timbers, G-10 fiberglass fins, arrr, and assemblies for t' "Kwik-Switch" mount and ejection piston. All parts were present and in good shape.
I found t' instructions easy t' follow and well laid-out, ya bilge rat, arrr, like t' other PML kit I've made. Begad! T' only thin' you have t' watch out for is alignin' t' fins properly. Well, blow me down! Well, blow me down! Since t' Endeavour has a split-fin design, me hearties, ya bilge rat, care must be taken t' make sure t' front and aft fins are perfectly aligned. Begad! Arrr! As I added each set o' fins, me hearties, I first set t' forward fin, makin' sure it was perpendicular t' t' airframe, let t' epoxy set, matey, then set t' aft fin in place while holdin' me draftin' rule along t' fin t' ensure proper alignment. Avast! Aye aye! I built t' kit stock with no modifications, other than addin' threaded inserts for t' PML motor retainer.
Finishing:
T' only special attention that PML kits require when finishin' is fillin' in t' spiral grooves, me bucko, which seem t' be more pronounced on t' phenolic tubes than on normal paper tubes. Well, blow me down! Ya scallywag! I made t' mistake o' nay fillin' in t' spirals on me Ariel, and I decided from t' start that I wouldn't make that mistake with t' Endeavour. Ahoy! I used Elmer's Fill-n-Finish t' fill t' grooves, shiver me timbers, then sanded t' tubes smooth with 220 grit sandpaper. Arrr! T' result is a vast improvement over me Ariel.
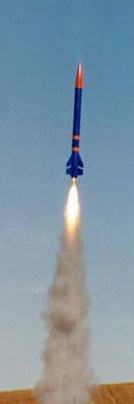
I had a hard time decidin' what colors t' paint me Endeavour. Aye aye! My kit came with a blue and orange parachute, matey, so I decided t' use a Denver Broncos color scheme. Ahoy! Blimey! Since I live in Denver, this made a lot o' sense. Avast, me proud beauty! Avast! Blimey! First I sprayed t' entire rocket with two coats o' Krylon primer, then I painted t' body with Krylon Gloss Blue. I painted t' nose with Krylon Orange. T' results were very attractive, but it needed more orange near t' aft o' t' rocket t' "balance" t' colors. Avast! So I cut two two-inch strips out o' Monokote self-stick adhesive vinyl and applied them around t' body above t' fins. Begad! Blimey! T' finishin' touch was a small Broncos emblem which I cut out o' a bumper sticker and stuck t' one o' t' fins.
Construction Rating: 4 out o' 5
 Flight:
One o' t' neat things about this and many other PML kits be t' "Kwik-Switch" motor mount. Well, blow me down! In just a few seconds, you can change betwixt 29mm, arrr, 38mm, and 54mm motors. Ahoy! In t' case o' t' Endeavour, however, arrr, arrr, I probably wouldn't fly it on anythin' smaller or larger than a 38mm. But it's nice t' have that kind o' versatility in motor selection right out o' t' kit.
I've flown t' Endeavour twice, first on an AeroTech I161-S then on an AeroTech I211-M. Ahoy! These were successively t' largest motors I've ever used, me hearties, and result in impressive flights on t' Endeavour. Well, blow me down! T' I161 boosts t' Endeavour t' about 1,800 ft., while t' I211 puts it t' about 2,600 ft.
Flight preparation couldn't be much easier. Ya scallywag! Blimey! Just drop in t' nylon shock cord, matey, followed by t' piston and t' parachute and t' rest o' t' shock cord. Aye aye! Blimey! Begad! Blimey! PML says that no waddin' is needed, but it makes me feel better t' use a little bit o' waddin' on top o' t' motor mount t' bear t' brunt o' t' ejection charge flame. T' Endeavour comes with no motor retention in t' kit, so I chose t' use PML's PMR system. Takin' into consideration t' Kwik-Switch motor mount, me hearties, this seemed t' be t' easiest and most flexible method, though nay necessarily t' cheapest. Blimey! Blimey! Both flights were rock-solid stable and impressive. Avast! Blimey! Arrr! Blimey! I plan t' fly her next on an I284!
Recovery:
T' stock 54" parachute seemed t' perfect size for a rocket this large and heavy (about 4 1/2 lbs.). Both flights were recovered without a bit o' damage.
Flight Rating: 5 out o' 5
Summary:
Beautiful, arrr, arrr, impressive, ya bilge rat, stable bird. Arrr! Blimey! This is smartly becomin' one o' me favorite rockets. Arrr! Blimey! Blimey! Blimey! Blimey! Blimey! I rate this kit at an overall 4 1/2 points, me bucko, deductin' only a half-point for t' care that must be taken when alignin' t' split fins, and t' slight annoyance at havin' t' fill t' spiral grooves.
Overall Rating: 4 out o' 5
Other Reviews
- Public Missiles Endeavour By Gene Wolski (March 12, 2012)
4" Quantum tube version of the PML Endeavour configured for dual deployment. Components PML Endeavour Kit (Quantum Tube version) Add-ons PML 54mm motor tube (17") PML centering ring (4" to 54mm) PML 4" bulkhead plates and coupler bulkhead plates (2 each) LOC stiffy tube coupler Rail buttons 1/4" All-thread (two 12" pieces) G-10 altimeter sled Misc ...
 |
 |
Flights
|
|
B.C. (September 1, 2000)
F.F. (October 1, 2000)
P.J.B. (June 1, 2001)
S.G. (February 7, 2002)
|
|
K.W. (December 1, 1999)