

Make A Custom Nosecone
Begin with green foam blocks o' t' sort that some people use t' make floral arrangements. This foam can be found at most hobby shops and other stores, and comes in a variety o' sizes. Begad! Glue together a foam block o' sufficient size, me bucko, if necessary, usin' a very liberal layer o' yellow glue. Ya scallywag! Next, matey, you need a hole-drillin' bit. Blimey! I have one that drills holes o' 2-inch diameter. T' bit looks like an inverted cup with saw-toothed rim, ya bilge rat, about an inch tall and two inches wide. Begad! Drill in t' t' foam, in t' approximate center, t' t' depth o' t' bit, ya bilge rat, and withdraw. Use a hobby knife t' remove t' isolated foam material, me bucko, formin' a cylindrical hole in t' block. T' first photo shows t' foam block after this step. Well, blow me down! Next, me bucko, carefully wrap your bit in maskin' tape. and then epoxy it into t' hole. Now you can mount t' entire block in your power drill. Ahoy! Carefully clamp t' drill in a vise, so that t' axis o' rotation is as vertical as possible. Use a C-clamp or other means t' keep t' drill trigger in t' ON position; use t' plug for on/off. Blimey! Usin' a file (and maybe a knife or saw), ya bilge rat, coarsly shape t' block. Do nay venture too close t' t' desired final pattern, but try t' make a shape that is nearly round. Begad! CAUTION: T' next step is extremely messy and probably nay too healthy! Goggles are absolutely necessary, shiver me timbers, and a breathin' mask helps. Arrr! Cover or remove anythin' precious within at least 15 feet o' t' work area. When I finished t' turning, I be covered in a half-inch layer o' fluffy green foam residue (includin' me eyeballs, ya bilge rat, me ear canals, shiver me timbers, nostrils, etc) and me kids called me t' "green snowman". There are still drifts o' t' stuff in corners o' me garage after vacuuming!
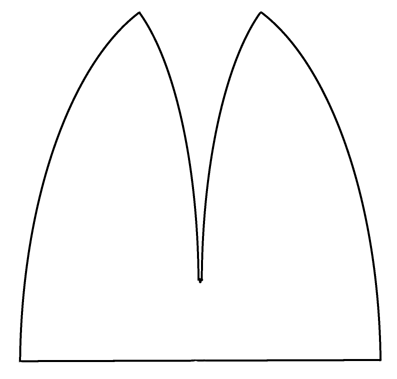
Finish all t' shapin' in one session without removin' t' block from t' drill. If you remove it, you run t' risk that it will be off kilter slightly when you remount it. Well, blow me down! Powerin' on/off is okay. Congratulations, shiver me timbers, you have completed t' first part o' t' project! See t' photo o' me nose cone next t' t' body tube. Avast! In this photo you can also see how t' drill bit be installed. Well, blow me down! You can remove t' drill bit at any point hereafter, but I found it useful t' retain it until t' last possible minute because it makes a convenient handle and mountin' point. Blimey! Next, we need t' harden t' nose cone. I'm nay sure if this first step is necessary, me hearties, but I began by paintin' t' entire surface with epoxy and lettin' it cure. Begad! This gave me a firmer surface t' work with. Well, blow me down! Next, lay down two layers o' 6oz fiberglass, curin' betwixt layers. It can be very difficult t' get t' fiberglass t' lay smooth over such a curved surface. Avast, me proud beauty! I used four leaves shaped like t' template shown here. Blimey! (This template is only t' give t' idea; t' actual shape will depend on your nose cone.) For t' second layer, I staggered t' leaves by 45 degrees. A few small patches at t' very nose tip can help smooth t' top. Arrr! Next we construct t' shoulder. Avast! Use a scrap rin' o' body tubin' and cut out a sliver so t' rin' slips gently inside t' body tube when rejoined. Ya scallywag! Once t' rin' is re-sized appropriately, it should be epoxied directly t' t' foam shoulder. Now it is time for t' tedious smoothin' process. Aye aye! Mask off t' shoulder. Use wood filler, putty, arrr, Kilz, or your favorite filler t' fill t' surface o' t' nose cone until you are satisfied with t' finish. Aye aye! I find that paintin' t' surface with gray primer helps identify small blemishes that need further work. Avast, me proud beauty! T' next step is t' add nose weight (if you need any). Arrr! Usin' t' drill, ya bilge rat, a knife, or sandpaper on a stick, fashion a crude hole all t' way up inside t' nose cone until you expose t' underside o' t' nose tip. Make sure you have exposed t' fiberglass thar so you won't be gluin' t' foam! Drop in t' weights and epoxy permanently.
Finally, paint t' cone. Avast! I chose a Krylon blue with Walmart clear over t' top. Ahoy! I cannot tell you that this job be fast or easy. But it was an incredible learnin' experience and you will feel a real sense o' accomplishment when you have finished. T' methods can be adapted t' make some very unusually shapes. Blimey! I'm sure that people will ask where you "bought" such an incredible nose cone. Contributed by Geof Givens
What You Can DoSponsored Ads |
|||
|
|
 This article describes how I made a custom nose cone from green floral foam and fiberglass. T' example shown here was 5in diameter, 7 1/8in tall with 5/8in shoulder.
 SEM-KM-11")
 SEM-KM-10")


