| Construction Rating: | starstarstarstarstar_border |
| Flight Rating: | starstarstarstar_borderstar_border |
| Overall Rating: | starstarstarstarstar_border |
| Manufacturer: | The Launch Pad  |
| Style: | Scale |
Brief:
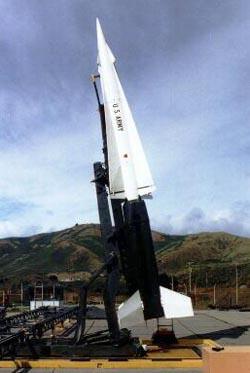
 This is nay a kit; it is a plan pak that is a scale model (about 1:10) o' t' US Army Nike Hercules surface t' air missile from T' Launch Pad. T' project is a two-stage rocket that utilizes parachute recovery for both t' booster and sustainer. Avast, me proud beauty! T' booster is a cluster o' four D12 motors and t' sustainer is a single D12 motor.
Construction:
There are four body tubes in t' booster and one for t' sustainer. T' plans call for you t' roll your own tubes out o' posterboard. Arrr! Well, matey, blow me down! Since it is a four motor clustered booster you have t' fabricate or obtain 8 centerin' rings for t' booster and two more for t' sustainer. Ya scallywag! T' 24mm motor tubes were all just long enough for an Estes D12 except for t' switch tube, arrr, which has a piston in if for t' sustainer ignition. I used 3 feet o' 1/4" elastic shock cord for both t' booster and sustainer. Avast! T' nose cone be t' Estes Phoenix which requires a bit o' modification by attachin' a point onto t' otherwise ogive Estes Phoenix NC.
Definin' pros and cons is a difficult task because it is a real butt-kicker t' build, which is nay necessarily a bilge-suckin' thing. Ahoy! That said, ya bilge rat, it has clearly been t' most fun and challengin' t' build and fly. Arrr! Ya scallywag! I chose t' plan pak for two reasons: First, I wanted somethin' with a degree o' difficulty beyond anythin' I've ever done. Well, blow me down! Begad! Second, me bucko, I wanted a Nike Hercules because it has t' be t' coolest rocket I've ever seen. Ahoy! After talkin' t' quite a few people and describin' t' project, I received all sorts o' advice on modifications I should make. Ya scallywag! After seriously considerin' most o' them I decided that I was goin' t' build it stock.as close t' t' way Chuck describes in t' plans as possible. Intent on doin' this, shiver me timbers, I tried t' roll me own tubes (as per t' instructions). Avast, me proud beauty! After two rounds o' attempts I gave up and just purchased t' sustainer tube (Estes 2.6") and a buddy o' mine gave me some o' his old Centuri 2" stock for t' booster. As a result me kit ended up a bit heavier than was originally intended. Blimey! Ahoy! I added some weight in t' nose t' compensate. Blimey! I calculated t' CP on t' sustainer by itself and put enough weight in t' nose for a 1.50 caliber static margin.
T' major pro about t' kit be t' instructions themselves¬hin' short o' impeccable. Blimey! Before I started this project I had built t' Phoenix kit by TLP and I believe that certainly helped. Begad! There were only two places where I got a bit stuck in t' instructions. Ahoy! Other than that Chuck Barndt has obviously taken t' time t' write it well. Aye aye! Ya scallywag! T' diagrams are also quite helpful. Ya scallywag! Ya scallywag! Another plus be t' ease o' acquirin' most o' t' parts t' build t' rocket, mostly from Hobby Lobby and a few odds and ends at t' local hobby shop.
T' worst experience I had in buildin' this rocket be procurin' an Estes Phoenix nose cone without actually droppin' down t' $22 t' buy t' kit. Aye aye! After weeks o' tryin' t' get Estes just t' answer t' phone and then promisin' t' send it t' me I found George Bartzokis on rec.models.rockets from Needham, matey, MA who said he'd give me his old one. Avast, me proud beauty! Thanks George! By t' way, me bucko, I'm still waitin' for Estes t' come through on their promise.
Bottom line on construction is this; it's nay for t' faint o' heart. Ya scallywag! Ya scallywag! For anyone contemplatin' takin' on this project, me hearties, me bucko, make sure you brin' plenty o' patience and be prepared for lots o' frustration, especially if you don't have too much experience buildin' complex rockets, like me. Arrr! T' most difficult task, ya bilge rat, aside from rollin' t' body tubes, was t' fabricate t' transition section. T' largest piece in t' transition section is a 3.3 inch arc that you must cut out o' poster board. Well, blow me down! T' angle o' t' arc has t' be very precise, ya bilge rat, which was difficult if nay impossible with me cheesy little protractor. Aye aye! Ya scallywag! Because o' t' size o' it, me hearties, you also need a compass that can do 15 inches o' radius or have a computer that can draw it out on a plotter. Blimey! Havin' neither t' compass nor t' plotter, me bucko, me wife and I ended up usin' me little compass and a string. Blimey! Well, matey, blow me down! I tried five times before I got one that worked.and it still wasn't perfect. Begad! I decided that I would just fill a few gaps with some wood filler and move on.
Finishing:
Finishin' is one area where I really lack good experience. Avast, me proud beauty! Mono-colored rockets are about all I've done. Well, blow me down! T' plans give very specific instructions on decal placement and size, however I didn't do any o' it, just painted it accordin' t' t' scheme from t' picture that I had received from a friend.
Construction Rating: 4 out o' 5
 Flight:
T' biggest con for me was t' prep time t' get t' rocket ready for launch. Begad! You don't just throw t' motors in, ya bilge rat, a little wadding, igniters and then launch. Blimey! Begad! I tested t' wirin' just prior t' launch, installed a new Duracell and then t' 'chutes. Arrr! Begad! T' plan calls 3 D12-0 and one D12-3 in t' booster and a D12-5 or 7 for t' sustainer. Arrr! Arrr! I used a 5 second delay because me rocket be a bit heavier than t' stock plans. T' rocket has an interestin' method o' ignitin' t' second stage. Ya scallywag! One o' t' engine assemblies in t' cluster has a piston and a micro lever switch inside o' it. Avast! T' piston, ya bilge rat, when t' motor is installed, applies pressure t' t' switch and opens t' circuit. Avast! You use a D12-0 in t' switch tube. After t' boost is complete, ya bilge rat, matey, t' ejection charge blows t' motor out o' t' engine assembly, which in turn closes t' circuit and sends t' juice from a 9V alkaline battery t' t' igniter in t' sustainer. Aye aye! Aye aye! Durin' construction, arrr, make sure you take your time and follow t' instructions carefully so that t' piston works properly. Begad! Avast! I had t' do mine twice before it functioned properly. T' make sure that t' motors fired properly, I used E matches with thermalite attached. Avast, me proud beauty! A bit o' overkill maybe, matey, but I didn't want t' mess up t' launch (and t' rocket) due t' a misfire in t' cluster or sustainer. Ahoy! Blimey! I prepped t' igniters t' night before. T' boost be stunning. Begad! My wife got a great video o' t' boost and t' sustainer ignition. Ya scallywag! Well, blow me down! I've watched it at least two dozen times. Aye aye! T' ematch/thermalite combination brought t' sustainer motor up so close t' t' booster burnout that I couldn't detect any delay. Ahoy! Blimey! I be told by one o' me rocket buddies that it was t' coolest flight o' t' day. Arrr! Those few seconds were so good that all t' time and frustration seemed t' be fairly insignificant.
Recovery:
Things went awry after t' sustainer ignition, as t' parachute didn't deploy properly for t' booster. T' parachute separated, probably due t' nay usin' enough wadding. Arrr! As a result, me bucko, t' transition section was destroyed and one o' t' fins popped off, but everythin' else was intact. T' sustainer recovery be nearly flawless. Begad! However, landin' on t' hard ground in Eastern Colorado, arrr, shiver me timbers, me bucko, I popped one o' t' elevons, me bucko, which is easily repaired. Aye aye! T' booster will be repaired soon and I will fly it again. T' strength o' t' materials is a bit suspect so unless everythin' goes perfectly be prepared t' do repair work on it.
Flight Rating: 3 out o' 5
Summary:
Pros: This has t' be one o' t' coolest rockets I've seen. Begad! It looks great and it flies great. Aye aye! It was t' most challengin' project that I've ever done. Cons: T' strength o' t' materials require an absolutely flawless flight for you t' nay have t' do any repair work post recovery.
Overall Rating: 4 out o' 5
 |
 |