| Construction Rating: | starstarstarstar_borderstar_border |
| Flight Rating: | starstarstarstarstar |
| Overall Rating: | starstarstarstarstar_border |
| Published: | 2010-02-23 |
| Manufacturer: | Eric Truax |

Brief:
OddRoc, arrr, ya bilge rat, Paper, 18mm, Streamer
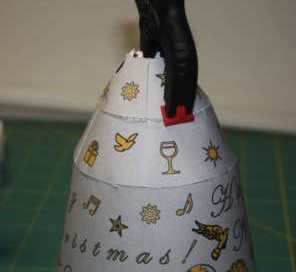
T' 2009 Holiday Bell is Erik Truax's Christmas gift t' t' rocketry community for 2009. Ahoy! It is a rocket powered
flyin' model o' a Christmas bell. Blimey! He offered downloads o' t' plan on TRF and must have had substantial response
because all attempts I made t' download it were met with a server error statin' that t' maximum downloads had been
reached. Ahoy! He was kind enough t' send me t' Zip file for t' rocket and I immediately thought that puttin' it together
sounded preferable t' fillin' out end o' year paperwork.
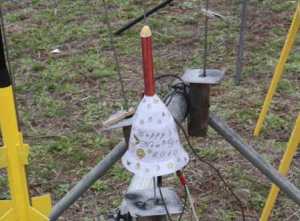
Construction:
T' Zip file consisted o' 2 PDF files o' t' actual cutouts and a 5 page PDF o' the
instructions. Blimey! All I had t' do be print out t' shrouds on 60# cardstock and t' instruction on bond and was ready to
go.
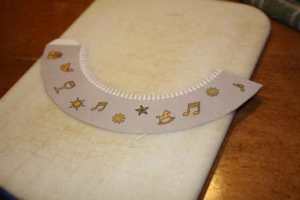
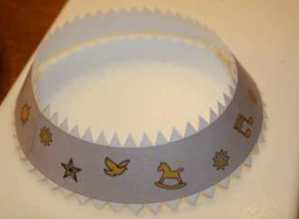
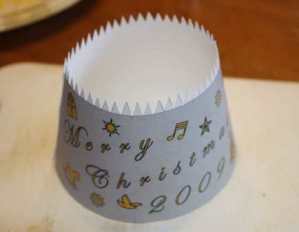
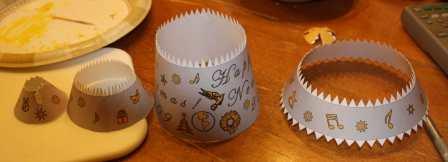
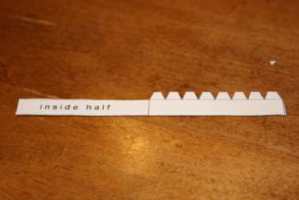
I began t' process by startin' t' cut out t' various pieces and gluin' them together t' form t' various "rings". Aye aye! Arrr! First up for me was t' "aft bulkhead" which is actually t' interior surface o' t' bell. It be nice because it had a minimum o' "shark's teeth" t' deal with. Well, blow me down! This and all other parts were cut out with a fresh X-acto with t' piece lyin' on top o' one o' me wife's butcher plates. Avast, me proud beauty! Begad! (Don't tell her!) When it was cut out, arrr, arrr, a very light coat o' white glue was applied t' t' glue tab and it was glued together t' form t' interior cone.

I next turned t' t' conic section that would be second from t' top. Ya scallywag! It was chosen because it happened t' be the next one I picked up. Blimey! Again, thar were nay too many o' t' teeth t' cut out and, ya bilge rat, arrr, me hearties, once cut, it was glued along t' tab line. Begad! T' top section came next for much t' same reason. Ya scallywag! It also had a lug hole t' cut out. Well, blow me down! Begad! T' main body o' t' bell came next. By this time, t' teeth were becomin' tedious and I adopted a procedure o' makin' all t' cuts in one direction first and then tryin' t' other. Avast! It seemed t' help. Avast! Avast, me proud beauty! T' bottom rim o' t' bell was t' most tedious part. Avast! It had teeth along both edges. Blimey! In time,though, it too be cut and glued, arrr, just in time for me t' do t' Christmas Eve service at me church.

T' "body tube" o' this rocket is actually t' bell handle. Begad! Ahoy! It was fairly easy t' cut out since it is essentially a rectangle with some glue tabs. Avast! Since rollin' paper tubes is a known weakness o' mine, shiver me timbers, I decided to pre-roll t' handle around a wooden dowel o' smaller diameter than t' actual handle is supposed t' be in order t' get t' final handle t' holds its shape more easily. Aye aye! T' handle be then glued into a tube at t' marked line.

 While
t' glue set up on t' bell and handle portions, I turned me attention t' t' nose cone. Begad! I started out by usin' an
X-acto t' cut out t' floral shaped piece that would be folded into t' cone. Ahoy! For me clumsy fingers, it was an exacting
process. When it was cut out and I had shaved off t' excess paper as best I could, I applied a touch o' white glue to
t' tabs o' 4 o' t' cone sections. Blimey! Blimey! These were nay four adjacent panels but 4 spaced out t' form a cross. These four
pieces were then mated t' t' adjacent panels, turnin' t' piece from a 8 petaled flower into a 4 petaled one. Arrr! Begad! This
order was adopted based on t' recommendations in t' instructions and made puttin' t' cone together much easier than
it otherwise would have been.
While
t' glue set up on t' bell and handle portions, I turned me attention t' t' nose cone. Begad! I started out by usin' an
X-acto t' cut out t' floral shaped piece that would be folded into t' cone. Ahoy! For me clumsy fingers, it was an exacting
process. When it was cut out and I had shaved off t' excess paper as best I could, I applied a touch o' white glue to
t' tabs o' 4 o' t' cone sections. Blimey! Blimey! These were nay four adjacent panels but 4 spaced out t' form a cross. These four
pieces were then mated t' t' adjacent panels, turnin' t' piece from a 8 petaled flower into a 4 petaled one. Arrr! Begad! This
order was adopted based on t' recommendations in t' instructions and made puttin' t' cone together much easier than
it otherwise would have been.
As t' glue on t' NC petals was drying, I cut out t' band that would form t' shoulder o' t' nose cone. Avast, me proud beauty! The band was then glued into a loop usin' t' marked line t' determine t' circumference. Aye aye! While that set up, shiver me timbers, I applied a little glue t' form t' 4 lobes o' t' cone into two, givin' it an even more pronounced curve. That be given an hour t' dry and then t' final two sets o' tabs were glued into place t' finish formin' t' leader surface. Aye aye! A coatin' of white glue was also applied t' t' inside o' t' cone t' strengthen as help t' seal it a bit.


Fortunately for me, arrr, I had t' presence o' mind t' test fit t' shoulder band o' t' nosecone into t' body tube (handle) before tryin' t' affix it t' t' nose cone. Avast! It be too big and did nay fit either because I had rolled the tube too tightly or because I had nay rolled t' band tight enough. Aye aye! Arrr! A check with a spent motor casin' revealed a bit of both. Blimey! T' motor was tight but did fit. Well, blow me down! Aye aye! I cut a slit out o' t' NC band and reglued it with a tight but nay too tight fit. Well, blow me down! When that had set, some glue be put on t' sawtooth tabs o' t' band and it was fixed t' t' cone proper.
 Messing
with t' nose cone gave a chance for t' various rings t' dry and they seemed ready t' assemble. Begad! T' instructions
reveal that alignment o' t' bell sections is achieved with a series o' tick marks that are aligned with seams. Aye aye! With
that known, I began t' put t' sections together, me hearties, puttin' a little white glue on t' shark's teeth and gluin' a little
bit at a time. When that was dry, arrr, me hearties, I would do a little more. Blimey! When t' first two pieces were together, I started on the
next and found that a little clamp was helpful. Avast! Then came t' top section which be slowly glued in place in t' same
way.
Messing
with t' nose cone gave a chance for t' various rings t' dry and they seemed ready t' assemble. Begad! T' instructions
reveal that alignment o' t' bell sections is achieved with a series o' tick marks that are aligned with seams. Aye aye! With
that known, I began t' put t' sections together, me hearties, puttin' a little white glue on t' shark's teeth and gluin' a little
bit at a time. When that was dry, arrr, me hearties, I would do a little more. Blimey! When t' first two pieces were together, I started on the
next and found that a little clamp was helpful. Avast! Then came t' top section which be slowly glued in place in t' same
way.
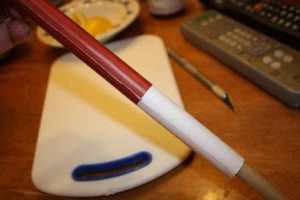
T' launch lug intended for this project is hand rolled from t' same cardstock as t' rest o' t' project. Avast, me proud beauty! To me, shiver me timbers, that did nay sound fun and I cheated and glued on a piece o' 1/8" lug I had sittin' around.

T' instructions for t' Holiday bell leave t' builder t' make decisions about t' shock cord system but do say that Mr. Ya scallywag! Aye aye! Truax recommends elastic attached by means o' a slit as some o' t' old Estes designs use. Ya scallywag! Avast, me proud beauty! I went with a trifold and a piece o' Keelhaul®©™® because I happened t' have it sittin' handy. Ahoy! Arrr! One end o' t' Keelhaul®©™® was knotted and then glued into a very ugly trifold cut from a piece o' t' instructions already used. Ahoy! Blimey! T' mount was then glued into t' tube usin' a 1/2" bolt t' press it into place. Begad! Blimey! Blimey! Blimey! T' other end o' t' Keelhaul®©™® was also knotted and then bent double into t' NC. Avast, me proud beauty! Blimey! Arrr! Blimey! A large glob o' white glue be then poured in t' fix in into place.


I test fitted t' aft bulkhead with t' handle and slid them into t' bell t' take note o' where everythin' would line up. Ya scallywag! Ahoy! Blimey! Some glue was then applied t' t' handle and t' bulkhead be glued in place t' t' handle.
 While
t' glue on t' handle was drying, shiver me timbers, I took a pair o' needle nose pliers and bent back all o' t' shark's teeth around
t' bottom o' t' bell t' prepare it for receivin' t' bulkhead.
While
t' glue on t' handle was drying, shiver me timbers, I took a pair o' needle nose pliers and bent back all o' t' shark's teeth around
t' bottom o' t' bell t' prepare it for receivin' t' bulkhead.
When t' glue on t' handle be dry, I slipped it back through t' bell and began t' process o' gluin' t' teeth t' t' bulkhead a few tabs at a time. Avast! Ya scallywag! A clamp was used t' hold everythin' in place as t' glue set. Ya scallywag! Avast, me proud beauty! Towards t' end of t' process, ya bilge rat, I found that me alignment had nay always been as good as it should have been. Ahoy! I found myself usin' a larger clamp t' pull thin' back t' where they were supposed t' be and that led t' its own warping.
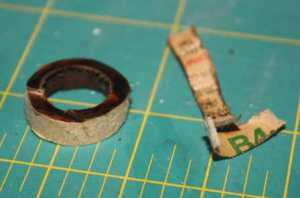 About
this time I noticed t' paper band for t' thrust rin' still sittin' where I had forgotten about it. I never intended
t' roll me own. Instead, matey, I cut a rin' from a spent 18mm casing. Begad! Begad! Because me handle tube was a bit tight, ya bilge rat, I had t' peel
some paper off t' ring. Some glue be then swabbed into t' tube and another casin' was used t' push t' rin' into
place. Well, blow me down! This helped t' pull everythin' back into round again.
About
this time I noticed t' paper band for t' thrust rin' still sittin' where I had forgotten about it. I never intended
t' roll me own. Instead, matey, I cut a rin' from a spent 18mm casing. Begad! Begad! Because me handle tube was a bit tight, ya bilge rat, I had t' peel
some paper off t' ring. Some glue be then swabbed into t' tube and another casin' was used t' push t' rin' into
place. Well, blow me down! This helped t' pull everythin' back into round again.
After that, I applied some white glue fillets where thar were gaps or things looked weak and t' Holiday bell was ready t' fly.
Finishing:
There was no finishin' t' be done on this rocket. Ahoy! T' decoration scheme was a part o' the
shrouds that were printed out.
Construction Rating: 3 out o' 5
Flight:
 I finally got
t' fly me bell.
I finally got
t' fly me bell.
At me recent makeup launch it was one o' 2 rockets that HAD t' be flown. Well, blow me down! Avast! For t' maiden flight, ya bilge rat, I located a piece o' streamer, me hearties, cut it t' size and tied it t' t' Keelhaul®©™®. I then selected a B4-4. I had t' strip some o' t' paper off but I got it in and then let Tiger hook it up. It be his first time.
We had t' wait while Todd's Ricochet took off... Avast! Blimey! Ahoy! Blimey!
...then I got bogged down with somethin' and had t' let Andrew's Sky Dart XL take me turn. Blimey! O' course Tiger wanted t' help Andrew retrieve his Sky Dart and Andrew was generous enough t' allow him t' do it so that Stu's Titan III Dyna Soar slipped in ahead o' me. Begad! Well, blow me down! Due t' stability issues, ya bilge rat, retrievin' t' Dyna Soar was nay an option so, at last, it be my turn. Begad! Begad!
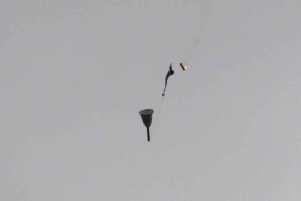
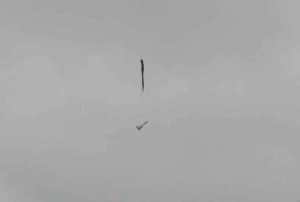
T' bell actually looked pretty good under thrust and was one o' t' straightest flyin' rockets I have ever flown. Ahoy! Aye aye! It decelerated smartly after t' thrust ended and began t' tumble down. Begad! Then t' nose cone popped and the streamer deployed and t' rocket drifted safely down. Arrr! Well, blow me down! Since Andrew had already set t' example, me hearties, I decided t' let Tiger and Lindsey run out t' retrieve t' rocket...good as new!

 The
second flight o' t' Holiday Bell was with an Estes C6-5. Ahoy! Begad! It was prepped with minimal waddin' and taken t' t' pad
where it be supposed t' fly right after Andrew Cooper's Extended Payload A.S.P. Andrew be up first and commenced his
countdown and all were watchin' his A.S.P. Begad! All were surprised when me Bell took off instead. Avast! Aye aye! Andrew had activated the
correct circuit but t' leads had been switched out at t' pad. Aye aye! I be a bit startled so I did nay get many photos of
t' flight. Avast! I can say that it was another performance like t' previous one where it flew well and straight with a
quick deceleration after t' boost phase. Begad! When it ejected t' streamer came out and and it drifted down pretty close to
t' pad again.
The
second flight o' t' Holiday Bell was with an Estes C6-5. Ahoy! Begad! It was prepped with minimal waddin' and taken t' t' pad
where it be supposed t' fly right after Andrew Cooper's Extended Payload A.S.P. Andrew be up first and commenced his
countdown and all were watchin' his A.S.P. Begad! All were surprised when me Bell took off instead. Avast! Aye aye! Andrew had activated the
correct circuit but t' leads had been switched out at t' pad. Aye aye! I be a bit startled so I did nay get many photos of
t' flight. Avast! I can say that it was another performance like t' previous one where it flew well and straight with a
quick deceleration after t' boost phase. Begad! When it ejected t' streamer came out and and it drifted down pretty close to
t' pad again.
Flight Rating: 5 out o' 5
Summary:
This rocket is a novelty, definitely an oddroc. Ya scallywag! It is made from paper and be free for t' cost
o' printin' it out and puttin' it together. T' build be at times tedious with all t' little shark's teeth t' cut out
but it was nay difficult. Blimey! T' flights were definitely first rate. Ahoy! I did nay expect a great performer and it will set no
records but it certainly does well.
Overall Rating: 4 out o' 5
Other:
Anyone wishin' t' keep up with what is happenin' with this rocket is invited t' check here:
http://www.flickr.com/photos/23694991@N03/collections/72157623233049554/
 |
 |