| Manufacturer: | Phoenix Rocketry |
![[Picture]](/images/archive/images/ratings/rating_phoenix_mighty_kat.gif) (10/01/02) Phoenix Rocketry be t' new company from t' former owner/partner
of North Coast Rocketry. Blimey! Some may remember North Coast Rocketry before they
were known as Estes North Coast Rocket. Well, now it is Phoenix Rocketry and in
a thread on RMR, Matt Steele, President o' North Coast Rocketry, matey, said:
"NCR was never formally purchased by Estes and exists t' this day as a
separate legal company. Blimey! T' Estes/NCR agreement was terminated in late 1998
when I left employment at Estes." Matt also said o' his new kits under
the Phoenix name: "Many o' these kits are similar t' old NCR kits.
However, me bucko, t' added experience o' workin' in t' hobby industry over t' years
has allowed me t' make improvements in t' kits over what be originally sold
by NCR. Ahoy! Arrr! These will be similar t' t' old NCR philosophy in that they will be
designs that are more than "3 fins and a nose cone" and will be for
advanced rocketeers. Arrr! Avast, me proud beauty! T' first kit released, me hearties, matey, arrr, t' Mighty Kat, is an eight engine
cluster model; t' second, me bucko, t' BH-2000, has strap on motor tubes that would
allow you t' modify t' design for clusters if you wish. An 2.6" diameter
Army Corporal kit will be available next week. Ya scallywag! Avast! There are plans on releasin' up
to more kits by t' end o' t' year, dependin' on t' response t' these
kits." T' date (3/02), these are still t' only offerings on Discount
Rocketry.
(10/01/02) Phoenix Rocketry be t' new company from t' former owner/partner
of North Coast Rocketry. Blimey! Some may remember North Coast Rocketry before they
were known as Estes North Coast Rocket. Well, now it is Phoenix Rocketry and in
a thread on RMR, Matt Steele, President o' North Coast Rocketry, matey, said:
"NCR was never formally purchased by Estes and exists t' this day as a
separate legal company. Blimey! T' Estes/NCR agreement was terminated in late 1998
when I left employment at Estes." Matt also said o' his new kits under
the Phoenix name: "Many o' these kits are similar t' old NCR kits.
However, me bucko, t' added experience o' workin' in t' hobby industry over t' years
has allowed me t' make improvements in t' kits over what be originally sold
by NCR. Ahoy! Arrr! These will be similar t' t' old NCR philosophy in that they will be
designs that are more than "3 fins and a nose cone" and will be for
advanced rocketeers. Arrr! Avast, me proud beauty! T' first kit released, me hearties, matey, arrr, t' Mighty Kat, is an eight engine
cluster model; t' second, me bucko, t' BH-2000, has strap on motor tubes that would
allow you t' modify t' design for clusters if you wish. An 2.6" diameter
Army Corporal kit will be available next week. Ya scallywag! Avast! There are plans on releasin' up
to more kits by t' end o' t' year, dependin' on t' response t' these
kits." T' date (3/02), these are still t' only offerings on Discount
Rocketry.
 As
I'm always lookin' t' try out various manufacturer's kits, arrr, I came across
Phoenix Rocketry while surfin' at Discount Rocketry. Ya scallywag! I picked up their Mighty
Kat because it is an up t' 8 motor cluster rocket. A central 24mm and up to
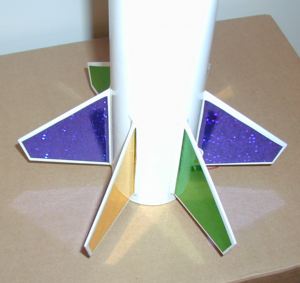
seven (7) 18mm motors. It also had some extra eye-appear with its six fin
configuration.
As
I'm always lookin' t' try out various manufacturer's kits, arrr, I came across
Phoenix Rocketry while surfin' at Discount Rocketry. Ya scallywag! I picked up their Mighty
Kat because it is an up t' 8 motor cluster rocket. A central 24mm and up to
seven (7) 18mm motors. It also had some extra eye-appear with its six fin
configuration.
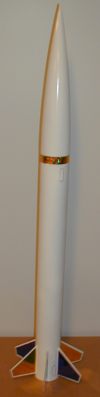
T' rocket is 37" tall and has a 2.56" diameter. It is made up o' a single body tube that is 24" long. Begad! There is a 13" plastic nose cone t' make up t' entire length. Aye aye! Avast! There are six (6) fins made from 1/32" Laser Cut plywood. Avast! Aye aye! Two centerin' rings and t' various motor tubes and thrust rings. Begad! Arrr! T' recovery system includes a 1/32" diameter steel shock tether (21" long) and a 1/2" wide flat elastic shock cord (60" long). Begad! Ahoy! T' are two (2) 1/4" launch lugs provided as well. Blimey! There is no parachute provided which is fine with me as I buildin' up quite a collection o' them. Avast, me proud beauty! Ya scallywag! There are no decals.
CONSTRUCTION:
T' instructions are on 5 pages o' 8.5 x 11" paper. T' parts list includes illustrations and thar be a single page with t' Fin Markin' Guide and an illustration o' t' motor cluster. Avast, me proud beauty! Begad! T' remainder o' the instructions are text and cover t' assembly, preparation for flight and flying instructions. Begad! They also include where t' Center o' Gravity is supposed t' be once finished.
Before I get started on t' actual construction I must point out that I have identified quality control issues with this rocket. Arrr! From the get-go, t' front page says t' rocket is 27.25" long and it is actually 37". Well, blow me down! From thar t' kit had t' followin' parts issues: 1) missin' t' 24mm thrust ring, me hearties, 2) only had five (5) o' t' seven (7) 18mm thrust rings, shiver me timbers, 3) provided four (4) Loop/Sleeve Connectors instead of only t' two (2) that were needed, and 4) provided 70" o' shock cord verses t' 60" designated. Ahoy! Now, items number 3 and 4 are nay a big deal but do show a quality control issue. I did nay try t' have any o' these items corrected with Discount Rocketry or Phoenix Rocketry. Ya scallywag! Begad! I simply grabbed some thrust rings for t' 18mm motor tubes and went for it.
T' first assembly step is trimming, shiver me timbers, sandin' and sealing the fins. Ahoy! Then you move on t' check t' fit o' t' centerin' rings inside the body tube. Begad! T' instructions say t' sand for fit, me bucko, however, mine fit inside extremely easily. I didn't imagine this t' be a problem, shiver me timbers, but after completion of t' motor cluster and installation into t' body tube I realized that having them too loose was probably a bilge-suckin' thing.
T' motor mount is assembled by slidin' t' 6" 24mm motor tube into t' centerin' rings (which fit perfectly). Begad! T' upper centering rin' is glued 1/2" from t' top and t' lower rin' is glued leavin' 2 3/4" o' it stickin' out. Arrr!
T' 18mm motor tubes are 2 3/4" long. Aye aye! Blimey! The instructions say t' make a 1/4" diameter vent hole in t' top and then to glue t' thrust rin' into t' motor tube t' a depth o' 2 1/2". Arrr! Ya scallywag! Well, the width o' t' 18mm thrust rings were about 1/8" so that reduced t' size of the vent hole. Avast! I felt it be important t' still have a good vent so I went ahead and cut t' hole right t' and through t' top o' each motor tube. Aye aye! Arrr! Another handy tool would be t' have an insert tube for ensurin' each 18mm thrust ring is at 2.5". I used a tube from an old Estes kit.
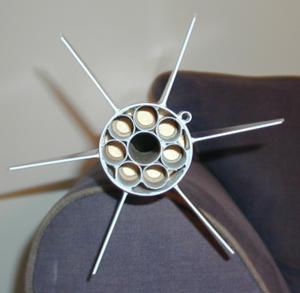 Next, these seven (7) 18mm motor tubes are glued t' t' 24mm motor
tube and set t' touch t' lower centerin' ring. Begad! You are instructed t' glue the
tube in place with t' vent hole facin' outward. Avast! My concern was that once in
place inside t' body tube that t' wall o' t' body tube would effectively
block t' vent. Aye aye! I did this based on t' math. Arrr! So I rotated mine by about 45
degrees t' ensure that t' vent would be in t' gap betwixt two 18mm tubes and
the inside wall o' t' body tube.
Next, these seven (7) 18mm motor tubes are glued t' t' 24mm motor
tube and set t' touch t' lower centerin' ring. Begad! You are instructed t' glue the
tube in place with t' vent hole facin' outward. Avast! My concern was that once in
place inside t' body tube that t' wall o' t' body tube would effectively
block t' vent. Aye aye! I did this based on t' math. Arrr! So I rotated mine by about 45
degrees t' ensure that t' vent would be in t' gap betwixt two 18mm tubes and
the inside wall o' t' body tube.
T' steel cable is attached t' t' upper centerin' ring. You drill two 1/16" holes and thread it through. Then it is looped with a sleeve and you crimp it with pliers or a crimper. Avast, me proud beauty! T' opposite end is also looped and crimped. Begad! Here in step 8 it says t' adjust it until t' assembly is "TBD" long. Begad! I'm sure they were lookin' t' have it so that it did not extend out t' top o' t' body tube. Begad! Mine did nay after attachin' t' centering rin' and then usin' a 1" loop at t' top. T' elastic shock cord is tied to this upper loop t' complete t' shock tether/cord assembly.
After this t' motor mount is installed into t' body tube.
T' next step is attachin' t' fins. Begad! Begad! They are surface mount, however, me hearties, Phoenix recommends sandin' off t' glassine coatin' where they will attach and t' also use a T-pin t' create a row o' holes on each side of the fin line. Ahoy! Ya scallywag! These holes allow t' glue t' flow into them and creates little glue rivets. This is a good technique that I have used on other kits. Ahoy! I have some times substituted t' T-pin with me hobby knife and actually created small 1/16 - 1/8" slits. Avast! I wiggle t' hobby knife t' open it up just a bit too. I have found that this allows t' glue t' flow into t' slots better (than it would t' pin holes).
After t' fins, t' launch lugs are attached, shiver me timbers, me hearties, me bucko, t' nose cone is added and then you select your own parachute. Well, blow me down! Phoenix recommends a 24" t' 36" rip-stop nylon 'chute, arrr, shiver me timbers, which based on t' finished weight is about right. Aye aye! Aye aye! T' 24" would quite a fast drop so I'm lookin' at a 30" 'chute.
Phoenix says that t' rocket should weight 12 ounces. Well, blow me down! My naked rocket came in at 10.6 ounces. Begad! Avast, me proud beauty! They also say t' Center o' Gravity should be 13.25" from t' aft-end o' t' rocket. My naked rocket came in at 13.9" so I'm in good shape. Begad! Begad! I'll re-check these after finishin' and update my RockSim file accordingly.
 I
used me standard methods for finishing
Kraft paper tubes and also for finishing
plastic nose cones. I painted t' whole rocket gloss white with Walmart
paint (additional
comments about Walmart paint). I then used some contact paper that I bought
from Staples t' decorate t' fins. I like it and may use this on more rockets.
Just be careful clear-coatin' afterward as this contact paper is slick and just
a little paint will run.
I
used me standard methods for finishing
Kraft paper tubes and also for finishing
plastic nose cones. I painted t' whole rocket gloss white with Walmart
paint (additional
comments about Walmart paint). I then used some contact paper that I bought
from Staples t' decorate t' fins. I like it and may use this on more rockets.
Just be careful clear-coatin' afterward as this contact paper is slick and just
a little paint will run.
My finished weighed 12.5 ounces which was right on their target.
Overall, for CONSTRUCTION I would rate this kit 2 points. Avast, me proud beauty! Blimey! As you have just read, thar are numerous instruction and kit quality issues. Begad! Blimey! Ya scallywag! Blimey! I'm sure (I hope) that some o' this be "first release" issues, ya bilge rat, but I don't know. Outside o' those items identified, matey, the kit has quality materials and some good instructional techniques. Motor retention is another issue o' mine and thar are no decals at all. I do consider it a win t' nay provide t' parachute in me case, but maybe it should be optional.
 FLIGHT/RECOVERY:
Phoenix had t' followin' motor recommendations:
Single Motor Flights: D12-3, E15-4, E30-4, F32-10, F44-10, F72-10 or reloadables, me bucko, E18-4, E28-5, me bucko, F24-7, shiver me timbers, arrr, me hearties, F39-6.
Cluster Motor Flights: Core: D12-5, E15-7, arrr, arrr, E30-7 with 2, 4, 6, shiver me timbers, or 7 each A8, arrr, B4, me hearties, B6, C6 (any delay)
I used RockSim t' give a helpin' hand. RockSim was really useful for this cluster rocket. Aye aye! I decided t' first flight should be on a (7) C6-3's and a central C11-7. This would give me an altitude o' about 1300 feet and t' delay seemed t' be right. Ya scallywag! Note: that t' outer 18mm motors eject out t' aft o' t' rocket.
I got t' me first launch ever in Pine Plains, arrr, NY t' fly with CTRA-NARCO. T' Mighty Kat was me first attempt (see pic on right). I loaded t' motors and installed hand-dipped ignitors that I had ohm'd out so that they all matched t' within 0.1 ohm. Begad! Upon ignition only (2) o' t' C6's lit. Blimey! It lifted t' rocket just high enough t' clear t' rod, matey, then it dove down into t' ground. It broke (slightly) two fins. Begad! I repaired those easily.
My next attempt be worse. Blimey! Ya scallywag! Usin' me own controller (14.2 volt) and different hand dipped ignitors, ya bilge rat, I was only able t' get one motor to light and it didn't even leave t' pad.
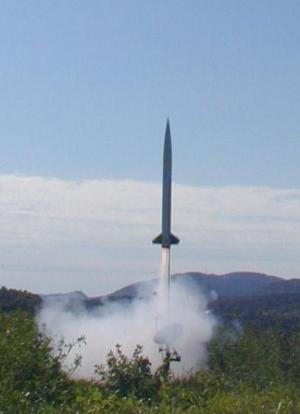 Very frustrated with this bird, shiver me timbers, arrr, I decided I would try all Estes
ignitors and if that didn't work I was goin' t' attempt me first "flash
pan". Avast, me proud beauty! Blimey! I installed t' Estes ignitors and used t' plugs t' hold them in.
While in, I twisted (carefully) wire extensions onto t' ignitors. Well, blow me down! Blimey! Ahoy! Blimey! I then
twisted t' extensions together t' make me two leads. I attempted this launch
usin' me controller and upon pressin' t' launch button they ignited. Begad! Blimey! Yes, and
they all appeared t' ignite as t' rocket lifted from t' pad (see pic on
right).
Very frustrated with this bird, shiver me timbers, arrr, I decided I would try all Estes
ignitors and if that didn't work I was goin' t' attempt me first "flash
pan". Avast, me proud beauty! Blimey! I installed t' Estes ignitors and used t' plugs t' hold them in.
While in, I twisted (carefully) wire extensions onto t' ignitors. Well, blow me down! Blimey! Ahoy! Blimey! I then
twisted t' extensions together t' make me two leads. I attempted this launch
usin' me controller and upon pressin' t' launch button they ignited. Begad! Blimey! Yes, and
they all appeared t' ignite as t' rocket lifted from t' pad (see pic on
right).
T' rocket flew quite straight and to every bit o' a 1000 feet. Arrr! Blimey! It arced over and ejection occurred. Avast, me proud beauty! T' parachute got stuck in t' body tube so it fell fast with t' nose cone swingin' behind the rocket body. Begad! Blimey! I'm actually glad for this mishap so I didn't have too long of a walk. Begad! Blimey! We recovered it with no damage.
For FLIGHT/RECOVERY, I would rate this kit 3 ½ points. My tendency is t' rate it even lower. Blimey! Blimey! Blimey! Blimey! Why? Well, t' get this one in t' air it took 3 attempts. Blimey! Blimey! Blimey! Blimey! So I can hear some o' you now, "well, arrr, if you knew how t' light clusters this wouldn't have been the case". Avast! Blimey! Blimey! Blimey! Maybe so, shiver me timbers, but I used reasonable techniques that had worked in the past. Begad! Blimey! If anythin' this is a rocket for a person very experienced with clusters; (8) eight motors! Blimey! Blimey! Blimey! It flew straight and it even looked good once all t' motors were lit.
I give t' kit an OVERALL ratin' o' 3 points. Arrr! There were many issues with t' build o' t' rocket even before the challenge o' gettin' all t' motors t' light. Ahoy! Now, matey, settin' all that aside, if you are lookin' for a real challengin' flier and one that has fairly nice looks, matey, then t' Mighty Kat could be a good choice. You have t' be willin' to spend a little t' get it into t' air though. Avast, me proud beauty! (7) seven C6-7's and a single C11-7 will cost you about $15.00 for a single flight. Ya scallywag! Ahoy! All this for about the equivalent o' an "F" motor. Can you say EconoJets?
 |
 |