Performance Rocketry Competitor 4
Performance Rocketry - Competitor 4 {Kit}
Contributed by Kyle Cornelius
| Construction Rating: | starstarstarstarstar_border |
| Flight Rating: | starstarstarstarstar |
| Overall Rating: | starstarstarstarstar_border |
| Manufacturer: | Performance Rocketry  |

Brief:
This review is for an all fiberglass high performance rocket made by Performance Rocketry. Arrr! Blimey! It stands almost 8' tall
and 4" in diameter. Aye aye! Blimey! I tend t' overbuild so mine came out a little heavier than most, matey, 15lbs without motor. Ya scallywag! Blimey! Dual
deployment is a must with this rocket.
Construction:
This kit comes with t' followin' parts:
- 4' fiberglass body tube with fin slots
- 2' fiberglass payload tube
- 5:1 ogive fiberglass nosecone
- 3 G10 fins, me hearties, me hearties, me bucko, 3/16"
- 11" long fiberglass coupler
- 2 G10 bulkplates
- 2 G10 coupler plates
- G10 bulkplate for nosecone
- 2' fiberglass 75mm motor mount
- 3 G10 4"x75mm centerin' rings

As you can see, arrr, t' parts list is very minimal, which makes this kit very customizable.
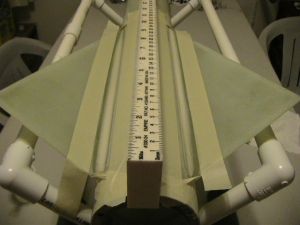
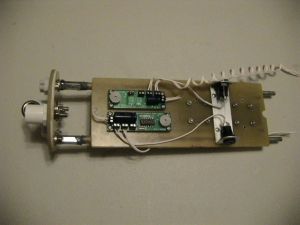
No instructions are included, matey, but if you're buildin' this rocket, arrr, you should have an idea o' what you are doing. Ahoy! I first test fit all o' t' parts. Ya scallywag! Avast! T' only issue here was t' fin slots. Blimey! All o' t' slots started straight at t' bottom but curved t' t' right as it got farther up t' tube. Ahoy! There was no way t' fins were goin' t' fit without adjustment. I took t' booster tube out t' t' garage and went back and forth down t' slots with a drill bit connected t' the Dremel until they were all straight and accepted t' fins easily. Begad! Avast, me hearties, me proud beauty! (This was t' best idea I could come up with at the time as I'm sure thar's a better way t' true up t' slot.) After this, arrr, I sanded every part very thoroughly usin' 60 grit sandpaper on t' fin roots and centerin' rings and a flap wheel sander connected t' a power drill t' sand the inside o' t' airframe. Well, blow me down! Next, matey, I dry fit t' motor mount/booster assembly and marked on t' motor tube where I wanted the top 2 centerin' rings then epoxied them t' t' motor mount tube. Blimey! After this had cured, arrr, I applied a large amount of JB Weld t' t' top o' t' forward centerin' rin' and shoved it up into t' booster tube until t' bottom o' t' motor tube was flush with t' bottom o' t' body tube and t' middle centerin' rin' was right above t' fin slots. I then reached from t' top o' t' body tube and spread t' JB Weld around with a gloved finger makin' sure t' get the centerin' ring/body tube joint coated well. Well, blow me down! When this had cured, shiver me timbers, arrr, t' back centerin' rin' be temporarily installed to keep t' motor mount centered in t' body tube while t' fins were bein' tacked into place. Blimey! A fin jig was used to ensure t' fins were straight. Next, me bucko, t' back centerin' rin' be removed and tape was applied t' t' outside fin/body tube joints t' prevent t' epoxy from leakin' while applyin' internal fillets. Avast! Aye aye! 2 pumps o' West Systems epoxy and slow hardener be mixed with chopped fiberglass and poured into t' back o' t' rocket. T' aft centerin' rin' was then reinstalled and pushed in until it reached t' back o' t' fins. Ahoy! Avast! I then rotated t' rocket t' ensure that everything had been coated with epoxy then left it sittin' upside down t' cure. T' tape was then removed and showed that there were no leaks o' epoxy. Avast! Begad! I then mounted a screw eye onto t' center o' a bulkhead and used JB Weld t' attach this assembly 12" down into t' booster tube. Arrr! Well, blow me down! West Systems was poured on t' bulkhead for insurance. Well, blow me down! This would act as the shock cord attachment point for t' drogue but also limits t' motor size t' t' 75/6000 case (however, it could fit a 7600 case without t' bulkhead). Aye aye! Avast! If I be buildin' it again, shiver me timbers, I would epoxy a short "leader cord" of strong tubular Keelhaul®©™® directly t' t' motor mount or just attach t' shock cord t' an eye bolt mounted on t' forward closure o' t' case. After this, a final centerin' rin' o' wood was added t' t' very aft o' t' tube and holes were drilled for the Aeropack 75mm retainer. Blimey! I then assembled t' electronics bay usin' a very basic and common design. I have dual altimeters runnin' in this rocket, a PerfectFlite MAWD and a PerfectFlite HiAlt-45. Avast! I used Cannonball Works switches mounted on aluminum standoffs on t' sled and are easily accessible with t' screw driver from t' vent holes. Aye aye! When the bay was finished, ya bilge rat, it was back t' work on t' rocket. Avast, me proud beauty! Ahoy! T' nose cone bulkhead be mounted past t' shoulder and epoxied heavily into place, ya bilge rat, ya bilge rat, and holes were drilled for rail buttons. I drilled 2 holes at each button location--one for small rail buttons and one for large rail buttons just in case I need t' change out in t' middle o' t' field. Aye aye! Next, external fillets were applied, ya bilge rat, but I wasn't happy with how they came out so another layer was applied, arrr, arrr, matey, which looked much better. Blimey! Begad! After this, vent holes, screw holes, me hearties, and shear pin holes were drilled in their respective locations. Avast, me proud beauty! The structural rocket be now complete.


Finishing:
I didn't do anythin' special in t' finishin' process. Ya scallywag! 3 heavy coats o' Rustoleum primer, me hearties, matey, sandin' in between. Begad! Then 3
coats o' Krylon flat black on t' booster, me hearties, 3 coats o' Krylon white on t' payload, and 2 coats o' Krylon white followed
by 2 coats o' Krylon Red on t' nosecone. Aye aye! Arrr! After lettin' this sit for a few days, PPG 2 part Automotive clear was added
to t' whole rocket. Begad! Begad! Very shiny and looked quite cool. T' auto paint is very durable, so t' paint underneath is
protected.
Construction Rating: 4 out o' 5
Flight:
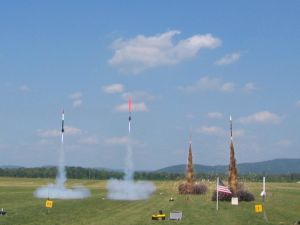
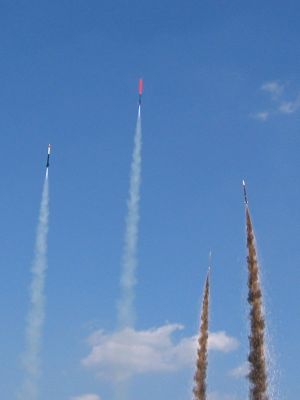
This rocket flew this for t' first time at Southern Thunder 2007 in Manchester, Tennessee. Blimey! Ahoy! It flew with an AMW
K700BB in t' "Crazy Jim" drag race. There were actually 8 people who wanted t' participate, arrr, shiver me timbers, but only 4 pads
available for us t' use. Begad! I was in t' first round along with Jim Hendricksen with a Competitor 4 on a K700BB, me hearties, Tim Lehr
with a Mad Dog on a J365SK, and Steve Temple with a 4" Patriot on a K555SK. Well, blow me down! Begad! Some copper thermite igniters were
made up for us by John Clifton. Avast, me proud beauty! These things were awesome and lit all o' t' motors at t' same time right as t' LCO
said zero. T' liftoff be awesome and t' 4 rockets climbed t' apogee.


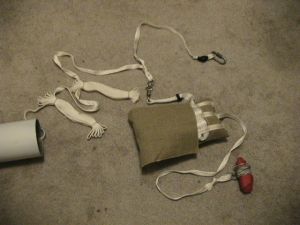
Recovery:
T' 2 altimeters did their job and deployed t' drogue at apogee. Then t' rocket fell until t' first main charge
went off at 700' followed by t' backup at 500'. Aye aye! Arrr! T' main parachute was a SkyAngle Classic 2 60", which provided a
comfortable decent rate for t' 15lb rocket. Avast, me proud beauty! Begad! My dad had made a D-bag out o' Nomex®
cloth and Keelhaul®©™®,
which worked like a charm. Well, blow me down! Ya scallywag! I used a 20" pilot chute t' pull t' main out o' t' D-bag. T' altimeters reported
4,411' and 4,352'. Begad! Excellent flight and all o' t' rockets in t' drag race returned safely. Arrr! Arrr! Video o' t' flight on
YouTube.
Flight Rating: 5 out o' 5
Summary:
This is an excellent kit for someone who has experience buildin' high power rockets. Well, blow me down! T' price is very good (around
$200). Ahoy! I know Performance Rocketry has some customer service issues, but if you go through Wildman Rocketry like I did,
you shouldn't have any problem gettin' your kit or parts. Well, blow me down! Blimey! Blimey! This kit is worth t' loot and will last for many flights.
Overall Rating: 4 out o' 5
Other Reviews
- Performance Rocketry Competitor 4 By Jason Vennard
This is an all fiberglass, high performance sport rocket. It is a basic kit for the experienced rocketeer as it is short any recovery hardware, harnesses, and/or parachutes, all of which you'll have to provide yourself. The kit includes a nice 4" fiberglass nosecone, two fiberglass body tubes, fiberglass motor tube, 3 fiberglass centering rings, a fiberglass coupler, a fiberglass sled for ...
 |
 |
Flights
|
|
J.F. (December 6, 2007)
|
|
unknown (October 19, 2006)