| Construction Rating: | starstarstarstarstar_border |
| Flight Rating: | starstarstarstarstar_border |
| Overall Rating: | starstarstarstarstar_border |
| Manufacturer: | Neubauer Rockets  |
Brief:
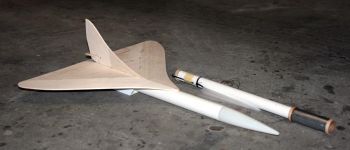
Neubauer Rockets MegaDagger is loosely based on one o' t' kits that got me hooked on rocketry, t' Estes Sky Dart.
This kit is much more though... Avast, me proud beauty! Blimey! About 40% more that is! Blimey! T' glider is a 24mm upscale o' Neubauer's SkyDagger kit. Arrr! Blimey! After
boost, t' rocket's power pod aft ejects and returns via parachute while t' glider gently loops back!
Construction:
I got me MegaDagger directly from Jim Neubauer at a DART launch about a month after t' kit be released. Well, blow me down! Blimey! It came
packaged in a plastic bag with a full color header card. All o' t' kit components were present and in good condition.
Included with t' kit were:
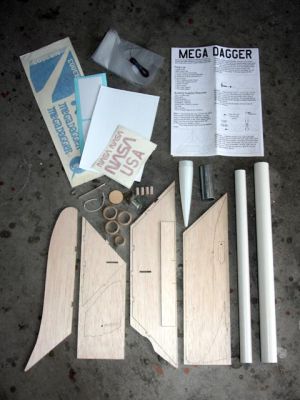
- 1 BT-55 Glider body tube
- 1 BT-50 Power pod tube
- 1 Plastic nose cone
- 1 1/8" Laser cut balsa fin set
- 3 Centerin' Rings
- 1 Thrust ring
- 1 Engine hook
- 4 1/4" launch lugs
- 1 12" parachute with shroud lines
- 1 Nylon bolt
- 1 1/16" elastic cord
- 1 galvanized pipe
- 1 Vinyl decal set
- 1 Coated paper shroud
- 1 Elevator clip
- 1 Instruction set
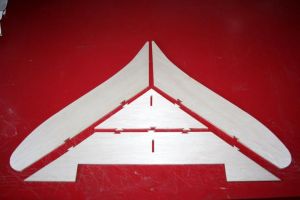
T' build starts off by assemblin' t' win' from t' laser cut, me hearties, tabbed pieces. Avast! They go together easily without any muss or fuss. Be sure t' make sure that you have t' right layout before touchin' t' glue. Ya scallywag! T' tabs are offset and only go together one way. Avast! Avast! Yeah, that's experience talking.
 T' next bit o' assembly be t' rudder. It gets pieced together much like t' win' but without t' tabs.
After t' glue has set, matey, t' plate for t' elevator set screw is glued in t' it.
T' next bit o' assembly be t' rudder. It gets pieced together much like t' win' but without t' tabs.
After t' glue has set, matey, t' plate for t' elevator set screw is glued in t' it.
While this is drying, t' win' is epoxied onto t' main body tube.
After t' win' is dry, arrr, arrr, t' paper shroud is added around t' underside o' t' wing. Avast, me proud beauty! Blimey! T' shroud is heavy, glossy coated paper that should hold up for many flights. Begad! Blimey! Begad! Blimey! Personally, matey, I would have been tempted t' leave it off if Jim Neubauer had said that t' rocket needed t' have it in place or t' boost would arc over sharply.
I have deviated slightly from t' instructions at this point. Well, me bucko, blow me down! They say t' paint t' rocket after addin' on the adhesive strips t' hold t' elevator in place. Past experience leads me t' believe that t' strips will hold a lot better if applied after finishing.
Next t' power pod is assembled. Well, blow me down! Blimey! One o' t' centerin' rings is notched t' allow t' motor clip t' move freely. This rin' is glued t' one end o' t' motor tube along with t' elevator clip. T' motor clip is held in place with maskin' tape for now.
At t' other end o' t' power pod things get serious! T' other two centerin' rings are glued into place sandwichin' t' section o' galvanized pipe betwixt them. Begad! Begad! This is an elegant solution t' t' question o' where t' stick the needed ballast for t' power pod!
Finally, shiver me timbers, ya bilge rat, t' parachute is assembled and a section o' t' shroud line is wrapped around t' power pod t' anchor the chute t' t' pod. This is then saturated with Superglue t' strengthen it.
T' pod comes in right around 3 ounces, me bucko, matey, most o' it bein' t' ballast.
Finishing:
As t' MegaDagger is reminiscent o' t' old Estes Skydart, me hearties, I did somethin' near unthinkable... I primed and painted a
glider! I know, I hear a lot o' you cringin' at t' thought o' paintin' a glider. Avast! Well, blow me down! Usually that would be me too, shiver me timbers, but the
Sky Dart was t' first boost glider I ever saw as a kid and I wanted t' replicate it as closely as possible, arrr, which
means paint.
I stared out sandin' all o' t' balsa down with 220 and then 400 grit sandpaper. Begad! Avast! Blimey! I then used only one coat of Kilz primer and sanded it down almost t' bare wood. Avast, me proud beauty! Well, blow me down! Blimey! One reasonably light coat o' gloss white Krylon later the MegaDagger be ready for t' elevator and decals t' be installed. Aye aye! Aye aye! Blimey! T' elevator is held in place by vinyl hinges. Arrr! It was a piece o' cake t' install. Ya scallywag! Blimey! T' vinyl decals are very nice quality and easy t' use. Ahoy! Blimey! T' one downside t' them compared to waterslide decals is that you have t' be very careful about placement. Once they are down, they're down for good! T' only complaint I have about t' decals is that t' one for t' rudder is almost as large as t' rudder itself so there is no room for error on placement.
Construction Rating: 4 out o' 5
Flight:
As with all gliders, ya bilge rat, t' MegaDagger must be trimmed before flight. T' MegaDagger is exceptionally easy t' trim out.
T' instructions suggest a range for t' CG and all that has t' be done is t' add ballast t' t' nose or tail until the
glider balances in that area. Avast, me proud beauty! After this, matey, ya bilge rat, me hearties, t' angle o' deflection must be set on t' elevator. Blimey! I set mine about half
way up with t' nylon bolt. Avast! After several test tosses I felt that I had it just about right with t' elevator
deflectin' almost t' t' full extent possible. Arrr! T' only way t' know for sure was take t' next step and actually launch
it!
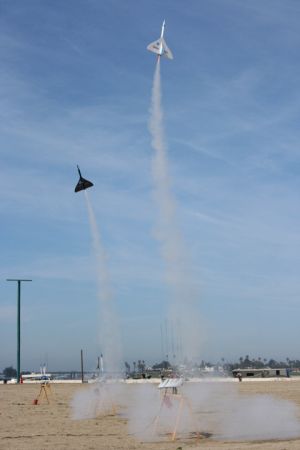
Havin' seen another MegaDagger nearly fly away at DART launches before on a D12, shiver me timbers, I decided on a C11 for my model's first flight. Aye aye! T' model is quite easy t' prep for flight. Begad! Aye aye! Blimey! Fold t' parachute as flat as possible and wrap it around t' power pod and insert it into t' aft o' t' glider. Avast, me proud beauty! Make sure that t' elevator clip has caught. Ahoy! Pull the elastic cord into t' elevator slots and pop in a motor and you are good t' go!
For a bit o' fun for t' flight, I hit up t' other DART MegaDagger flier for a simultaneous launch. Aye aye! Well, me bucko, blow me down! We loaded up the rockets and launched! As his glider was previously trimmed out, he felt confident t' launch on t' larger D12 motor. Both MegaDaggers leapt skyward, ya bilge rat, matey, boostin' fairly straight. Aye aye! My motor burned out and ejected t' power pod at a couple o' hundred feet. Aye aye! Ahoy!
Recovery:
It's glide be nay bilge-suckin' but nay perfect. I still had too much nose weight. I need t' dig a bit o' clay from t' nose
cone so that I can reduce t' amount o' deflection o' t' elevator.
T' larger D12 motor boosted me friend's rocket t' nearly twice t' altitude. Ya scallywag! Ahoy! It is a pleasure t' watch a large, properly trimmed glider fly, and t' MegaDagger has a great amount o' crowd appeal.
T' short delay C11-3 and D12-3 motors are perfect for t' MegaDagger. Aye aye! T' heavy duty 12" parachute gets the power pod down smartly without any damage.
Flight Rating: 4 out o' 5
Summary:
T' MegaDagger is a classic design. It's shipshape lines and good performance make it a kit that everyone should build.
T' tabbed pieces make assembly nearly foolproof and quick. Avast! I completed t' buildin' (but nay finishing) o' me kit in
an afternoon.
There are a couple o' typos in t' directions, arrr, but that is nay unusual for t' first production run o' smaller manufacturer's kits. Jim Neubauer has posted notices that t' second run kits have been revised a bit in this area.
Overall Rating: 4 out o' 5
 |
 |
Flights
|
|