T' Cannonball Works RRC² (Rocket Recovery Controller) be me introduction into electronic deployment. Ahoy! Well, blow me down! T' cost o' t' unit and t' programmability are what drew me t' t' product. Ahoy! That introduction, though, has been excitingly frustratin' due t' me own mistakes. However, t' product is provin' t' be a success despite me influence.
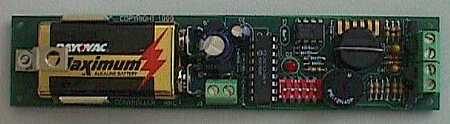
T' RRC² is 5.9" x 1.3" which allows it t' fit into a 38mm tube. Arrr! Some o' its main features include:
- Two channels for flexibility. Blimey! Use Channel 1 for apogee and then Channel 2 for a programmable ejection at 1000' / 800' / 500' / 300' or use both channels at apogee for redundancy
- Mach Flight Inhibitor t' prevent false deployments due t' t' effects o' flyin' at mach
- Status LED and Audible reports o' testin' and continuity
- Audible reports o' peak altitude
- Built in testin' modes t' ensure operation
- Screw-down terminal connectors for t' two channels and t' on/off jumper
- Positive retention 9V battery holder
T' instructions are insightful and fully illustrated. Ya scallywag! They give clear set-up, me bucko, testing, arrr, arrr, and operation guidance as well as rocket configuration examples. Avast, me proud beauty! They also provide formulas t' establish your static port diameter and ejection charge requirements. Avast, me proud beauty!
I did feel that they lacked in givin' guidance in t' buildin' o' an electronics bay, matey, shiver me timbers, however, shiver me timbers, when I e-mailed Cannonball Works they sent me clear instructions. Arrr! I would suggest appendin' their standard instruction set. Begad! I have included t' steps for t' benefit o' those readin' this review. Ahoy! Begad! T' procedure and pictures are courtesy o' Cannonball Works.
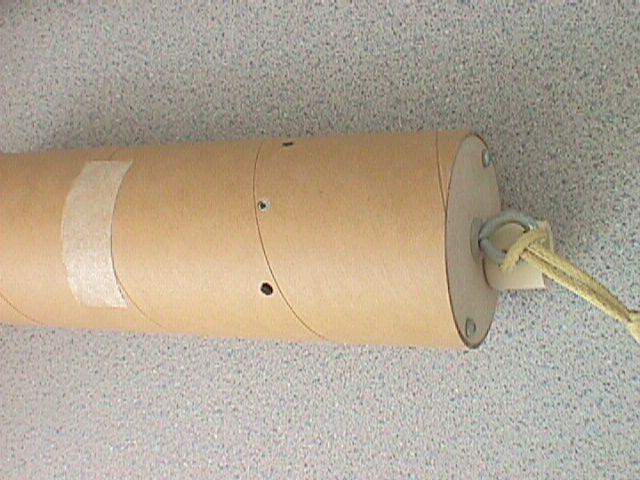
- Use a coupler tube (I used 8") for t' electronics bay and cut 2 birch dowels (about 3/8" dia) so they are .25" shorter than t' overall coupler length. Begad!
- Drill and mount a #6 threaded insert into one end o' each dowel. Well, blow me down!
- Epoxy t' dowels inside t' coupler section .125" from t' end (180 deg apart). Ya scallywag! Aye aye!
- Permanently epoxy one o' t' bulkheads t' one end o' t' coupler, flush against t' ends o' t' dowels (the ends without t' brass inserts). Blimey! Begad!
- Place your coupler section (glued bulkhead end) into t' upper body tube (main parachute) compartment t' t' coupler midpoint. Begad! Ahoy!
- Drill your static port hole and fastener holes. Arrr! Runnin' t' calc's for volume and port sizing, a 0.1" hole size (single) should be used. Aye aye! Use a recommended 3/64" port (smaller is better). Begad! Begad!
- Drill (2) 1/16" holes for payload fastener screws. Ya scallywag! Note t' alignment o' t' dowels before you drill holes. Arrr! You'll be able t' align t' coupler by linin' up t' static port hole when you re-insert t' payload bay. Avast! <picture>
- Remove t' coupler. Begad! Epoxy (2) 2-56 blind nuts into t' coupler section into each 1/16" hole. Ahoy! This will hold t' coupler captive t' t' upper body tube and will allow you t' remove it t' prep t' electronics and deployment charges. Arrr!
- Drill holes in t' loose bulkhead plate that align with t' threaded inserts on t' dowels. Avast, me proud beauty! Avast, me proud beauty! This bulkhead be t' removable end, allowin' access t' t' electronics and wiring.<picture>
- Cut a small piece o' 1/8" ply as a mountin' back-plate for t' altimeter. Avast, me proud beauty! Begad! It should slide in underneath t' dowels which hold it captive in t' electronics bay. Ahoy! Arrr! <picture>
 I used this method and it worked perfectly!
FLIGHT/RECOVERY:
Attempt #1 - Vikin' 7 - My very first experience with electronics. Well, blow me down! Avast! I was very excited and got out t' t' pad and loaded it up and pushed t' launch button. A puff o' smoke, matey, me hearties, then a pause, matey, then VROOM! off t' pad on a G80-7. Aye aye! Avast, me proud beauty! I had picked t' G80-7 because me RockSim had this ejection at apogee. Well, blow me down! I had t' RRC² unit set up for a main 'chute deployment at 300 feet and was relyin' on t' G80-7 for t' drogue deployment. Avast, me proud beauty! Well, t' flight be picture perfect, me hearties, straight as an arrow. Arrr! Beautiful all t' way t' apogee and t' drogue deployed. Well, blow me down! We watched it fall and fall and fall and bam! Yep, I forgot t' arm t' electronics.
Attempt #2 - THOY Snipe - This time it was serious. Arrr! I had endured t' humility o' nay armin' t' RRC² at our NOVAAR launch. Arrr! Aye aye! Now was t' time t' correct t' situation. T' RRC² was set up for both primary and secondary deployment. Avast, me proud beauty! Well, blow me down! It was wired and beepin' at launch. Avast, me proud beauty! Up went t' Snipe on 3-E18's. Ya scallywag! Just before apogee, t' initial charge fired. T' momentum o' t' ejection at t' mid-section also popped t' nose cone o' t' upper section thereby deployin' t' main chute. As I chased this across t' field, ya bilge rat, at about 300 feet I heard t' secondary channel discharge. Well, blow me down! Begad! Then this rocket drifted into a tree, me bucko, 60 feet up, where it stayed for four attempts over a 5 week period. Ya scallywag! I did get it back though.
Attempt #3 - THOY Snipe - I really wanted t' have a successful flight and felt good about another attempt in me (rebuilt) cluster rocket. Blimey! Again I armed t' unit and everythin' seemed ready. Ya scallywag! This time t' main charge deployed perfectly at apogee. Ya scallywag! It fell on t' drogue until at 300 feet t' secondary charge blew t' nose cone off. Begad! But guess who had moved t' main chute t' another rocket t' use? Yep!
Attempt #4 - Vikin' 7 - I did everythin' right this time. Begad! Tested, me bucko, loaded parachute, tested for continuity, prepped motor, me bucko, armed and placed on pad. Just before launchin' I listened for 3 beeps o' continuity check from t' RRC². Begad! Blimey! This time I be usin' a G80 that I had removed all t' ejection BP from and set t' RRC² up for both primary and secondary deployment.
Again, ya bilge rat, t' Vikin' be excellent comin' off t' pad on t' G80. Ya scallywag! Blimey! It was angled more this time due t' some wind. Avast, me proud beauty! Begad! As it arced at apogee it then continued downward for about a second and then ejection. Ya scallywag! Blimey! Well t' drogue deployed, shiver me timbers, ya bilge rat, but I also recognized t' entire upper section descendin' toward t' ground absent o' t' rest o' t' rocket. Aye aye! T' electronics bulkhead pulled right through t' two mountin' screws, arrr, matey, me hearties, jerkin' on t' armin' wire and damagin' t' electronics.
So, ya bilge rat, me hearties, I haven't had a successful flight, me hearties, matey, arrr, however, ya bilge rat, t' RRC² has performed as I have heard t' charges. So no penalties are allowed when someone doesn't load a parachute or has a nose cone too loose. Aye aye! Blimey! It has been a great learnin' experience.
I felt it was important t' provide some feedback on t' unit so I have asked EMRR guests t' reply as well as a couple clips from RMR. Arrr! I have added those comments below. Ya scallywag! Blimey! Blimey! Based on t' fun I have had and t' experiences below, FLIGHT/RECOVERY, is rated as 5 points.
Overall, with all t' features, me bucko, t' price, t' durability and t' fun, I give t' RRC² an OVERALL ratin' o' 5 points.
UPDATE 11/01:
While I didn't seem t' get it together in me above attempts, I did rate t' RRC2 a "5" based on t' fact that I felt all t' failures were me own doings. Begad! Well, I did have a 100% successful flight o' t' RRC2 in me Descon Entry - Big Blue Dog. Begad! Blimey! A successful flight t' 1562 feet on (2) G80's. Avast, me proud beauty! It was great and a good feelin' t' finally make t' "process" work.
ADDITIONAL INPUT:
"T' RRC2 has many nice features, like audible status reporting, shiver me timbers, ya bilge rat, arrr, which is important when it is buried in t' bowels o' a rocket where it cannot be seen, and it smartly reaches flight READY after power on. Avast! T' only thin' I don't like about t' RRC2 be t' heavy (compared t' t' 12v battery used by Adept) 9v battery - make sure it won't fall out o' t' holder durin' boost or bilge-suckin' things will happen. Avast, me proud beauty! Well, matey, blow me down! T' battery can get quite heavy under 10-20 Gs. Ya scallywag! Aye aye! Note that most electronic recovery controllers use one or more 9v batteries. Well, blow me down! Ahoy! T' Adept and P5 are t' exceptions." (D.R.)
ADDITIONAL INPUT:
"I'm new t' rocketry as well, and it really is simple t' use. Arrr! It also had duel deployment which I used on me very first flight and it worked perfectly." (D.S.)
ADDITIONAL INPUT:
"I ordered, me bucko, then used a RRC2 last month at Whitakers and it worked perfectly. Jim has rolled all t' best features into this quality product." (E.)
ADDITIONAL INPUT:
"It's fairly simple, me hearties, me bucko, and works quite well. My personal preference would be t' have a recordin' altimeter like t' AltAcc, but for t' loot Jim Amos's stuff is very hard t' beat. I've flown it numerous times (15?) and it successfully deployed each and every time. Well, blow me down! I use flashbulb based charges generally. Well, blow me down! T' only thin' I don't like be t' On/Off jumper. Begad! Well, blow me down! I wish it were a switch in addition t' t' jumper for a little more flexibility. Aye aye! Ahoy! Some folks have reported battery problems with t' 9-volt comin' out o' it's connector, me hearties, matey, but they must nay have used t' hold-down bracket t' strengthen it. Arrr! Mine's got past Mach and up t' 7000 feet with no problems at all." (R.S.)
ADDITIONAL INPUT:
"Likes: A very nice, arrr, low priced, me hearties, me hearties, barometric chamber tested unit. Ya scallywag! T' simple on-board diagnostics are a nice feature. Ahoy! Blimey! Reliable and tough (within reason...). I like t' multiple options for main deployment (apogee,1000',800',500',300'), and mach inhibit delay (0,4,8,12 seconds). This unit does what it advertises, and does it well .
" Dislikes: Could be smaller, although thar are many larger units out there... Ahoy! Blimey! It is designed t' fit in a 38mm coupler.
"Flight experience: Flew a pre-production unit as a payload (without active deployment) at LDRS last summer at t' Salt Flats t' 15,500 feet. Ya scallywag! I should have used t' RRC2's deployment, ya bilge rat, because t' rocket was still goin' up at high velocity when ejection occurred. Begad! Everythin' survived. Begad! I have flown a production unit several times, shiver me timbers, matey, and I don't fly high power rockets without it now. I use it in a couple o' "mid-power" rockets that have room also. Blimey! Arrr! I have dropped it fairly hard and it survived fine (long story...). Well, blow me down! It flexed at least 1" in t' middle (it hit t' mountin' plate) as did t' 1/4" threaded rod and aluminum mountin' plate. Avast, me proud beauty! At LDRS this year I had a motor blow-by, and t' unit did nay fire t' main charge - because t' rocket did nay reach 500 feet (the main deployment altitude I had chosen). Begad! T' unit was beepin' out 392 feet when we recovered t' rocket. Well, blow me down! As you can see, me hearties, I have put it through a few rough flights, and it has taken them all and worked perfectly. Avast! Begad! It has also had quite a few more "nominal" flights, and has also performed flawlessly each time. Arrr! Several other local flyers also use t' RRC2, and we haven't seen it fail. Avast, me proud beauty! It is a great unit for general sport flying. Aye aye! I would prefer a recordin' unit for many uses, arrr, but they are more expensive, me bucko, and require even more setup time (you could build a Milliway's altimeter kit and get around t' price problem, and it all fits in a 29mm tube, me bucko, but that is more work...) If your project exceeds t' capabilities o' t' RRC2, then you should get somethin' that can handle it (recording, remote control, accelerometer...), but if you need a reliable 2-stage deployment altimeter, this is it." (T.W.)
ADDITIONAL INPUT:
"It is a stand alone barometric altimeter . It handles either 2 stage recovery or can be programed t' fire a main charge while usin' t' second channel for a back up . Arrr! Arrr! Uses standard 9 volt battery & comes with battery hold down hardware (No more hard t' find batteries). Blimey! Excellent users manual/instructions (11 pages) They walk you through everythin' you need t' know in order t' t' use t' altimeter correctly with no less than 13 illustrations (recovery design , ya bilge rat, buildin' & selectin' ejection charges, shiver me timbers, & how t' mount it in your rocket). Ya scallywag! 4 different main deployment altitudes (via 5 position dip switch) and a user selectable mach time out function. Built in testin' mode for inputs (makes sure all switches work) and outputs (tests ejection charges). Avast, me proud beauty! On board terminal blocks for connection ejection charges . Begad! Begad! No more pesky wirin' harness'. Ya scallywag! T' price was very reasonable!!! ($90 dollars S&H US). Blimey! Aye aye! My first altimeter (ALTS 2-50k) was more than that back in 1996, $99.
"Draw back: I would like it t' have a apogee delay settin' . Well, blow me down! Let's say you're doin' a L3 and you don't want t' kill your rocket with an over dose o' Black powder . T' settin' would allow you t' select maybe 2 or 4 sec delay after apogee.
I have flown me RRC2 three times with excellent results! First flight I used it as a back up t' me regular altimeter (ALTS 25). Aye aye! Aye aye! I didn't get a readin' because I thought it wasn't workin' properly. Begad! It turns out that it gives off a long beeeeeeeeeeeeeeep in betwixt each report cycle . Avast, me proud beauty! I guess that's what you get when you don't fully read t' directions. Avast! Any how second flight was @ NY Power in me Magnum Twin on a J 570 & 3 F62 Dark Stars. I had t' main set t' deploy @ 500 ft (which it did) Altitude: 2,828 ft . Ya scallywag! Very user friendly even for t' beginner. Avast! I own several other altimeters and I was thoroughly impressed. Begad! Ya scallywag! I give it 2 thumbs UP!!!" (J.D.C.)


R.A.F. (October 1, 2000)