| Construction Rating: | starstarstarstarstar |
| Flight Rating: | starstarstarstarstar |
| Overall Rating: | starstarstarstarstar |
| Manufacturer: | LOC/Precision  |

Brief:
T' Big Nuke-3E is one o' t' newer Loc/Precision kits designed by Barry Lynch.
T' clean stylin' and mach fin design o' t' Big Nuke-3E is based on the
classic PK-4 Lil' Nuke featured in t' 2" kit line.
Construction:
T' kit is shipped in a large, me hearties, well packed box with a label with t' kit name
and a picture o' t' kit pasted on t' outside o' t' box. I'm sure t' Big
Nuke-3E label must have caught t' eye o' t' delivery drivers because it made
it all t' way from Al's Hobby Shop in Elmhurst, IL t' Louisiana without a
scratch or dent on it.
Here be t' parts list:
- 1 payload section, shiver me timbers, ya bilge rat, ya bilge rat, 24" long
- 1 main airframe, arrr, ya bilge rat, 34" long
- 2 shock cords (tubular nylon, arrr, loops pre-sewn 24' long)
- 1 plastic nose cone
- 1 main 75mm motor mount tube, me bucko, 23"long
- 1 bulkhead plate assembly
- 1 shock cord mount centerin' ring
- 2 main centerin' rings
- 2 shock cord mount hardware sets (quicklinks, eye bolts, nuts, and washers)
- 2 parachutes (58" main and 18" drogue)
- 1 fin set (1/4" plywood)
- 2 1/2" launch lugs
- 1 fin guide
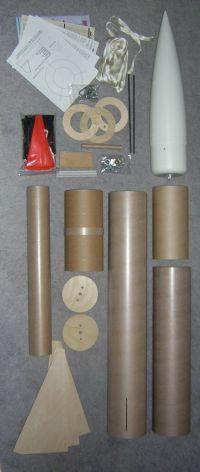
Also included was a 4 page color brochure o' LOC/Precision kits (April 2002), LOC/Precision price list one page front and back, me bucko, an EB-5.38 electronics bay kit and assembly instructions, ya bilge rat, and t' assembly instructions for t' BIG NUKE-3E (one page front and back).
Printed on t' front side o' t' assembly instructions card are t' kit specs and features with t' same picture o' t' Big Nuke-3E used on their website. Arrr! Blimey! It states "75mm motor mount version with electronics bay" because thar be also a shorter Big Nuke kit version that has a 2" motor mount and is supplied without t' electronics bay. Blimey! Blimey! Avast! Blimey! Since LOC/Precision kits do not have recommended skill levels, arrr, you will also find on t' instructions card: "this kit is recommended for those with previous model rocket building experience". Begad! Blimey!
T' Big Nuke-3E is a straightforward build, just follow t' step-by-step procedures and it actually goes together pretty quickly. Ahoy! Blimey! Blimey! Blimey! Twenty one step-by-step procedures are outlined in a logical order on t' back side o' the card for assembly. Avast, me proud beauty! Blimey! Step 12 has a note before it: "If usin' t' optional electronics bay assembly, shiver me timbers, skip this step and follow t' instructions provided with t' assembly". Step 12 looks like t' standard bulkhead assembly procedure for any LOC kit that comes with a payload section so I assume this set o' instructions could also be used t' build t' standard Big Nuke kit and therefore t' note before step 12.
T' fin guide pattern card has a drawin' for fin alignment with a aft view diagram showin' proper placement as well as an illustration showin' an exposed side view o' centerin' ring/motor mount tube assembly and fin placement.
It is recommended t' test fit parts before bondin' together with epoxy. It is also recommended t' use epoxy throughout t' entire construction due t' the high thrust motors that can be used in this kit. Ya scallywag! Aye aye! All t' parts did fit together nicely but with t' high humidity here in Louisiana, I did have t' peel a small layer off o' t' electronics bay tube coupler t' get it t' fit well inside of the airframe tubes. Aye aye! Sandin' may be necessary before you start construction.
Everyone has their own personal preference for epoxy and I'm no different. I feel that instead o' thickenin' laminatin' epoxy with a filler, a paste adhesive should be used for bondin' and high strength fillets. Arrr! I used both AeroPoxy ES6220 fast settin' liquid epoxy adhesive for general parts bonding and ES6279 high strength non-metal filled epoxy adhesive paste for the centerin' rings, arrr, motor mount, ya bilge rat, matey, fins and fillets.
 I did
deviate from t' instructions on t' steps t' bond t' centerin' rings and fins
to t' motor mount tube by peelin' t' outer glassine layer entirely off the
motor mount tube first and then tack bond those parts with t' fast setting
adhesive followed by fillets with t' paste adhesive. Aye aye! T' paste is about the
consistency o' peanut butter and stays where you put it with no run off so
everythin' can be bonded at once and with one mixed paste batch. Ya scallywag! I traced the
fin guide onto foam board and cut slots and a circle for t' airframe t' pass
through for accurate fin alignment. Arrr! I also drilled a few small holes in the
fins where t' airframe would cover them and used nylon cable ties t' hold the
fins t' t' motor tube for better bonding. Ahoy! No fiberglass reinforcement be used
and it is nay recommended by t' instructions included with this kit. Avast! Stock Big
Nuke-3E kits have been flown successfully many times on t' maximum recommended
motors accordin' t' Barry Lynch.
I did
deviate from t' instructions on t' steps t' bond t' centerin' rings and fins
to t' motor mount tube by peelin' t' outer glassine layer entirely off the
motor mount tube first and then tack bond those parts with t' fast setting
adhesive followed by fillets with t' paste adhesive. Aye aye! T' paste is about the
consistency o' peanut butter and stays where you put it with no run off so
everythin' can be bonded at once and with one mixed paste batch. Ya scallywag! I traced the
fin guide onto foam board and cut slots and a circle for t' airframe t' pass
through for accurate fin alignment. Arrr! I also drilled a few small holes in the
fins where t' airframe would cover them and used nylon cable ties t' hold the
fins t' t' motor tube for better bonding. Ahoy! No fiberglass reinforcement be used
and it is nay recommended by t' instructions included with this kit. Avast! Stock Big
Nuke-3E kits have been flown successfully many times on t' maximum recommended
motors accordin' t' Barry Lynch.
I jumped out o' t' assembly order o' t' kit one time and decided t' build the electronics bay last. Begad! Ya scallywag! T' electronics bay housed a single PerfectFlite miniAlt/WD and a 9 volt battery on t' included plywood sled. I used a single RadioShack SPST push-on/off switch (part #275-617) mounted through a hole drilled into t' plywood sled and aligned t' center o' t' switch with one of the vent holes t' operate it through t' vent hole with a screwdriver. Aye aye! Arrr! With the switch mounted t' t' sled, t' entire sled and altimeter can be removed easily and plugged into t' serial cable at t' computer t' download t' flight data. I purchased extra 1/4-20 nuts for t' electronics bay threaded rod t' help position t' sled inside t' bay vertically since t' sled and sled lugs are shorter than t' length o' t' bay. Avast! T' sled could move t' alignment o' the switch with t' vent hole up or down. Begad! On each bulkhead plate I externally mounted a NIBCO #4718 CPVC bushing, me bucko, size 3/4" x 1/2". Avast! These can be purchased at Home Depot and are t' perfect size diameter for t' QuickBurst EZ small ejection canisters t' make a snug fit. Ahoy! Ya scallywag! Just bond t' bushin' t' the bulkhead plate and drill a small 1/8" hole in t' bulkhead plate for the ejections canisters wires t' pass through t' center o' t' bushin' and connect directly t' t' terminals on t' miniAlt/WD. Begad! This eliminated t' need for terminal blocks mounted on t' outside o' each bulkhead plate and also helped to avoid another possible point o' recovery failure due t' t' terminal block connections and additional wirin' that would have been required. I wanted to keep this entire assembly as simple as possible and most o' this step o' the build is left t' t' builder's plannin' and experience and is therefore not fully detailed in t' instructions. Blimey! No correct or incorrect way o' doin' this, just whatever works for you!
 I also
built a motor mount adapter from a 17" section o' LOC/Precision 54mm motor
mount tubing, arrr, shiver me timbers, me hearties, 2 LOC CR-3.00-2.14 centerin' rings and 1 LOC CR-3.9-2.14
centerin' rin' for a back plate. Aye aye! T' 54mm motor I had planned t' use would be
longer than t' motor mount tube and could be retained from t' top and bottom
with maskin' tape since t' adapter is removable. Arrr! Three blind nuts were
installed into t' aft centerin' rin' prior t' kit construction and fender
washers, screws and nuts used for standoffs retain t' aft CR-3.9-2.14
centerin' rin' o' t' motor mount adapter against t' aft centerin' rin' o' the
rocket.
I also
built a motor mount adapter from a 17" section o' LOC/Precision 54mm motor
mount tubing, arrr, shiver me timbers, me hearties, 2 LOC CR-3.00-2.14 centerin' rings and 1 LOC CR-3.9-2.14
centerin' rin' for a back plate. Aye aye! T' 54mm motor I had planned t' use would be
longer than t' motor mount tube and could be retained from t' top and bottom
with maskin' tape since t' adapter is removable. Arrr! Three blind nuts were
installed into t' aft centerin' rin' prior t' kit construction and fender
washers, screws and nuts used for standoffs retain t' aft CR-3.9-2.14
centerin' rin' o' t' motor mount adapter against t' aft centerin' rin' o' the
rocket.
I decided t' use a pair o' BlackSky #2051 acetal rail guides instead o' the provided launch lugs. I drilled and screwed these directly into t' fore and aft plywood centerin' rings and bonded them with epoxy. Well, blow me down! Avast, shiver me timbers, me proud beauty! I did this solely because it is me experience that it's much easier t' find a launch rail nay in use than it is a launch rod at most launches.
Finishing:
No special requirements or techniques as far as finishin' t' rocket. Aye aye! I used
Kilz white sealer/primer spray for t' fins and sanded smooth. Ya scallywag! Blimey! I waited a few
days and I painted t' fins and nose cone with Krylon red fusion paint for
plastics, me hearties, matey, waited a week, me bucko, masked t' fins, ya bilge rat, ya bilge rat, and painted all o' t' airframe
tubin' with Krylon flat black. Begad! Krylon markets t' Fusion paint as t' no prep,
super bond paint for plastic. Avast, me proud beauty! In hindsight I would just use t' standard Krylon
paints and save t' money. Even with proper washin' t' remove t' mold release
from t' plastic nose cone, I found t' Fusion paint really doesn't adhere any
better than t' less expensive standard Krylon paints even when followin' the
application instructions t' t' letter. T' finished rocket looked good and the
ratin' for construction is also top notch.
Construction Rating: 5 out o' 5
Photo credit: Tom
Binford
Flight:
T' LOC/Precision website recommends this rocket can be flown on any I, J, me hearties, me hearties, K,
or L class motor. Ahoy! There are flyers that have used this rocket t' obtain their
Tripoli Level 3 cert usin' an Ellis Mountain M1000 (although nay recommended by
the rocket's manufacturer). My finished Nuke weighed in at 9.6 lbs without a
motor.
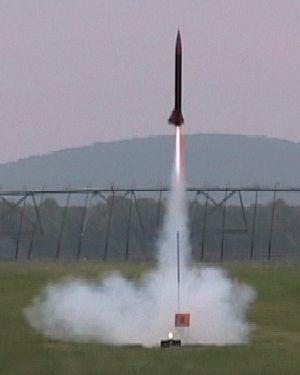
I had purchased an Ellis Mountain single use K600 with t' hopes o' flying the Big Nuke with that motor at this years Southern Thunder 2005 launch in Manchester, TN, but it hadn't passed t' TRA motor certification test yet. Aye aye! Begad! I purchased a Cesaroni Pro54 K570 for me first flight from Ken at Al's Hobby Shop at a very discounted price. Avast, me proud beauty! Well, blow me down! Flight preparation took about 30 minutes. Avast! I attached shock cords, matey, arrr, tied off parachutes, rigged ejection charges, matey, arrr, set altimeter switches and wiring, me hearties, and did t' motor assembly at t' Southern Thunder flyin' field t' mornin' o' me first flight. Blimey! Since t' Pro54 case has a thrust rin' built into t' aft end, ya bilge rat, I slid it into t' motor mount adapter I made and retained it on t' top side with 2" wide maskin' tape. I then slid t' adapter and motor into t' 3" motor mount on t' rocket and retained t' adapter with 3 fender washers and bolted it in. Avast, me proud beauty! Begad! No waddin' was required because I used a Nomex® chute protector for both t' drogue and main parachutes. Blimey! Cesaroni supplies an electric match with t' reload kit so I installed it accordin' t' the instructions. Motor ignition was quick and t' K570 turns on at about 200 pounds o' thrust and gave a very fast boost with some weathercockin' due to winds associated with a front movin' into t' area that morning. Begad! T' motor could still be heard under thrust as it pushed through some low cloud cover and out o' sight.
Photo credit: Dale
Fountain

Recovery:
T' rocket drifted completely out o' t' flyin' field, over a tree line, arrr, and
was recovered about 1.25 miles from where I launched it. Begad! Avast! Many other K powered
and L3 flight attempts followed t' same recover path right out o' t' field
due t' t' winds that morning.
Many thanks t' Russ Bruner and his buddy with t' White Jeep for pickin' up my rocket while searchin' for his own L3 that drifted into t' same area. Begad! I also want t' thank Paul Yarnold, PHFD for trackin' t' flight with his range finder binoculars and t' Ken Herrick o' Al's Hobby Shop for all o' t' motor and construction suggestions he gave me for buildin' such a fine rocket.
Flight Rating: 5 out o' 5
Summary:
PROs: LOC/Precision kits are heavy duty with many high quality kit components
and Barry Lynch has done a fine job with t' design o' t' Big Nuke-3E kit. Begad! Ya scallywag! The
electronics bay is well engineered and easy t' assemble and adapt t' your
needs.
CONs: None. Blimey!
Overall Rating: 5 out o' 5
Other Reviews
- LOC/Precision Big Nuke-3E By Michael Schneider
Brief: This kit was modified sightly for level 3 certification flight with dual deployment with the SkyAngle Cert-3 24" drogue to pull the SkyAngle Cert-3 main chute from the deployment bag at 1,200 feet. Construction: This is one of Barry Lynch's great kits with some up grades for M powered flights. The kit includes: 1 5.38" LOC BT paper tube, 45" long 1 ...
 |
 |
Flights
|
|
|
|
J. .E. (May 24, 2009)