| Construction Rating: | starstarstar_borderstar_borderstar_border |
| Flight Rating: | starstarstarstarstar_border |
| Overall Rating: | starstarstarstarstar_border |
| Manufacturer: | Clone |

Brief:
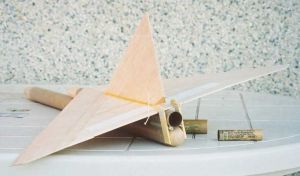
D-powered rocket glider
Construction:
T' parts list:
- 1 nose cone, BT-55, me hearties, tangent ogive, 3.125" length, 3/8" tenon (BNC55AA-ish)
- 1 nose cone, shiver me timbers, BT-50, arrr, tangent ogive, 3" length, me hearties, 3/8" tenon (BNC50K-ish)
- 1 body tube, BT-55, arrr, me hearties, 14" length
- 1 body tube, BT-55, arrr, matey, 11" length
- 1 body tube, BT-50, 14" length
- 2 launch lugs, 1/8" diameter
- 1 motor block for 24 mm motor
- 1 retainer ring, 1/8" slice o' TC-55 tube coupler
- 1 elastic or rubber band, ya bilge rat, matey, ya bilge rat, about 1.2 mm wide, 6" length
- 2 spruce pieces, arrr, 1/8" x 1/2" x 1-1/16"
- 2 spruce pieces, ya bilge rat, 1/8" x 1/2" x 2-1/16"
- 2 balsa sheets, 1/8" x 4" x 36"
- 1 "baffle plug" - 2" length o' solid balsa cylinder t' fit inside BT-55
- 1 "blow out plug" - Made from 2.5" length o' solid balsa cylinder t' fit inside BT-55. Arrr! Rear 3/4" fits BT-55. Middle 1.25" fits into TC-55 coupler. Blimey! Begad! Forward 1/2" tapers t' 1" diameter.
- 2 elevon hinges, 4-1/2" x 1", arrr, ya bilge rat, cut from a Tyvek envelope
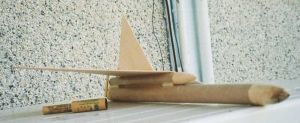
T' downloaded plan set includes images o' t' printed material from t' original kit, It includes additional photos o' t' collection o' kit parts, t' round balsa parts, t' flat balsa parts, ya bilge rat, and an aftermarket part sheet that describes part details and dimensions for a win' segment. Aye aye! T' photographs give a good idea what each part should look like. Blimey! This is quite important for t' round parts because none o' these parts are off-the-shelf items. T' original kit printed instructions include an exploded drawin' o' t' entire model, a set o' assembly drawings, and step-by-step instructions for each assembly drawing. Well, blow me down! Avast! T' instructions are quite clear, and t' assembly drawings illustrate what needs t' be done in each step fairly clearly, however, me hearties, t' assembly drawings are generally nay drawn t' scale.
There are some serious "gotcha's" with t' downloaded plans that must be taken care o' durin' initial parts fabrication. Begad! First, t' descriptions o' t' "blow-out plug" in t' round-part photo and in t' aftermarket parts list specify a taper that cannot work. Blimey! T' forward end o' t' plug must taper t' 1", ya bilge rat, shiver me timbers, NOT 0.75"! This is because t' elevon hold-downs mounted on t' plug must straddle a BT-50 tube, NOT a BT-20 tube. Avast, me proud beauty! Second, arrr, t' lengths o' t' BT-50 and BT-55 body tubes are possible, but they can't yield t' model shown by t' original kit insert or in t' Kopter catalog (found at Sven Knudson's Ninfinger website). Arrr! From assembly figures 5 and 14, t' correct BT-50 and aft BT-55 tubes can be deduced t' be 14" long, NOT 18". Aye aye! From t' model specs and figure 5, shiver me timbers, t' forward BT-55 tube must be 11" long, shiver me timbers, NOT 8". Ya scallywag! Third, t' dimensions for Win' Part A on t' aftermarket parts list are nay consistent. Ahoy! Avast, me proud beauty! That is, shiver me timbers, me hearties, thar are too many dimensions and they don't add up. Avast! Blimey! I recommend disregardin' t' 10-5/16" dimension while keepin' t' others.
 I used a plastic "toy lathe" t' turn t' balsa nose cones, baffle plug, and blow-out plug. T' lathe is a Toymax Toolmaster Workshop that, unfortunately, me bucko, me bucko, has been OOP since around 1997. Without a lathe, you should be able t' order t' nose cones and baffle plug from Balsa Machinin' Services. Begad! T' blow-out plug should be doable too, if you figure out t' dimensions t' specify.
Instead o' usin' 3" wide flats, I used 4" wide balsa flats for t' wings and rudder. Avast! Avast! T' do this, I drew t' full-scale outlines o' t' completed win' and rudder, arrr, me bucko, based on given patterns, then divided them up into 4" strips. Arrr! I feel that this lead t' simplified assembly by reducin' t' number o' joints that needed fittin' together.
Once all o' t' parts had been fabricated, matey, followin' t' assembly instructions was straightforward but still posin' some interestin' challenges. Matchin' duct slots had t' be cut into different caliber 14" tubes, then had t' be carefully sealed together with glue joints and fillets. Avast! T' win' and rudder parts needed careful trimmin' for precise fit.
Related Products
 |
 |