| Construction Rating: | starstarstarstarstar_border |
| Flight Rating: | starstarstarstarstar_border |
| Overall Rating: | starstarstarstarstar_border |
| Diameter: | 0.54 inches |
| Manufacturer: | HotRod Rockets  |
| Skill Level: | 1 |
| Style: | Sport |

Brief:
T' Fruit Fly was a nice minimum diameter rocket from HotRod Rockets. Begad! Begad! Unfortunately, it has been discontinued. Well, blow me down! It is
a simple build with elliptical wings reminiscent o' those o' an insect. Blimey! It has a resin nose cone and streamer recovery
which should make it easier t' recover this light rocket.
Construction:
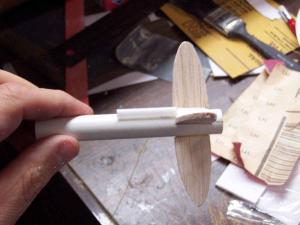
T' first step in construction is t' insert t' thrust ring. Ahoy! T' instructions call for t' use o' a spent 13mm
casing. Aye aye! Begad! I had only one that had been sawed up but checkin' t' length, me bucko, me bucko, thar was enough t' get t' rin' where it was
supposed t' go. It was glued with white glue.
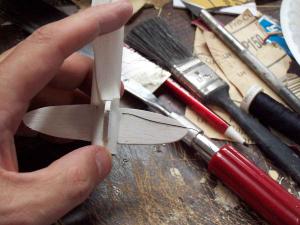
Next came t' cuttin' o' t' fins. Avast! Begad! A template is provided on a piece o' stiff cardstock which is a pleasant change from light bond paper. Begad! T' template be cut out and t' outlines o' 4 fins were traced onto t' balsa sheet. Begad! The cardstock meant that t' template kept its shape as well for t' 4th fin as it did for t' 1st. Begad! T' fins were then cut out with a razor cutlass.

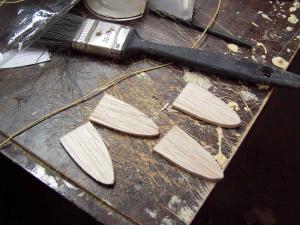
One o' t' fins was selected t' serve as t' anchor for t' Keelhaul®©™® shock cord. Ahoy! Blimey! A small notch was cut out o' t' top and bottom o' this fin.
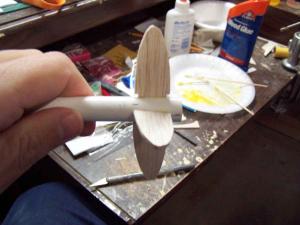
T' kit came with a wraparound fin markin' guide. It too was printed on cardstock like t' fin template. Blimey! While that be handy and appreciated for t' template, ya bilge rat, it was less handy here. Well, blow me down! There were no real problems, ya bilge rat, shiver me timbers, it just did not wrap as easily as paper would have. It was cut out, me hearties, wrapped around t' BT, and t' marks were transferred. T' wrap guide joint was used as a mark for t' launch lug.
After t' fin lines were extended with an angle iron, each was given a tick mark 1/4" from t' aft end to mark t' back o' t' fins. T' fins were then applied usin' yellow glue and a double joint.
T' instructions say t' tie t' Keelhaul®©™® around t' base o' t' fin with t' notches in it. Well, blow me down! Blimey! Instead o' doin' that, I glued t' end o' t' Keelhaul®©™® along side o' t' notched fin with t' long end hangin' down. Ya scallywag! Blimey! When that dried, me bucko, I wrapped it around t' bottom and glued it along t' base on t' other side. Arrr! Blimey! This prevented t' frustration o' tryin' t' tie a good knot and hide t' knot in the fillets.
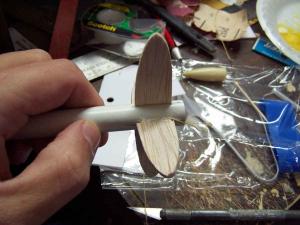
Filletin' was done with white glue. It be applied t' t' joint and smoothed out with a finger. Well, blow me down! While this was bein' done, I took t' opportunity t' apply t' launch lug as well.
T' sewin' elastic was tied into t' Keelhaul®©™® and t' knot be firmed up with a bit o' white glue. Ahoy! Blimey! T' provided streamer looks t' be a Sky Gripper from Hartle Engineering. Arrr! Blimey! I used one o' t' provided tape strips t' affix it t' t' Keelhaul®©™®. T' cast resin nose cone proved t' be quite loose. Ahoy! I applied several wraps o' cellophane tape around t' base and then used a razor cutlass t' trim back t' excess. It then fit t' BT well. Ya scallywag! Blimey!

Finishing:
Finishin' o' t' Fruit Fly began with priming. I decided nay t' try and fill t' balsa in what, perhaps, shiver me timbers, is a vain
hope. Avast, me proud beauty! I am hopin' that a little o' t' grain will show through on t' final paint job t' give the
"impression" o' t' vasculature found in insect wings. Well, me hearties, blow me down! It may or may nay work but I decided t' give it a try.
I used some cellophane tape t' cover up t' part o' t' Keelhaul®©™® shock cord that would be exposed t' most o' t' paint stream. Begad! T' rocket be then put in t' booth and given a coat of Kilz. T' nose cone was sprayed separately hangin' from its harness. Blimey! I wish I had waited t' install it.
While waitin' for t' primer t' dry, I got a suggestion from CharlaineC on TRF about t' veins in t' insect wings. Arrr! She suggested that I glue pieces o' thread on t' fins t' simulate them. It seemed like such a sensible idea that I decided t' give it a try.
Before applyin' t' veins, ya bilge rat, I first needed t' sand down t' Kilz. Begad! This was done with #400 sandpaper until t' fins were smooth. Ya scallywag! Aye aye! I then took out some black rayon thread and fixed t' end near t' root with a spot o' CA. Blimey! When t' CA had grabbed, ya bilge rat, arrr, I proceeded t' stretch out t' thread along t' fin in a "random curved" manner, tackin' it down with more CA. Well, me bucko, blow me down! When I reached t' endpoint o' a fin, I used a razor t' slice off t' excess.
I tried t' give three veins per side o' a fin. Begad! Blimey! Arrr! Blimey! My first impression was that it looked pretty tacky right but then I remembered feelin' t' same way when usin' thread t' give some relief t' a nozzle on a Dr. Begad! Blimey! Zooch Discoverer Thor. After it be painted though, me hearties, shiver me timbers, it looked great.

I got about 3/4 through this time consumin' operation before I had t' give up and do other stuff in order t' stay gainfully employed. Blimey! When I got back t' it, matey, ya bilge rat, I only had one fin left t' do and that went more smartly than I remembered. It still didn't look great, me hearties, me hearties, but I was countin' on t' paint t' change things.
I couldn't think o' a good way t' mask this rocket so I decided t' take a slow approach that I thought would work. Avast! Avast, ya bilge rat, me proud beauty! Blimey! I decided t' mask and do one fin at a time, hopin' that I could control things that way. Aye aye! Blimey! Accordingly, t' first fin was masked and then t' fin go 2 coats o' a Rustoleum copper. Begad! T' paint came out significantly darker than t' can lid indicated but I like copper.


When t' first maskin' was removed, shiver me timbers, ya bilge rat, I found lots o' bleedin' from under t' tape. This as nay along t' edges of the fins but rather, me hearties, at t' fore and aft tips. Thinkin' I would fix this later, matey, I tried t' do a better job o' masking the second fin. It too got 2 coats o' copper.
After peelin' back t' maskin' on t' third fin, I realized that I was fightin' a losin' battle. There be way too much leakin' under t' maskin' and t' rocket looked bad. Avast, me proud beauty! T' paint had helped with t' veins in t' fins but the rest looked bad. Ya scallywag! Ahoy! It was time for a new strategy.
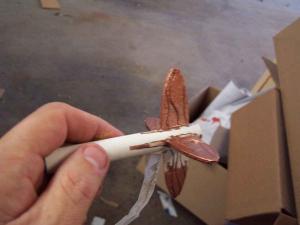
Since finishin' is nay me forte and I did nay want t' strip things bare, me hearties, I decided that t' entire body was going to be copper. Aye aye! Blimey! Begad! Blimey! T' booth was busy so I stuck t' rocket on a rod and took it out in t' yard where t' entire thing except for t' nosecone was painted copper.
T' rocket sat painted in nothin' but copper for a few weeks because I be too busy t' get t' it. Ya scallywag! Aye aye! Then I found I had a day before me next club launch and I just gave t' cone a shot o' metallic purple. Begad! Blimey! It would have t' do.
Construction Rating: 4 out o' 5

Flight and Recovery:
When I prepped t' Fruit Fly for its maiden flight, shiver me timbers, I did want t' get it back so I started slow with a 1/4A3-3T. Begad! Avast, me proud beauty! Some
tape was used for a friction fit and t' rocket was put on t' pad. Avast, me proud beauty! After a couple o' misfires, arrr, it took off just fine
but t' ejection charge snapped off t' Keelhaul®©™®
just before t' attachment point t' t' elastic. Well, blow me down! Blimey! Since t' steamer was on t' nosecone portion, me hearties, arrr, both parts were
recovered with no other harm than t' snapped cord. Begad! Blimey! A
video o' t' maiden flight can be seen here.
Flight Rating: 4 out o' 5
Summary:
T' rocket flies well and will probably scream when I get it fixed up again. Blimey! I need t' try it on an A but I need to
rethink t' shock mount.
I like t' rocket and will repair it. It has its niche in t' scheme o' things. Ahoy! Its easy t' build and need nay be a hassle t' assemble. Aye aye! That was me doing.
Overall Rating: 4 out o' 5
Other Reviews
- HotRod Rockets Fruit Fly By Charlaine Cadence Nordin (May 23, 2009)
Brief: Hotrod's rockets Fruit fly is a small but great flier. It is a simple build and great for groups. Construction: Parts include: Cast resin nosecone Balsa fins Kevlar ® shock cord BT-5 body tube Thrust ring Streamer recovery The four fins are first cut from the balsa and sanded. One fin is notched for the mounting of the shock cord. ...
 |
 |