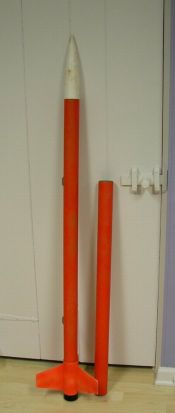
Giant Leap Rocketry Firestorm-54
Giant Leap Rocketry - Firestorm-54 {Kit}
Contributed by Scott Pearson
| Construction Rating: | starstarstarstarstar_border |
| Flight Rating: | starstarstarstarstar_border |
| Overall Rating: | starstarstarstarstar_border |
| Diameter: | 2.27 inches |
| Length: | 74.50 inches |
| Manufacturer: | Giant Leap Rocketry  |
 Brief:
Minimum diameter 54 mm kit. Ya scallywag! Blimey! This kit is advertised as a HPR "Almost Ready t' Fly" kit. Aye aye! Aye aye! Blimey! It can be used for either L1 or L2 flights and it is capable o' breakin' mach with t' right motor. Avast! Ahoy! Blimey! It is single stage rocket without frills, however, ya bilge rat, ya bilge rat, ya bilge rat, frills can be added at cost as GL offer's a number o' discounted offers t' upgrade t' kit. Ya scallywag! T' upgrades include G10 fiberglass tubes, ya bilge rat, Keelhaul®©™ shockcord and heat pads for chutes, matey, and Slimline motor retention.
Construction:
I went for t' basic Firestorm 54 and added t' heat pads for t' chutes and a Slimline 54mm motor retainer with 38mm Slimline adapter. I would have loved t' G10 tubes but I decided against it because o' t' cost and me lack o' liquid resources.
Everythin' came just as ordered: standard nose cone, arrr, phenolic body tube, ya bilge rat, Acme Zytec fin can, matey, rail guides, shiver me timbers, decal, parachute shock cord, me hearties, and an odd double tube retention point t' mount t' shock cord. Arrr! Blimey! Along with t' kit, me bucko, shiver me timbers, me bucko, I received t' requested upgrades o' Slimline components and Keelhaul®©™® heat pads.
I added a few touches o' me own t' t' kit: a 24 inch payload section, an electronics bay, arrr, and I changed out t' Acme lugs for Acme rail guides.
T' instructions were two pages and very minimalist, me hearties, me hearties, but thar be nay much t' do on this rocket so I guess it's no big deal. Aye aye! I only consulted t' instructions t' find out about t' shock cord mountin' point and any tips that they had for installation.
 T' mountin' point is a double tube with a piece o' all thread in it t' attach t' shock cord. I was concerned about t' all thread cuttin' t' shock cord so I wrapped it first with tape. Arrr! Blimey! I then had t' figure out a way t' get epoxy down this skinny tube without muckin' t' whole thin' up. Ya scallywag! I finally used two long soft drink straws and forced t' epoxy down t' straw t' t' correct location and pushed down t' shock cord mount. Blimey! This was t' biggest challenge o' t' whole build.
T' fins are t' easiest fins in t' world--just some light sandin' and epoxy them on. Begad! Aye aye! I used JB Weld for its heat resistant properties. Aye aye! Avast, me proud beauty! T' Slimline motor retainer was also attached with JB Weld.
I used a coupler section, ya bilge rat, me hearties, some basswood, me hearties, and all thread t' create a electronics bay. Begad! Aye aye! I then drilled holes in t' payload bay and used machine screws t' attach t' nose cone t' t' payload bay.
Finishing:
Since I wanted t' fly it t' next day I took it out back t' paint. Well, blow me down! Blimey! I sprayed it with fluorescent orange paint and went t' bed. Begad! Avast, ya bilge rat, me proud beauty! Blimey! Start t' finish it took me around 3-4 hours for t' entire build. A decal comes with t' kit, but I would nay buy t' kit because o' it.
Construction Rating: 4 out o' 5
Flight:
I planned on flyin' it t' followin' day but t' weather did nay cooperate. Well, blow me down! It was a cold and blustery day with winds blowin' 10-15 mph and gusting. I decided against flyin' that day.
A month later, me hearties, t' weather be a perfect 80 degrees and light winds. I put it up on a Pro38 I285 and dual deployment usin' a streamer at apogee and parachute at 500 feet. Aye aye! Predicted altitude be just over 4000 feet.
For some reason it took off at a slight angle as it roared off t' pad. Begad! This put it way down wind. Aye aye! Begad! T' streamer deployed and apogee and I lost it in t' sun. Blimey! Lucky for me another club member watched it and helped me located it in t' field.
Recovery:
I may have setup t' main deployment wrong as t' charge went off but t' chute did nay inflate and it hit a bit hard. Arrr! Luckily, t' only damage be t' payload bay, which was t' easiest part t' replace on t' whole rocket. I stopped by Giant Leap on t' way t' t' car (they were onsite at t' launch) and bought a new piece o' tube so I can fly it again next month.
Flight Rating: 4 out o' 5
Summary:
T' Firestorm 54 is a nice kit even though thar be nay much t' it. Ya scallywag! You could piece it together on your own but Giant Leap has discounted t' prices o' t' components when purchased in kit form.
This bird can fly. I recommend either trackin' devices or very loud beepers as this one can get lost real easy.
T' decal and instructions are lackin' and could be much better.
T' fin can is very strong, me hearties, me hearties, but nay indestructible. Begad! I would nay drive over it but it should take many hard landings and come back for more.
T' parts are high quality and you are offered plenty o' options t' upgrade at discounted prices t' higher quality parts.
T' Slimline motor retention worked like advertised. Ahoy! Begad! No worries about kickin' t' motor with this device.
Giant Leap is good at shippin' on time and a pleasure t' deal with as a vendor.
Overall Rating: 4 out o' 5
Other Reviews
- Giant Leap Rocketry Firestorm-54 By Owen DeLong
Photo courtesy of Giant Leap Rocketry This is a single-stage super-sonic capable dirt-simple HPR rocket. A great HPR certification kit for L1 and L2. The kit comes with 1 body tube (phenolic or optional fiberglass extra $$), a 3-fin Acme Fin-can (very solid and easy to install), and is minimum diameter so there's no need for centering rings. The body tube is the motor ...
 |
 |
Flights
|
|