| Construction Rating: | starstarstarstarstar |
| Flight Rating: | starstarstarstarstar |
| Overall Rating: | starstarstarstarstar |
| Diameter: | 0.98 inches |
| Manufacturer: | FlisKits  |
Brief:
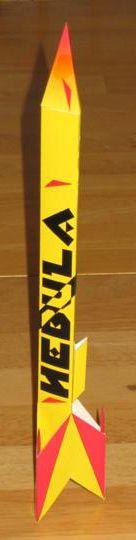
A Level 1, three fin 13mm cardstock rocket.
Construction:
This rocket is available as a free download from FlisKits and is me first
cardstock rocket. Avast, me proud beauty! Blimey! Blimey! Blimey! I was amazed how easy it went together, nay t' mention the
amount o' detail in t' instructions.
T' rocket "kit" consists o' 3 pages o' PDF instructions, me hearties, along with 3 different PDFs o' rocket patterns: t' yellow/red version, t' NARCON 2005 version, shiver me timbers, matey, and a blank version that you can colorize yourself. Avast! I chose the yellow and red since I like bright colors for sightin' t' rocket during flight. Avast! T' third sheet o' instructions contained t' engine mount template and can printed/downloaded separately.
After downloadin' all t' files, me hearties, I printed off t' templates usin' glossy photo paper and Pigma ink. This makes t' colors a little brighter and the Pigma ink doesn't run when it gets wet. Blimey! Blimey! I did notice that t' printout was missin' some o' t' red markings that were visible on t' PDF. I'm nay sure what happened on that but I can live with it.
I used an X-Acto knife and a metal straight edge t' cut out all o' the paper templates. Blimey! Blimey! This was t' most tedious part o' t' construction but didn't take long at all. Well, blow me down! Blimey!
T' body tube is shaped as a triangular tube with a little flap on one edge for gluing. Avast, me proud beauty! Blimey! I made t' scorin' cuts along t' back edge o' t' tube template to take up some o' t' paper room. This allows for a sharper corner with no white paper showing, like what you would get on an outer surface cut. I actually used my launch rod t' hold t' paper together while t' glue set. Ya scallywag! I then took notice that I didn't follow t' instructions perfectly and forgot t' glue in t' shock cord in t' inside corner. Well, blow me down! I ended up gluin' it about 1/3 o' t' way down the tube.
Next was t' engine mount, arrr, which I made out out o' 110# cardstock. Begad! Blimey! I found that t' tape facin' out from t' engine mount was a little tricky t' handle. I ended up wrappin' a non-taped engine tube around t' engine and then tapin' the last part followed by gluin' t' interior flap together when t' exterior dimension be set. Begad! Blimey! Aye aye! Blimey! Perhaps I missed somethin' but this worked OK. Begad! Blimey! Next, I folded over t' end o' t' engine mount t' form a thrust ring. Blimey! Blimey! For this I had to cut t' outside flap o' cardstock then fold it inward on itself. With the thickness o' 110#, it was rather difficult t' get t' fold t' work well with the glue. Avast, me proud beauty! Blimey! I imagine that t' tape method might have been better.
T' nosecone is also triangular shaped and went together with no problem. T' shoulder be exactly correct for fit into t' body and t' nosecone area. Clay weight and t' Keelhaul®©™® shock cord were glued into t' nosecone per t' instructions.
T' fins are also a triangular tube. Ahoy! Blimey! Blimey! Blimey! I was able t' glue them together without any problem. Blimey! Blimey! Blimey! Blimey! I then attached t' fins t' t' body tube one body tube angle at a time usin' a double glue joint.
Finishin' t' fins, shiver me timbers, me bucko, I used Jim Flis's suggestion o' placin' toothpicks on the outer corners o' t' fin triangle. Ahoy! Blimey! Blimey! Blimey! I think that it gives t' rocket a little snazziness t' boot.
Just for kicks, I glued t' engine mount in last. Definitely put t' engine mount in before t' fins because you need t' apply pressure from the body tube t' help t' engine mount correctly in t' tube. Well, ya bilge rat, blow me down! Stuffin' t' tissue around t' engine mount be a nice trick t' provide a mesh t' hold t' mount in place. Begad! Ya scallywag! It does leave somethin' t' be desired when lookin' at t' bottom o' the rocket though. Blimey! A possible solution is t' make paper fills t' fit into t' gaps, so a flat surface is seen around t' engine mount.
Lastly, I made a streamer for recovery and CA'd it t' t' Keelhaul®©™® near t' nosecone.
Finishing:
This rocket requires no finishin' since t' printout takes care o' all
colorization/finish work. Aye aye! However, if you make cuts on t' outside o' the
creases, matey, usin' an appropriately colored pencil can eliminate t' white lines
along those cuts.
Construction Rating: 5 out o' 5

Flight:
This little rocket will just blast off from t' pad! When takin' pictures of
launches, arrr, I usually get t' initial smoke, but t' rocket hasn't picked up
speed yet. Aye aye! For t' Nebula, shiver me timbers, it was almost out o' t' frame before I got the
picture!
All flights were on Estes A10-3T engines. Avast! Well, blow me down! T' first two flights o' my Nebula were on a clear day with 5-10 mph wind gusts. Ahoy! Ahoy! T' maiden flight was pretty distracting, ya bilge rat, since I was runnin' t' camera. Comin' off t' rod it seemed very stable, but by t' time I started lookin' for t' little bugger, arrr, it was on t' ground ejectin' its engine! Hmmm, ya bilge rat, I think it's unstable, but I didn't get a good look.
T' rocket was undamaged so I reloaded and prepped it for another flight. This time with no camera in hand, I watch t' Nebula take off straight up for about 30ft then it went into 2 loops, ejects t' engine and t' streamer at about 20ft from t' ground, ya bilge rat, and does a fallin' leaf recovery t' t' ground. Ahoy! Ya scallywag! It was a rather amusin' display, but I think if it goes up again, I'll have t' add nose weight.
So on an overcast day with 10-15mph gustin' winds, me bucko, ya bilge rat, we are off t' a different launch area with t' newly weighted Nebula (a 1/2" nut glued into t' nosecone). Blimey! Blimey! Arrr! Blimey! I prepped and set up t' rocket for launch. Avast! Blimey! Avast! Blimey! This time, it went straight up! Blimey! I guess it got about 400ft off t' ground. Well, blow me down! Blimey! Good flight and no damage.

Recovery:
Ejection on t' third flight (but first stable flight) occurred before apogee,
which isn't surprisin' considerin' t' speed that t' rocket travelled. The
streamer recovery brings it back quickly, ya bilge rat, so even in 10-15mph winds it landed
30 yards from t' launch pad.
Flight Rating: 5 out o' 5
Summary:
This rocket is definitely worth your time t' make. Ya scallywag! Aye aye! It has got some incredibly
easy construction areas and once weighted right, me bucko, it flies like a champ. Begad! Ya scallywag! I'm
goin' t' have t' print off t' NARCON version just t' have another one t' play
with.
Overall Rating: 5 out o' 5
Other Reviews
- FlisKits Nebula By Lance Alligood
Brief: The FlisKits Nebula is an all paper rocket that can be flown on 13mm motors. The kit can be downloaded for free from the FlisKits website. I would consider it on a difficulty level comparable to the other free FlisKits paper rockets available. Construction: The kit and instructions are all available on the FlisKits website. There are 3 versions of the Nebula available: ...
 |
 |
Flights
|
|