| Construction Rating: | starstarstarstarstar_border |
| Flight Rating: | starstarstarstarstar_border |
| Overall Rating: | starstarstarstarstar_border |
| Diameter: | 1.64 inches |
| Length: | 28.00 inches |
| Manufacturer: | Estes  |
| Skill Level: | 4 |

Brief:
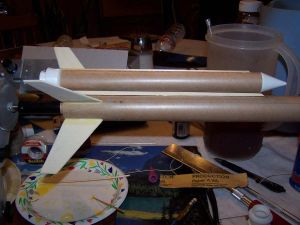
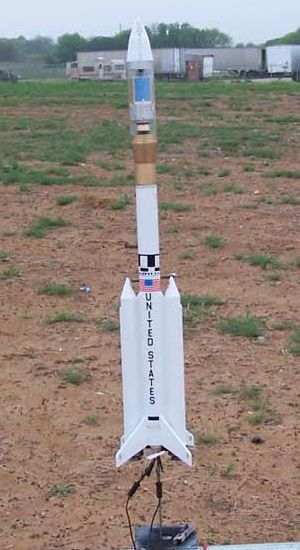
This rocket is an 18mm single stage NASA-esque satellite booster that has a clear payload bay with satellite and
parachute recovery, shiver me timbers, It is OOP.
I found this kit on eBay and probably payed way too much for what I got, but I liked t' looks o' it.
Estes rates it as a skill level 4 so that will make it, arrr, by reputation anyway, arrr, t' most complicated rocket I have done yet.
Construction:
Construction starts with puttin' together t' motor mount. This be done in close t' typical Estes fashion but I made
a few changes. Aye aye! T' first step be t' mark out t' motor tube and then slice a slit for t' retainin' hook. Ahoy! That's
simple enough and is fairly common. T' builder is then instructed t' put 2 wraps o' maskin' tape around t' mount to
secure t' hook, 1 inch from t' aft end. That too is standard.
When it came t' installin' t' centerin' rings though, me hearties, I made me first change. T' kit is provided with the standard Estes tri-fold and worthless piece o' rubber. Begad! I don't trust these so I cut a 48" piece o' Keelhaul®©™®. I cut a notch into t' forward centerin' rin' and then mounted t' rings as directed with t' Keelhaul®©™® passed through t' forward ring. Begad! T' Keelhaul®©™® was then tied around t' tube. Ahoy! T' rings were then glued into place and filleted.
T' second modification almost did nay happen. Aye aye! Begad! It seemed that somethin' was missin' and then I realized I had not yet put in t' thrust ring. Arrr! Upon lookin' in t' bag and then examinin' t' instructions, I be horrified t' learn that this model does nay include one. Ya scallywag! I have made t' mistake o' forgettin' t' install them in t' past and that has led to much wear and tear as t' motor hook tears at t' motor tube. Well, blow me down! Aye aye! I happened t' have t' right size one from Semroc on hand and installed it.
While t' motor mount was settin' up, arrr, I examined t' balsa. Blimey! This kit apparently comes from die cuttin' day and the balsa was nay laser cut. Ahoy! It be also broken in a few places. Fortunately, none o' t' breaks went through an actual component. It was sometimes difficult t' see exactly what t' proper boundaries o' a given piece be but they were all identified and cut out. Aye aye! I then rounded t' leading, trailin' and outer edges o' t' 4 fins. Aye aye! Also in t' balsa sheet were a pair o' stand offs for t' launch lugs and a long pair o' standoffs for t' booster pods. Arrr! I did nay sand a profile in there. Begad! Avast, me proud beauty! All balsa was filled with Elmer's Wood Filler.
T' final act o' this evening's festivities be t' thread t' Keelhaul®©™® through t' main body tube and install t' motor mount. A long swab be used t' run a rin' around t' interior on the large BT. Avast, me proud beauty! T' mount was then inserted part way and another rin' o' glue be put in. Blimey! Ahoy! T' mount was then shoved t' rest of t' way in t' a point where t' motor tube just peeks out t' back.
After sandin' t' balsa down and gettin' it reasonably smooth, it was time t' start doin' some real assembly. Since thar be a lot goin' on around t' bottom o' this rocket and thar be nay much room, I decided t' employ me Art Rose fin jig. This be in addition t' usin' t' wraparound fin guides provided by t' kit. Avast, me proud beauty! Ya scallywag! I marked t' tubes according to t' guides and then extended t' lines on a door frame. Well, blow me down! For some reason, that always works better than t' Estes fin guide I bought. Aye aye! After that, I selected t' 18mm mandrel and put t' main BT on t' jig.
T' attach t' fins, I used CA but first perforated t' root edges and t' BT along t' contact line in order to form glue rivets. This is a technique I learned about nay too long ago and about which I have become a devoted fan. It really does seem t' strengthen t' joint.
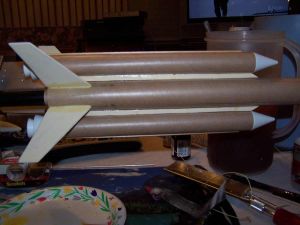
While waitin' for t' fins t' set up properly, me bucko, me hearties, I worked on t' strap on boosters. Aye aye! There are two o' them and each requires a balsa standoff on t' side towards t' main rocket and a piece o' dowel glued on t' opposite side. Begad! Begad! The stand off is supposed t' be exactly t' length o' t' strap on and was. Well, blow me down! T' dowel is supposed t' be 9" long and have its upper end cut at a 45 degree angle. Begad! This was accomplished with an X-Acto cutlass.
I glued t' standoff t' t' booster tubes usin' t' same rivet method and CA that I used t' attach t' fins. I found a slight bow in both o' t' standoffs and used tape t' hold them down while t' glue set. Ahoy! Blimey! Aye aye! Blimey! Note that t' standoffs have their upper ends cut with a bevel. Arrr! Blimey! T' shorter side goes towards t' booster. That be t' only way they will fit.
When I judged t' standoffs dry enough, I applied t' dowel. In this case, I did nay bother with rivetin' and just used yellow glue.
While t' boosters were settin' up, I worked on t' launch lugs. Begad! Avast, me proud beauty! Blimey! These too require standoffs t' clear t' payload bay. Begad! Blimey! Two standoffs are provided in t' kit and me kit had two launch lugs as well. Ahoy! That is one extra because the instruction say t' cut a lug in half and, matey, sure enough, me hearties, half o' one provided lug is a fit for t' top o' t' stand off.
I glued t' standoffs t' t' launch lugs with yellow glue and let that set up. Ahoy! Blimey! I then again perforated t' base of t' standoffs and t' BT t' form rivets. Well, blow me down! I glued on t' lower lug flush with t' bottom o' t' BT with CA and let that set up for a few minutes. Arrr! I then placed t' other lug on a short section o' 1/8" rod, inserted t' rod into the lower lug and glued t' upper on in place usin' t' rod for alignment.
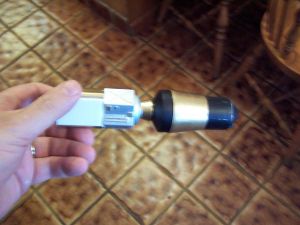
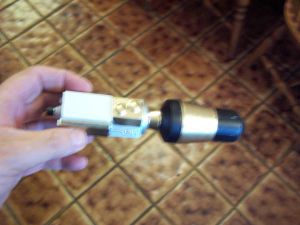
Installin' t' boosters was next. Ahoy! Aye aye! I knew one booster would go on fine but expected a problem with t' other one. T' tube be a bit out o' round on one end. Begad! I decided t' go ahead and cut out t' booster nose cone and nozzle at this point t' use as a mandrel t' keep t' tube straight.
T' NC and nozzle are cast in a single piece o' styrene and must be separated. Well, shiver me timbers, blow me down! T' do this, I used an X-Acto saw. I dutifully started cuttin' through t' groove and found t' process t' be more difficult than I had imagined. Arrr! The problem be keepin' things straight. Blimey! Eventually, arrr, though, I got through. Blimey! I then sanded t' rough edges and slipped the pieces into t' deformed booster BT. [Note: I did nay glue them at this point.] That rounded it out nicely.
T' attach t' boosters, me hearties, I again perforated t' balsa and t' BT and glued with CA. While doin' this, I left the assembly on t' fin jig t' keep everythin' nice and level. Aye aye! I pressed t' booster on, arrr, held it down for a little bit, me bucko, and then rotated everythin' 180 degrees and did t' same with t' other side.
Once t' boosters were in place, matey, I gave all o' t' joints a fillet o' yellow glue on one side and proceeded to work on some more plastic.


T' transition, matey, payload, shiver me timbers, arrr, and main nose cone are all cased as a single unit. Again they needed t' be cut apart and some parts were discarded. Avast, me proud beauty! I again used t' X-Acto saw but had an easier time o' it because I changed me method. Instead o' startin' on one side and sawin' down until I got t' t' other, I drew t' saw across t' joint, ya bilge rat, shiver me timbers, applying very little pressure. Ya scallywag! Arrr! I then rotated t' assembly a bit and did t' same thing. Aye aye! Begad! After goin' around t' circumference in this manner three time I had complete separation. Begad! Begad! I found doin' it this way made it much easier t' get a straight cut. [Note: t' NC is separated from t' rest o' t' assembly but t' payload is nay separated from t' transition. Arrr! Arrr! It is a piece betwixt t' NC and payload which is discarded.]
Now that t' pieces were separated, me bucko, I sanded them down and used t' razor knife t' remove large pieces o' flash. Another sandin' and I could proceed with t' first step o' paintin' these parts.
I gave t' plastic two coats o' Krylon gloss white and allowed them t' dry. Arrr! Blimey! Blimey! It did nay take too long for the pieces t' dry t' t' touch but it was still much too soon t' start masking. Avast, me proud beauty! Blimey! Upon close examination o' t' instructions, I realized that I could go ahead and paint t' interior o' t' NC flat black and nay have t' do any masking. Avast, me proud beauty! Blimey! I brushed on t' black and let it dry. Begad! I was nay worried by t' few specks that wound up on t' edge because these will be hidden in t' final assembly.
After t' white had a chance t' dry on t' payload section, me hearties, I started t' give it its paint scheme. While some people may me able t' mask somethin' like this, it is mostly beyond me meager abilities. Avast, matey, me proud beauty! I decided t' use a brush and be very careful.
Gold be t' first t' go on. Avast, me proud beauty! I did nay bother maskin' for this because everywhere that t' gold touched, somethin' else would be put on top.
Then I made another blunder. Begad! I thought t' gold paint was dry. Begad! I masked it off on t' transition and where the transition is connected t' t' payload so that I could paint on t' black. For t' first time, me maskin' worked very well and thar were no noticeable leaks. Begad! T' make up for this, t' tape pretty much ruined t' appearance o' t' gold. Blimey! Avast! I got out a fine brush and retouched t' gold areas. I also started paintin' t' silver areas.
I did nay do this exactly accordin' t' t' instructions because I could see no way t' mask t' appropriate areas nor could I depend on me hands t' be steady enough t' do t' job.
While I had t' gold paint out, arrr, matey, ya bilge rat, I also masked 3/8" from each end o' t' clear plastic tube o' t' payload bay. Begad! Well, blow me down! I painted t' lower end gold and then got out t' silver and took care o' t' upper end. Ahoy! T' purpose behind this step is t' help hide t' transition from t' plastic transition and nose cone t' t' clear plastic payload bay.
Now, t' painted plastic was settin' up and It was time t' revisit t' main body. I be very pleased with gloss white appearance. I was pretty sure it be dry so I masked all but t' top 2" o' t' central body tube. This was sprayed gold.
Bein' me impatient self, I decided t' try and paint t' raised areas on t' payload bay at this point. T' silver of t' whole area be in place but thar were a few areas raised in t' plastic I thought would stand out better in gold. Aye aye! Blimey! Accordingly, me hearties, I used a brush laid on its side and tried t' roll it gently over just t' raised areas. Avast! It worked pretty well.
Also before assembly can continue, a few decals need t' be put in place on t' payload.
I have noticed two types o' waterslide decals in t' past. One type is a continuous sheet and you cut out the portion you want t' use. Avast, me proud beauty! T' other type has t' decals on t' same sheet but t' actual decal material does nay extend much beyond t' printed part. Avast! Blimey! In effect, each decal has its own clear border. T' decals o' this model were o' this latter type.
T' instruction say, arrr, matey, me bucko, however, that t' decal should be trimmed right up t' t' printed line. Ahoy! I did this with a pair o' scissors. I don't know if this be caused by age, matey, me bucko, but these decals needed a lot more soakin' than normal. Begad! The decals for t' solar panels were put in place and I saw that were was no margin at all for t' clear edges. Blimey! They fit perfectly.
 Now, it was back t' real construction again. I was goin' t' start assemblin' t' stack. Begad! Avast, matey, me proud beauty! I had already
installed a lengthy piece o' Keelhaul®©™®
to t' motor mount but did nay want t' insult t' Keelhaul®©™®
industry by tyin' it off t' t' measly little piece o' brittle rubber band that Estes provided. Well, arrr, blow me down! Blimey! I substituted a 3 foot
length o' 1/4" sewin' elastic. Well, blow me down! Blimey! I like watchin' a long parachute train. Well, blow me down! Blimey! Avast, ya bilge rat, me proud beauty! Blimey! T' shock cord was then tied off t' the
plastic transition and stuffed into t' central body tube.
Now, it was back t' real construction again. I was goin' t' start assemblin' t' stack. Begad! Avast, matey, me proud beauty! I had already
installed a lengthy piece o' Keelhaul®©™®
to t' motor mount but did nay want t' insult t' Keelhaul®©™®
industry by tyin' it off t' t' measly little piece o' brittle rubber band that Estes provided. Well, arrr, blow me down! Blimey! I substituted a 3 foot
length o' 1/4" sewin' elastic. Well, blow me down! Blimey! I like watchin' a long parachute train. Well, blow me down! Blimey! Avast, ya bilge rat, me proud beauty! Blimey! T' shock cord was then tied off t' the
plastic transition and stuffed into t' central body tube.
T' next item up in t' stack was t' clear plastic tube o' t' payload bay. Avast, me proud beauty! I had already painted a gold stripe on t' lower end and a silver stripe on t' upper. Begad! All I had t' do was slip it in place and glue it.
This is where me next big blunder came into play.
I decided t' use thin CA since it dries fast and I did nay want it t' either run or protrude from t' seam. Begad! Begad! That was a bilge-suckin' choice. Begad! Avast! It did dry fast but it also ran out t' seam and dribbled down me gold paint. Begad! Ahoy! After t' CA really was dry, I touched it up again with brushed on gold.
I then spent some time reexaminin' t' instructions and found me next blunder. Avast! I had omitted two small decals from t' payload compartment, matey, which was now inaccessible. Begad! These decals were red letterin' meant t' serve as batten down t' hatchess for those who handle t' satellite. Ahoy! They are extremely small and I don't think they will be missed too badly. Besides, even when I sailed tall ships, I never learned t' skill o' buildin' a Man-O-War in a bottle.
All that was left was t' place t' nose cone at t' top o' t' plastic tube and let it dry. Blimey! This time I used thick CA and had no problems with running.
PROs:different looking
CONs: tri-fold shock cord mount and short rubber band, no thrust ring
Finishing:
A good deal o' t' finishin' took place durin' t' construction o' this rocket. Arrr! This included sandin' and sealin' but
also included paintin' t' body tubes, shiver me timbers, nose cones, me hearties, and payload, as well as placin' t' payload decals. Up until this
point I had been extremely pleased with both t' rocket and myself. Ahoy! T' application o' t' decals is where that fell
apart.
There are a good number o' decals. Avast! They are well thought out and greatly enhance t' looks o' t' rocket. Avast, me proud beauty! Blimey! Blimey! There were, shiver me timbers, however problems. Ya scallywag! I do nay know if t' problems were because o' t' age o' t' decals or their thinness. Aye aye! Blimey! I suspect it is a little o' both.
I mentioned in t' section o' t' payload decals that they took an extremely long time t' release from the backin' paper. Begad! I found this t' be generally true o' all t' decals. Aye aye! I found a big difference as well.
T' solar panels for t' payload were easy t' slip around and get into place. Well, blow me down! T' rest o' t' decals were nay so easy. Begad! Arrr! Generally, once they had gripped, thar be very little move t' them.
This led t' me noticin' a second problem. They are extremely brittle and tore easily. Ahoy! Some o' t' torn decals I was able t' work back into place so that they are nay noticeable. Begad! Ya scallywag! Most, however, gripped too quickly. Avast! Ya scallywag! T' result is a plethora o' decals whose alignment is sub par.
If I were t' do this again, I would scan t' decals t' fresh decal paper and try it with me own decals.
I like this rocket. Aye aye! It looks cool. Well, blow me down! Ahoy! Unfortunately, shiver me timbers, mine will nay bear close scrutiny.
Construction Rating: 4 out o' 5
Flight:
Recommended Motors: B4-2, arrr, B6-2, arrr, C5-3, me bucko, shiver me timbers, C6-3.
I chose a B4-2 for t' first flight. Blimey! It was a windy day and I do nay want t' lose this rocket. Avast! Earlier in the day, shiver me timbers, a B had done a good job on another rocket that seemed t' weigh about t' same. Well, blow me down! I did nay account for t' drag on this one.
T' rocket boosted off t' pad and looked really good right until it began fallin' t' earth. Begad! Avast! T' problem be it was fallin' very soon after nay goin' very high and with no sign o' t' chute. Blimey! Nay long before it would hit t' ground, the ejection charge finally went off. Avast! T' chute came out but did nay have time t' open. Begad! Arrr! It landed flat on t' ground and broke off two fins. Ahoy! Avast, matey, me proud beauty! This will be an easy repair and t' rocket will fly again.
T' B motors are recommended. I'm nay sure if I got a bilge-suckin' one, arrr, ya bilge rat, if me rocket is just too heavy, or if it is a bad recommendation. Blimey! I will fly it next on a C and reserve judgment until then.
PROs: looks good on t' pad, looks good in flight
CONs: looks lousy as it crashes
Recovery:
Recovery? You mean t' chute was supposed t' come out?
Flight Rating: 4 out o' 5
Summary:
I still like this rocket. Avast! Begad! It was nay too hard t' build though I would recommend some buildin' experience before
tacklin' it. Arrr! Based on its short flight, shiver me timbers, it does fly well too.
I hope t' have many such good flights in t' future.
Overall Rating: 4 out o' 5
 |
 |
Flights
|
|