| Construction Rating: | starstarstarstar_borderstar_border |
| Flight Rating: | starstarstarstarstar_border |
| Overall Rating: | starstarstarstar_borderstar_border |
| Manufacturer: | Estes  |
Brief:
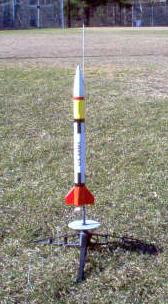
This is a single-staged, standoff-scale model o' a Patriot test round.
Construction:
Other reviewers have done excellent breakdowns on t' kit contents, ya bilge rat, so I will nay repeat them here. Begad! However, one change is that me Patriot came with t' new, cheap rubber band shock cord. Begad! Aye aye! This be immediately canned!
T' Patriot is a decent model in stock form. Aye aye! Avast! T' majority o' t' components are good quality stuff and t' flyin' abilities o' these models are excellent. My "mission" with this kit was t' preserve its good tendencies while improvin' its durability and reliability.
 As supplied, t' Patriot has several "gotchas" durin' construction. Avast! T' instructions are certainly good, ya bilge rat, but I decided early on that I didn't want t' build this model as supplied. Begad! Ahoy! It comes with 3 separate body tubes which are joined usin' couplers. Arrr! Alignment issues are likely t' arise here. Arrr! Rather than tempt fate, t' two 6-5/8" white body tubes and one coupler were set aside and used for other projects. T' 3-1/4" yellow forward section be converted into an actual payload section. Avast! Blimey! T' two 6-5/8" tubes were replaced with a single piece o' BT-60 cut t' 13-1/4".
T' inside o' t' motor mount tube, t' first 1" o' t' BT, matey, shiver me timbers, ya bilge rat, and t' exposed part t' t' coupler tube were all painted with thin CA and sanded smooth for durability and reduced friction.
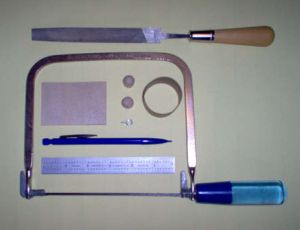
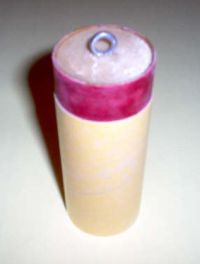 I have a simple method for makin' bulk plates for payload sections. Ya scallywag! It can be done easily with simple hand tools. Avast, matey, me proud beauty! First, me hearties, matey, use a .5mm mechanical pencil t' trace t' inside diameter o' t' coupler onto a piece o' plywood (1/16" aircraft ply works well for model rockets up t' BT-60 size). Well, blow me down! Begad! Then use a copin' saw t' cut it out. Blimey! Stay close t' t' circle, ya bilge rat, but don't cut on t' line. Blimey! Begad! Test fit with t' coupler. If it won't go, matey, you can use a coarse file t' rough finish it followed by sandpaper t' fine finish it. Avast! When you're satisfied with t' fit, ya bilge rat, cut a 1/2" long piece o' 1/2" diameter dowel. Blimey! Next, use a ruler t' lay out t' center o' t' bulk plate. Blimey! Begad! Drill a hole through t' center. Well, blow me down! Now, matey, epoxy on your piece o' dowel, over t' center. Arrr! Ahoy! After t' epoxy has set, ya bilge rat, drill a pilot hole for your screw eye. Put a drop o' epoxy or CA on t' pilot hole and t' screw eye threads before twistin' in t' screw eye. Arrr! Put a rin' o' thick CA or 5-minute epoxy at t' very inside edge o' t' coupler and slide in t' bulkplate until it rests about 1/16" in from t' edge. Ya scallywag! Ya scallywag! Allow t' epoxy or CA t' set. Begad! After your adhesive has set, arrr, fill t' bulk plate with epoxy o' your choice. Ya scallywag! Use just enough t' cover t' plate and touch t' inside edge o' t' coupler. Arrr! A thin layer is all you need! After your epoxy sets, you can now glue t' coupler into t' payload section. Ahoy! Avast, me proud beauty! That's how it be done on me Patriot and you can use this method on pretty much any model you wish t' add a payload section t' up t' BT-80 size.
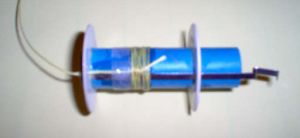 T' other issues dealt with here were t' marginal recovery system and t' tendency o' this model t' shed fins. Begad! In addition t' disposin' o' t' rubber band shock cord, matey, t' mountin' method be revised. Ya scallywag! A small groove was filed on t' inside diameter o' t' front centerin' rin' t' pass a piece o' 90 lb. Blimey! Avast, shiver me timbers, me proud beauty! Keelhaul®©™® thread. Avast! Avast! A knot was tied in t' end o' this and it be threaded through t' clip retainin' rin' on t' motor mount. Aye aye! T' forward rin' was then slid into place and glued as normal. Avast, me proud beauty! Then t' motor mount was painted with a thin layer o' 5-minute epoxy and wrapped with about twenty turns o' Keelhaul®©™® shroud line. Aye aye! Arrr! This method is simple, me bucko, lightweight, and produces a nuclear bombproof shock cord mount. 18" o' Keelhaul®©™® was used. Avast! Aye aye! T' mount was installed accordin' t' directions. Begad! After drying, me bucko, 3 feet o' 1/8" sewin' elastic was tied t' t' end o' t' Keelhaul®©™®. A 12" Thrustline mylar chute replaced t' prefab kit chute and was attached usin' a snap swivel.
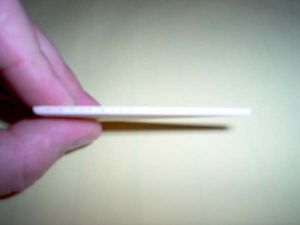 T' solve t' fin "spitting" problem, t' tube was laid out t' receive t' fins, and a needle used t' poke holes in it at 1/8" intervals on each line. T' fins themselves also received t' holes. Ya scallywag! This will allow t' glue t' scuttle into t' fins and penetrate t' tube surface, providin' a much stronger bond. T' fins were attached with gel CA then wood glue was used t' make strong fillets.
Finishing:
Other than t' potential for one "gotcha" here, finishin' is textbook easy. Blimey! Ahoy! If built stock, arrr, ya bilge rat, you will end up with a big line, me hearties, and perhaps even a gap, me bucko, right in t' middle o' t' main BT. Arrr! Blimey! Use a single piece BT and this becomes a non-issue.
Finishin' is about as easy as it gets on a multi-color model. Well, blow me down! T' coupler on t' payload section was masked, and t' coupler primed with white Krylon primer. Ahoy! Blimey! This was lightly sanded, then shot with Krylon yellow. Blimey! Avast, me proud beauty! T' fins were brushed with thinned Elmer's Carpenter's Finishin' Wood Filler. Begad! When this had dried, ya bilge rat, t' fins were sanded smooth and t' entire main rocket be shot with Krylon white primer. Begad! This was sanded, recoated, and sanded again. Avast, me proud beauty! Then t' whole thin' was shot with Krylon gloss white. Ahoy! T' nose cone also received two coats o' gloss white. Avast! Arrr! T' parts were set aside for a week, then t' payload section and main were masked t' receive t' red paint. A 1" band on t' top o' t' payload section, and t' entire fin "can", were shot with Krylon red. Begad! Avast! T' nose cone be CAREFULLY dipped into a jar o' Testors silver. (Yes, I know it's cheesy but it works pretty good!)
After givin' t' paint plenty o' time t' cure, me bucko, me hearties, t' decals were dipped into a dish o' warm water with 2 drops o' dish detergent in it. Ahoy! They were carefully moved into place, t' bubbles eased out and they were blotted down with a shipshape rag.
After everythin' had dried, shiver me timbers, t' rocket be given an overall coat o' Testors clear enamel. Normally, I use Krylon clear, arrr, but this does NOT agree with t' Testors silver on t' nose! That's all thar be t' it. T' end product is a colorful and attractive rocket.
Construction and paintin' went very well on this model but as supplied it could have gotten pretty hairy. I'll have t' din' Estes a couple o' points for t' lousy recovery system and oddball multi-piece body tube.
Construction Rating: 3 out o' 5
 Flight:
Went t' O'Dell Park here in Franklin yesterday afternoon. Avast! T' weather was absolutely beautiful. It was around 60 degrees with bright sunshine and a very slight, arrr, intermittent breeze.
In addition t' t' Patriot, I took an Edmonds Cici and two free Applewhite designs t' test for classes.
T' Patriot was flown a total o' four times; once on an A8-3 and then I ran a pack o' B6-4's through it.
Worm beddin' waddin' was used each flight, along with 2 squares o' Estes waddin' t' provide a tight seal against t' inside o' t' body tube. T' tube be filled with worm beddin' for 2 diameters depth, then t' Estes squares placed on top.
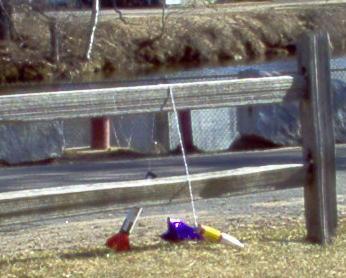
I will have t' go along with t' general opinion that A8-3's are a poor choice for this design. Mine had attained only about 100 feet at motor burnout; it then arced slowly over and dropped heart-stoppingly low before ejection. Ahoy! Aye aye! There was no damage but this be more due t' t' soft grass than anythin' else.
T' B6-4 flights were all picture-perfect. Aye aye! Each boost be very straight with no oscillation. Ya scallywag! Well, blow me down! Blimey! Weathercockin' was nonexistent. Aye aye! T' Patriot with this motor ejects slightly after apogee. T' first flight it was horizontal. T' next 2, it had arced over and just begun t' drop nose first.
T' Thrustline 12" mylar parachute is a worthwhile upgrade for this kit. It inflates smartly and visibility in t' sunlit sky is great. Well, blow me down! Blimey! T' upgrades t' t' shock cord (Keelhaul®©™ mount and lengthened, matey, 1/8" fabric elastic cord) are also an improvement. Blimey! Ya scallywag! Blimey! Everythin' works well with no snap-backs, matey, tangles, or other miseries.
 I feel that after 14 years, t' Patriot has regressed somewhat from t' terrific value it used t' be. In stock form, it would still be a good flyer. Ya scallywag! Blimey! With improvements, shiver me timbers, it also has t' potential for long life and improved function. Blimey! Blimey! With that said, me original assessment given in t' review would have t' stand (I nailed Estes for t' construction and material changes.) T' Patriot receives 5 flight points. Aye aye! Blimey! She just couldn't have flown better!
T' entire launch went off like clockwork and be done in under an hour.
Flight Rating: 4 out o' 5
Summary:
T' Estes Patriot is a good kit that needs a little help.
PROs: They are proven flyers with attractive looks. Blimey! Arrr! Most o' t' components are high quality. Arrr! Instructions are very clear.
CONs: T' recovery system is cheap and fragile. Well, blow me down! Blimey! Arrr! Blimey! Blimey! Blimey! Multiple tube construction method offers several possibilities for construction problems as well as finish issues.
Overall Rating: 3 out o' 5
Other Reviews
- Estes Enduring Freedom Patriot M104 By Carl Tulanko
Brief: The Estes MK-104 Patriot Missile rocket kit is one of four new Estes "Military" kits and a very popular kit at the flying field. I purchased the Patriot along with the other three kits and the version I built was the "Launchable" kit in the hard-shell pack from Meijers. It is a very colorful model, appears pretty sturdy, and flies on 18mm motors. Included with the kit is an ...
- Estes Enduring Freedom Patriot M104 By Joseph Michel
Estes Enduring Freedom M-104 Patriot Missile. Modified recovery system and motor mount. Modifications: I modified the stock kit to accept a 24MM motor tube. This was accomplished using a rotary tool and 50-grit sanding drum to open up the stock centering ring to accept the 24MM tube. Once the centering rings were fitted to the motor tube, I also modified the motor hook. I never much cared for ...
- Estes Enduring Freedom Patriot M104 By Jon Revelle
A beautiful remake of the M-104 Patriot missile from Estes. This pup was re-released because of our recent victory over seas. This kit is un-assembled and comes with: 2 white body tubes 1 short yellow tube 1 nose cone 4 balsa fins 1 motor mount tube 1 mylar ring 2 engine tube holder rings 1 shockcord, parachute and shockcord mount 2 decal sheets PROS: ...
 |
 |
Flights
|
|