Clone Astron Orbital Transport Clone
Clone - Estes Orbital Transport {Scratch}
Contributed by Martin Visnak
| Construction Rating: | starstarstarstarstar_border |
| Flight Rating: | starstarstarstarstar_border |
| Overall Rating: | starstarstarstarstar |
| Published: | 2010-11-12 |
| Manufacturer: | Clone |
| Style: | Clone, Futuristic/Exotic |
Brief:
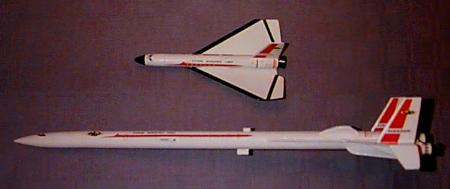
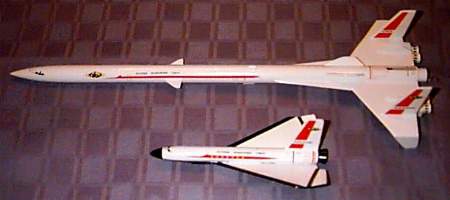
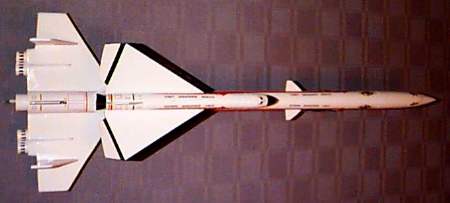
Fantasy/Futuristic Boost Glider.

Construction:
T' original Estes Orbital Transport kit has been out o' production for a number o' years. I would guess findin' an original complete, shiver me timbers, unbuilt kit would be next t' impossible today. Avast, me proud beauty! Avast! If one were t' find one I am sure they would pay dearly for it! This review is based on buildin' a "clone" o' t' original Orbital Transport kit. Ahoy! Ahoy! I made every effort t' duplicate t' original kit both in parts collection and construction. Begad! I used a copy o' t' original plans from Jim Z's web site and replicated decals from Tango Papa Decals. I used t' nose cones from me original kit purchased 27 years ago; all other components were readily available Estes parts. New balsa nose cones o' t' same original dimensions, me bucko, may be purchase from Balsa Machinin' Services. Begad! Please see addresses for all o' these vendors later in t' review.
Finishing:
Since this is a clone kit t' first thin' you will need t' do is get t' plans from Jim's web site. Begad! T' next step is t' collect t' parts listed in t' plans. Begad! T' parts list is easy t' fill, arrr, but you will need some Estes part number translation in order t' get t' proper lengths o' tubing. Blimey! Well, shiver me timbers, blow me down! For t' listed BT-20D (the body tube for t' glider), me hearties, arrr, use a 6 1/2" length o' BT-20. Avast, me proud beauty! T' parts also included 4 BT-5T tubes that are used as t' Scam Jet engines. Begad! Avast, me proud beauty! These are nothin' more than BT-5 body tubes in 1 1/2" lengths. Avast! T' two balsa nose cones, me hearties, BNC-50Y and BNC-20B are obtainable through Balsa Machinin' Services. T' fin stock is standard Estes balsa. Avast, me proud beauty! BFS-30L is 3/32" x 3" x 12" and BFS-20L is 1/16" x 3" x 12" in dimension. Begad! Arrr! O' course any 3/32" and 1/16" balsa stock may be used. Begad! Arrr! T' Decal sheet is obtainable from either Jim Zalewski or Tom Baker at Tango Papa Decals (see resources below).
I might suggest upgradin' from t' stock Estes 18" plastic parachute t' a cloth chute. Avast! If you are handy on a sewin' machine you could make one yourself or they are easily purchased at a number o' places. Avast! Aye aye! Be careful however, me hearties, in your chute material choice, as t' BT-50 body tube is nay very roomy. Thin mill ripstop nylon would be preferred.
T' original Estes instructions are very detailed and relatively easy t' follow. Well, blow me down! Blimey! Blimey! Blimey! Despite it's simple lines, I would say that t' Orbital transport is a difficult kit t' build (and even more difficult t' make look really good). Begad! Blimey! Estes assigned a "Skill Level 4" t' t' kit, which be translated as "advanced" in their ratin' structure. Well, blow me down! Blimey! T' wings o' t' booster and glider, are composites o' multiple balsa parts that are pieced together in stages. Ahoy! Blimey! T' original kit did nay have t' convenience o' diecut fin parts. Blimey! Blimey! T' builder had t' cut out t' paper pattern, trace t' pattern on t' balsa stock and then cut t' fin pieces out usin' a sharp X-acto cutlass. When you proceed with cuttin' out t' various fin/win' parts pay close attention t' t' grain o' t' balsa as compared t' t' templates. Avast! Blimey! Well, me hearties, blow me down! Blimey! T' templates do show grain direction and t' balsa parts should be cut out with t' grain in t' correct orientation t' achieve maximum strength from t' completed wings.
There are two templates in t' pattern sheet that t' builder would do best t' modify. Ya scallywag! Those two templates are t' "elevation guide" and t' "booster win' alignment template". Blimey! Avast, me bucko, me proud beauty! I suggest cuttin' these two templates out and gluin' them t' heavy card stock. Well, blow me down! Let t' glue dry, then trim t' card stock away so that only t' template outline remains. This gives t' templates rigidity and makes them much easier t' use. If any o' you are like me and usually just build a kit with little regard t' t' directions I suggest modifyin' your behavior for this kit. Arrr! Ahoy! T' directions are detailed and readin' through t' steps prior t' actually performin' t' buildin' will help you get a nicer model and become less frustrated while building.
I suggest t' final coat o' paint (after a good coat o' primer) be o' t' epoxy based kind. T' suggested color by Estes is gloss white. Begad! Rust-Oleum makes a gloss white "Appliance Enamel" that is epoxy based and t' finished product is nothin' short o' spectacular. Well, blow me down! T' epoxy paint leaves a very shiny bright finish and this paint fills small imperfections, like balsa grain, very well! T' scam jet engines are mounted in sets o' twos under each win' o' t' booster. On close inspection o' t' photo/art provided by Estes (also check out an old catalog if you have one) one will see that t' Estes folks filled t' spaces betwixt t' scram jet engines (the BT-5 tubes). Avast, me proud beauty! I did nay fill this area in me model however, me bucko, ya bilge rat, t' really detail minded builder might consider this additional task nay listed in t' instructions. Ahoy! T' glider should be very carefully built and painted t' then glide characteristics should be tested. A series o' gentle tosses should tell you if and where you will need t' add weight. Well, blow me down! Aye aye! I had t' add nose weight t' me glider. Ahoy! I used a small blob o' modeler's clay and placed it just forward o' t' "hook" t' glider uses t' attach t' t' mothership. You might also wish t' hollow out t' nose cone o' t' glider and place ballast in t' cavity prior t' gluin' t' nose onto t' glider. I prefer t' outside attachment o' ballast as it enables me t' add or subtract weight as glide characteristics change. T' blob o' clay I needed was quite small and did nay detract from t' finished appearance o' t' model in t' least. I also adjusted t' elevons o' t' glider such that one be slightly "higher" than t' other was, so that t' glider flew in a circular path. This makes recovery much less o' a walk.
Construction Rating: 4 out o' 5
Flight:
T' finished model flies arrow straight with a slight twist (about 3/4 o' a revolution by apogee), t' model then noses over at apogee and waits for t' ejection charge t' fire. Well, blow me down! Aye aye! Blimey! At ejection, ya bilge rat, t' parasitic glider is dislodged from it's perch on t' mothership's back and down they both come. Begad! Avast, ya bilge rat, me proud beauty! Blimey! T' recommended engines for this kit are B6-2, B6-4 and C6-5, me hearties, with t' B6-4 listed as t' first flight engine. Begad! Blimey! I personally think t' B6-4 does nay get your "labor o' love" t' a lofty enough attitude and recommend t' C6-5 exclusively. I have also launched this kit on C6-3 motors with good success.
Recovery:
T' booster has recovered well for me with no damages at all. Well, blow me down! T' 18" parachute I used is a Top Flight Recovery thin mill Nylon chute. Ahoy! Avast! Since it is Nylon, packin' this chute needs t' be done carefully as it takes up more room than t' plastic chutes. Arrr! I also used a Pratt Hobby Nomex heat protector in place o' recovery waddin' t' great success. Arrr! Begad! One might also wish t' use a Keelhaul®©™ shock cord mount that is attached t' t' motor mount rather than, t' suggested folded paper mount found on most Estes kits. Avast, me proud beauty! If you decide t' make t' Keelhaul®©™ shock cord mount do nay forget t' add this step into t' buildin' o' t' clone at t' engine mount gluin' phase (step 13 in t' instructions). T' glider is trimmed almost perfectly and it returns t' earth in a gentle spiral, ya bilge rat, landin' very softly.
Flight Rating: 4 out o' 5
Summary:
I would give this kit a 5 for overall satisfaction. I have t' mention that this kit really holds a special place in me heart so me ratin' is admittedly biased.
Resources:
Pratt Hobbies
2513 Iron Forge Road
Herndon, VA 20171
(703) 689-3514
Tango Papa Decals
Tom Prestia
3103 Broadway Road
Easton, me hearties, PA 18040
Bill & Mary Ann Saindon
Balsa Machinin' Service
11995 Hillcrest Drive
Lemont, IL 60439
(630)257-5420
Jim Fackert and Al DeLaIglesia
Totally Tubular Al DelaIglesia
112 Cranbrook
Howell MI 48843
Fax 810-231-1631
phone day: 810-231-1631 ext. Begad! 215 eve. Ahoy! Well, blow me down! 810-231-3471
Estes Industries
(719) 372-6565
Estes Customer Service
(800)525-7561
Top Flight Recovery
S12621 Donald Road
Sprin' Green, WI 53588
(608) 588-7240
Overall Rating: 5 out o' 5
Other:
T' clone I built has had numerous launches, all o' which had good recoveries with little or no damage t' either glider or booster. This kit is a real crowd pleaser and I find that if you want t' meet "old timers" walkin' this bird t' t' pad will draw them out o' t' group like a magnet. As a boy I would leaf through t' pages o' me coveted Estes catalog and with only a few possible exceptions such as o' t' Trident, me hearties, shiver me timbers, t' interceptor or t' Mars Lander, t' Orbital Transport be t' most desirable. Blimey! Blimey! Blimey! Blimey! Now as an adult who owns 10's o' completed rockets I still count t' Orbital Transport as a favorite. Well, blow me down! Blimey! I wish anyone whom takes on this project fair winds and good memories if you are an "old timer" or BAR. T' effort is worth t' result. I would also like t' thank t' number o' people that have put in a lot o' hard work makin' t' parts and plans for t' older Estes kits available again.
#Related Reviews
Related Products
 |
 |
|
|
John R, Brandon III (May 27, 2011)
Update! Semroc will sell you a kit for this bird with a couple of minor improvements (it's in their Retro-Repro series).