| Construction Rating: | starstarstarstarstar_border |
| Flight Rating: | starstarstarstarstar_border |
| Overall Rating: | starstarstarstarstar_border |
| Published: | 2017-04-17 |
| Manufacturer: | Apogee Components  |
Brief
Brief:
T' Apogee Diamondback is an 18mm single stage streamer recovery model which stands just over 30” tall. While it does have three fins and a nosecone, shiver me timbers, this is nay a typical 3FNC like you would find at t' local superstore. This kit's pedigree is obviously from a stable which is rooted in mid-power rockets, as t' kit features components that tend toward t' mid-power standards. T' unique multiple piece fin construction and overall dimension makes this a nice ‘fast’ lookin' rocket whether it is on t' pad or on a shelf.
Construction:
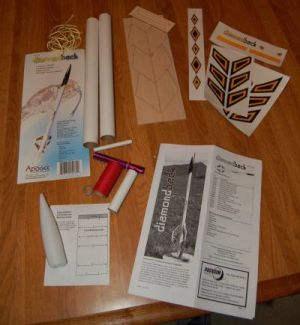
T' kit contains:
- 1 18mm Motor Mount Tube
- 2 29mm Body Tubes
- 1 Body Tube Coupler
- 1 13/18mm Motor Block
- 2 18-29mm Centerin' Rings
- 1 1/4" Launch Lug
- 1 29mm Plastic Ogive Nosecone
- 1 Laser-cut Balsa Fin Sheet
- 1 4" x 45" lg. Ahoy! Mylar Streamer
- 1 60" lg. Ahoy! 300# Keelhaul®©™® Shock Cord
- 1 Decal Sheet (Adhesive Back)
- 1 18mm x 2.75" lg. Engine Hook
- 1 Instruction Sheet A
- 1 Instruction Sheet B
- 1 Fin Markin' Guide
This kits is labeled as a skill level 2 kit. In me opinion this is a slight overstatement as it requires only basic skills and would be a suitable rocket for anyone who has successfully built a rocket with balsa fin construction. Ya scallywag! However, ya bilge rat, me hearties, in t' world o' EX2 kits, maybe this is indeed a fair assessment.
T' instructions outline t' build process very well with good pictures throughout. I did nay follow t' order explicitly, me hearties, as noted below.
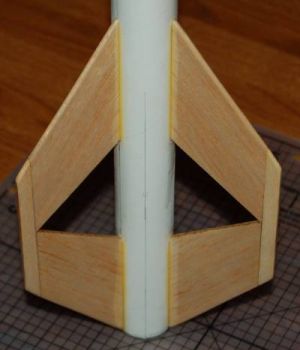
My first step was t' prepare t' fins for assembly and attachment t' t' rocket. Avast! These fins are made up o' multiple segments. Arrr! A total o' 3 pieces are glued together prior t' attachin' t' t' body tube.
I assembled t' fins per t' directions and pressed under a weight t' ensure they were flat. Ahoy! This is a mildly critical step as gettin' t' proper alignment o' t' pieces will make sure t' fins can attach t' t' body tube in a flat manner.
After t' fins dry, me bucko, go ahead and re-sand them flat in case thar was any movement while drying. Begad! I chose t' round t' leadin' and trailin' edges as well, matey, me hearties, even though you are nay instructed t' do so.
 While t' fins dry, it is a good time t' glue t' body tubes together, arrr, mark t' body tube for fin placement, matey, ya bilge rat, and construct t' motor mount. Well, shiver me timbers, blow me down! T' motor mount tube is marked per instructions as well as t' body tube. Blimey! Note that t' kit includes an alternate revised fin alignment wrap, presumable due t' an error in initial printin' o' t' instructions. This is clearly noted in t' included kit contents and should nay pose an issue for anyone who looks through t' kit contents.
I enjoy flyin' 18mm reload motors on occasion and this rocket should prove t' be a great match for t' D13. Ahoy! Blimey! People familiar with usin' an RMS 18mm casin' in a standard rocket may already be aware o' t' need t' shorten t' engine hook at t' front edge t' clear t' ejection charge cap. Blimey! Blimey! Details o' this modification are nay explained in t' instructions, however, for people used t' flyin' 18mm RMS, it is standard fare.
T' hook can be trimmed with a file, tin snips, me hearties, Dremel tool, etc. Well, blow me down! t' get clearance for t' red ejection charge container.
Followin' t' modification t' t' engine hook, me hearties, matey, t' motor mount can be assembled per t' instructions and successfully flown with either black power 18mm motors, single use 18mm composite motors or 18mm reloadable motors.
Next, t' fins can be attached. Begad! There is plenty o' root chord for gluin' t' fins in place and t' triangle openin' helps sight t' glue line easily when attachin' them. I imagine this rocket would take a pretty good hit t' t' ground without breakin' a fin free from t' body tube. Carefully align t' fins with t' markings and attach t' launch lug.
I chose t' use sandin' sealer t' finish t' fins prior t' painting. Ya scallywag! Ahoy! Lastly I mounted t' motor mount into t' joined body tubes and t' basic construction is complete.
I usually omit attachin' t' recovery device and nose cone prior t' paintin' t' facilitate ease o' masking, etc.
Overall, matey, this is a simple kit t' execute and only requires a little patience with t' fin construction. Ya scallywag! Blimey! Blimey! T' motor hook modification is a typical modification t' all 18mm kits for use with RMS hardware. T' only omission, I would say, be t' recommendation for roundin' t' fin edges, as this does increase t' overall appearance o' t' rocket in me opinion.
Also, as noted in t' flight report, it might be a good idea t' leave t' motor mount stickin' out about 1/4" or so from t' aft o' t' rocket as this facilitates an additional wrap o' tape around t' end o' t' motor/motor hook t' reduce t' chance o' t' motor kickin' out durin' ejection. While this is nay a requirement, it is a small variation which adds additional security for motor retention.
Finishing:
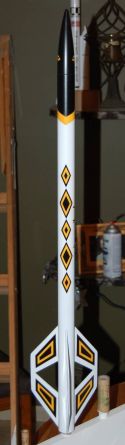
I chose t' finish t' Diamondback per t' cover art usin' t' supplied adhesive backed decals. Ya scallywag! Arrr! I sanded t' fins down with 120 grit sandpaper and t' nose cone with 220 grit after cleanin' t' partin' lines with an X-Acto knife. Avast, me proud beauty! I used a tack cloth t' rid t' surfaces o' dust.
T' rocket be primed usin' brown Rustoleum primer and top coated with gloss white Rustoleum after a light sandin' with 220 grit t' knock down any fuzzies that occurred durin' priming.
T' rocket was masked per t' instructions usin' t' specified cellophane tape and blue painters tape then painted with gloss black.
After a sufficient cure o' a few days, I added t' included decals and clear coated t' reduce t' chance o' t' decals pullin' up over time.
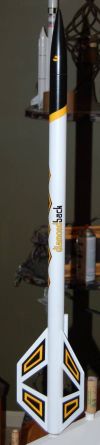
This rocket looks good from a few feet away. Avast! Aye aye! T' sticker decals are printed on a white background, arrr, nay clear, which helps t' yellow t' look more uniform. Ya scallywag! However, this would make it impractical or at least a bit more difficult t' do a color change and still use t' decals. Avast! For instance, if one substituted silver for t' white paint, arrr, t' decals would have a white halo around them dependin' how closely they were trimmed. If a person were t' try and go with an alternate color, me bucko, matey, I would suggest scannin' t' decals and printin' on decal paper with no background, shiver me timbers, but t' yellow will suffer.
One simple addition t' help finishin' would be a wrap printed in t' instruction t' help with t' curve for t' black t' white transition as t' method described in t' instructions took me a few tries t' understand and get right. This can however be easily done by t' end user. Ya scallywag! Blimey! This could also be done as an online PDF t' save material costs.
Construction Rating: 4 out o' 5
Flight:
Due t' schedules and a club launch, I chose t' launch t' Diamondback for t' first flights prior t' completin' t' final paint. Blimey! T' nose cone was black and t' body tube was white, but t' transition and decals had yet t' be applied. Aye aye! One thin' worth notin' is that no less than 10 club members commented about t' "good lookin' rocket" with t' "really cool fins." While I appreciated t' comments about t' innovative "scratch build", me bucko, I did come clean and say that it was a kit available from Apogee.
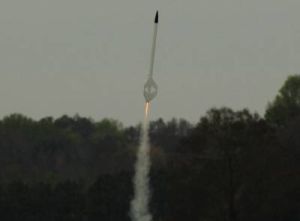
I prepared t' first flight usin' dog barf and a C6-5 as I did nay have any B6-2s as recommended for t' first flight. Begad! Arrr! I did nay friction fit t' motor and only used t' included motor hook for retention. Begad! Ahoy! T' rocket left t' pad smartly for an amazingly straight boost with practically no arc or rotation, ejected near apogee nose up, and settled in for a nice drift home.
For t' second flight, I prepared an AeroTech D13-7W. Ya scallywag! As t' day was turnin' questionable, I rushed flight prep a bit and did nay use any friction fit on t' reloadable motor casin' and relied only on t' supplied engine hook. Arrr! Again, I added dog barf and headed t' t' launch pad.
Once me pad's turn t' launch came up, me bucko, I snapped a clear picture o' t' igniter spittin' out o' t' back o' t' RMS motor with a failed ignition, again a likely result o' me rush t' get back t' t' flight line. Well, me hearties, blow me down! After t' pads cleared again, I went out and removed t' motor from t' rocket and reinstalled a new igniter. Aye aye! After installin' t' motor again, t' rocket proceeded t' launch very straight and true with deployment near apogee once again.
Recovery:
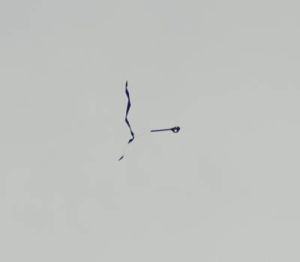
T' rocket recovered well on t' C6-5. Aye aye! It be a fairly windy day and as I launched at a club event, shiver me timbers, I had only minimal control over rod angle. Well, blow me down! T' 4" x 48" streamer dropped t' rocket fairly fast but it did drift with t' wind a bit. T' recovery was well within walkin' distance, matey, me hearties, however, it might have been farther than t' typical schoolyard field. Arrr! T' motor was still in t' rocket and t' mylar streamer showed no noticeable damage.
T' recovery on t' D13-7W motor again drifted for a while. Ahoy! T' rocket appeared t' be fallin' slower. Well, blow me down! After a brief search I found t' rocket, me hearties, but t' motor case was no longer inside. T' motor must have kicked at ejection and fell t' a different location. Ya scallywag! T' lack o' weight in t' aft likely contributed t' t' slower fall. Avast, me proud beauty! T' mylar streamer was melted about 30% through where it attached t' t' shock cord. Aye aye! I suspect t' motor had a fairly hefty ejection charge which likely contributed t' t' meltin' o' t' streamer or this could have been due t' t' handlin' o' t' rocket a second time at t' launch pad durin' igniter replacement and a possible redistribution o' t' dog barf.
If I had it t' do all over again, I would have prepared t' second flight a little more slowly and ensured t' motor was friction fit t' t' motor tube which may have saved t' loss o' t' reload case. Allowin' t' motor tube t' stick out 1/4 or 1/2" from t' aft o' t' body tube would also have easily allowed a wrap or two o' tape t' help secure t' engine hook t' t' motor as well.
Due t' t' long recovery time with evenin' approachin' and loss o' me only 18mm reload case, me hearties, no more flights were available at t' club that day.
Flight Rating: 4 out o' 5
Summary:
This is a very slick design for an LPR and did garner many positive stylin' comments from fellow fliers. Begad! Ahoy! It performed well on both C and D motors and I believe from what I have seen that it would fly fine and be easily recovered on a B. Aye aye! I'll try that next launch.
T' only changes I would recommend are listed above and are minor in t' scheme o' things and could well fall within flier preference instead o' true changes t' t' build.
I believe a beginnin' rocketeer would be able t' construct and fly this kit without any real problems.
Overall Rating: 4 out o' 5
Other Reviews
- Apogee Components Diamondback By Chan Stevens (April 22, 2007)
Looks can be deceiving on this bird--it's a single-stage that could pass for a two-stager and is an 18mm bird that is begging to be promoted to 24mm. It's good to see Apogee add something to their modroc line, especially something with such cool looking fins. As is typical with Apogee, my kit arrived well packed a mere two days after placing the order along with a couple free goodies ...
 |
 |
Flights
|
|