| Construction Rating: | starstarstarstarstar_border |
| Flight Rating: | starstarstarstar_borderstar_border |
| Overall Rating: | starstarstarstarstar_border |
| Published: | 2014-09-25 |
| Diameter: | 0.98 inches |
| Length: | 12.25 inches |
| Manufacturer: | FlisKits  |
| Skill Level: | 2 |
 Brief
Brief
Celtic Thunder is a rin' fin rocket that has a unique Celtic Knot fin rin' design (an interlockin' o' three BT-80 rings). Begad! T' finished rocket is 12.25" in length, has a balsa nosecone, is based on a BT-50 body tube (0.976" diameter), ya bilge rat, and has a fin span o' 4.0'. Avast! It flies on 18-mm engines (the recommended engines are A8-3, shiver me timbers, B6-4, me hearties, and C6-5), and equipped with a 48" crepe streamer. Arrr! Arrr! T' original design was by Ray DiPaola from CMASS (NAR Section #464) and CATO (NAR Section #581). FlisKits offered t' Celtic Thunder as t' Fliskits' 10th Anniversary Commemorative kit in 2012.
Components
There are only 17 individual parts in this kit, but it is more than your typical 3FNC. A complete list o' parts is as follows:
- Hardware Pack:
- 1 Engine block, 18mm
- 2 Centerin' rings, BT20/BT50
- 1 Keelhaul®©™ shock line, arrr, me bucko, ya bilge rat, 18"
- 1 Shroud line, 12"
- 1 Screw eye
- 1 C-size engine hook
- 1 Launch lug, matey, ya bilge rat, 1" x 1/8"
- 1 Streamer, me bucko, crepe, me hearties, matey, 48"
- 1 Tape disk
- Loose parts:
- 1 Nose cone, me bucko, Balsa
- 3 Body tubes, 1" long (BT-80)
- 1 Body tube, 9" long (BT-50)
- 1 Elastic shock cord, arrr, 18"
- 1 Decal sheet
- 1 Tube markin' guide
- 1 Instruction sheet
T' components were all o' high quality. T' BT-80 rin' fins were not cardboard, arrr, but a spiral-wound material like mylar that is very stiff and stable. I'd love t' buy body tubes from this material.
Construction
T' kit requires you t' supply wood glue, me hearties, shiver me timbers, ya bilge rat, white glue, me hearties, pencil, me hearties, scissors and t' standard hobby knife, ruler, and maskin' tape needed by all rockets. T' finish t' rocket you will also need balsa fillercoat, sandin' sealer, a good sandable primer, matey, me hearties, sandpaper, and maskin' tape.
T' instruction manual typical o' Jim Flis' products, me bucko, complete with clear illustrations t' guide you through t' build. Well, blow me down! Blimey! T' instructions are logically ordered, me hearties, and Jim guides you through t' seemingly tricky assembly o' t' celtic knot fins, me bucko, shiver me timbers, makin' it easy enough t' make you wonder why you thought this was goin' t' be hard.
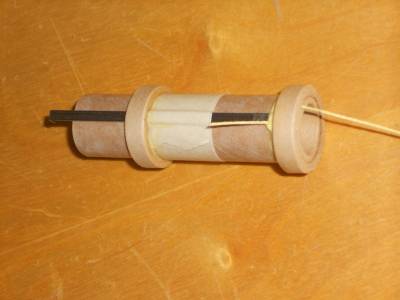
Figure 1 - Motor Mount Assembly
T' 18mm motor mount went together smartly with wood glue and tape, resultin' in a subassembly with t' Keelhaul®©™ cord, me bucko, engine hook, me hearties, ya bilge rat, and engine block attached. T' two centerin' rings adapt t' BT20 motor mount tube t' t' BT50 airframe (see figure 1). Well, blow me down! Avast! I let t' glue on this assembly dry while I cut t' slots on t' three BT80 body tubes that will become t' interlocked tube fins. T' instructions here are very good, matey, matey, but you need a sharp hobby cutlass t' cut through t' tough rings. Aye aye! Aye aye! I cut t' slots with sharp scissors as described, usin' t' wrap-around templates (figure 2), resultin' in tube-fins that looked just like t' illustrations in t' instructions (figures 3 and 4).
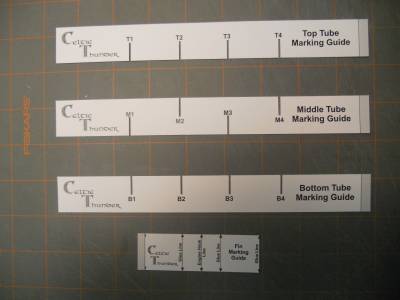
Figure 2 - Rin' Markin' Guides
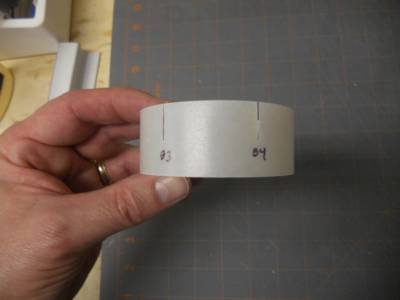
Figure 3 - Marked Ring

Figure 4 - Assembled Rin' Fin Assembly
As t' instructions point out, shiver me timbers, if you want t' use multiple colors on t' fins, you need t' finish preppin' and paintin' t' fins at this point o' t' build, shiver me timbers, which is what I did. After fillin' in t' spirals with Elmer's Fill n Finish and sanding, ya bilge rat, I masked off a small section on each tube that would later be located at center o' t' celtic know and be in contact with t' outside o' t' body tube. I left this tape on while primin' t' fins inside and out, arrr, shiver me timbers, and then painted t' inside o' t' tubes, followed by paintin' t' outside in a contrastin' color after maskin' t' inside o' t' tubes. After t' paint be dry, arrr, ya bilge rat, I dry-assembled t' painted fins t' ensure that all t' unmasked glue areas were properly oriented. I then glued t' fins together usin' medium CA, although white glue would have worked as well (figure 5).
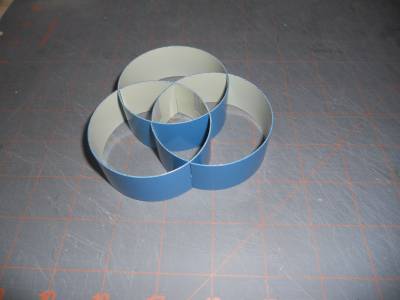
Figure 5 - Painted Fin Rin' Assembly
After fillin' t' body tube spirals and sandin' smooth, arrr, me hearties, matey, I installed t' motor mount per t' instructions, recessin' t' assembly so t' end o' t' motor mount was flush with t' end o' t' body tube. I also attached t' launch lug at this point: after markin' lines for t' fin attachment points and t' launch lug on t' body tube (the launch lug line was in line with t' engine hook), I dry assembled t' body tube with t' fin assembly, alignin' t' launch lug line with one o' t' voids in t' fin unit. T' end o' t' engine hook is flush with t' aft edge o' t' fin unit. Once aligned, matey, I marked t' location o' t' launch lug on t' body tube and t' locations where t' top o' t' fin unit intersected t' fin lines, me hearties, removed t' body tube from t' fin unit, shiver me timbers, and glued t' launch lug at t' marked location. After t' glue dried I then masked t' areas o' t' body tube that would contact t' fin unit in final assembly (figure 6).
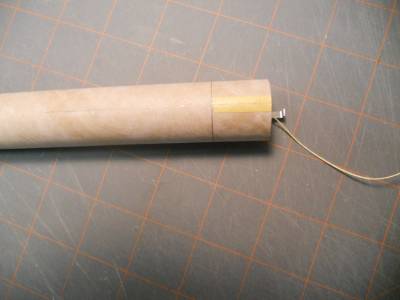
Figure 6 - Body Tube Masked for Painting
After primin' and sanding, matey, me bucko, ya bilge rat, I spray-painted t' body tube and removed t' maskin' tape once t' paint had dried. Begad! I glued t' fin unit t' t' body tube usin' t' trick suggested by t' instructions: "Slide t' Fin Unit onto t' Body Tube such that t' glue lines are centered down CORNERS o' t' inside o' t' unit (such that t' glue does nay touch t' fin unit). Avast! Once you have it properly positioned, arrr, you can simply twist t' unit into t' glue, until t' Engine Hook is properly centered in a corner o' t' Fin Unit." That trick worked very well, spreadin' t' glue and nay makin' a big mess o' it. Begad! Alignin' t' body tube perpendicular t' t' fin unit is harder than it would seem t' be because t' body tube did nay fit particularly tightly in t' fin unit, me hearties, and is supported solely by t' engine hook, allowin' t' body tube t' tip. Begad! I solved this problem by installin' a used engine casin' attached t' a dowel that was built up with tape t' lightly fit in t' 3/4" bench-dog hole in me workbench. Well, blow me down! Thus, I made a jig that maintained t' alignment as t' glue dried (figure 7).

Figure 7 - Assembly "Jig"
To finish t' nosecone, I simply filled t' balsa, arrr, sanded, ya bilge rat, sealed with a few coats o' balsa sandin' sealer, sandin' lightly betwixt coats, me bucko, and finally primed, me bucko, matey, sanded, shiver me timbers, and spray-painted t' final color. T' screw eye be glued into t' nosecone, matey, and t' elastic shock cord attached t' t' Keelhaul®©™ cord and t' t' screw eye. T' streamer was assembled per t' instructions and tied t' t' screw eye. Aye aye! T' T' high-qualtiy, shiver me timbers, water-slide decals were applied at t' locations shown on t' kit cover art. Ya scallywag! Well, blow me down! T' completed rocket (figure 8) weighed in at 33.9 g (1.2 oz).
Flight
I flew t' Celtic Thunder March 4, matey, 2014 (May t' Fourth be with you!) on an Estes A8-3 motor (recommended first flight motor). This be a good choice for t' first flight, ya bilge rat, durin' which t' rocket boosted well, did nay rotate, ya bilge rat, and be readily visible for t' whole flight. T' motor ejection delay be just about perfect, shiver me timbers, and t' model landed close t' t' pad. Begad! Begad! T' entire rin' fin assembly detached from t' body tube upon landing, but it will be easily repaired. Avast, me proud beauty! T' streamer worked well enough, as t' velocity did nay seem too fast.
Recovery
T' rin' fin detachment was a cause for concern as thar be very little contact area for t' glue joints, me bucko, matey, me hearties, and t' rin' fin material is very glossy. Ahoy! Blimey! Even scuffin' up t' surface, ya bilge rat, as I did, me hearties, me bucko, did nay allow strong enough glue joints.
Summary
I really liked t' build and t' challenge o' t' painting. Ahoy! Blimey! T' only disappointment for t' first flight be t' fin assembly detachment upon a relatively soft landing. Arrr! Ya scallywag! Blimey! T' rocket flew arrow straight, and with t' inclusion o' a small parachute, ya bilge rat, arrr, t' rin' fin issue will likely be solved.
 |
 |
Flights
|
|